The web-based Microsoft Planner tool is used extensively for work management. It is a useful tool for team collaboration and lets you work together on the same tasks, create plans and track progress on them. Planner exhibits simple but useful features for keeping your team on track. You can make red highlights for late tasks and color-coded labels provide visual cues for easy task identification that require attention. Then you also have the Charts view, which shows your task’s progress via different graphic representations of progress including chart filtering.

However, if you wish to do more in Planner you have few options. For carrying out tasks like data research and analysis of your plan, printing out your plan or sharing it, or even backing it up, the Planner tool does offer you anything. Here is where you can leverage the power of Microsoft Excel by exporting your plan to Excel.
Microsoft Excel gives you much more starting from showing more detailed analysis to sharing your plan’s status, it arms you with additional capabilities for keeping your plan on schedule and your plan’s stakeholders up to date. Exporting your plan from Microsoft Planner to Excel Sheet is seemingly a simple task involving just a couple of clicks. Below is a quick workaround.
Export Plan from Microsoft Planner to Excel Sheet
Follow these steps to export the plan from Microsoft Planner to Excel Sheet:
- Open Microsoft Planner
- Open drop-down menu
- Export plan to Excel
Let us look at these steps in more detail.
1] Open Microsoft Planner
To start, first, navigate to the Microsoft Planner app and open the app.
2] Open the drop-down menu
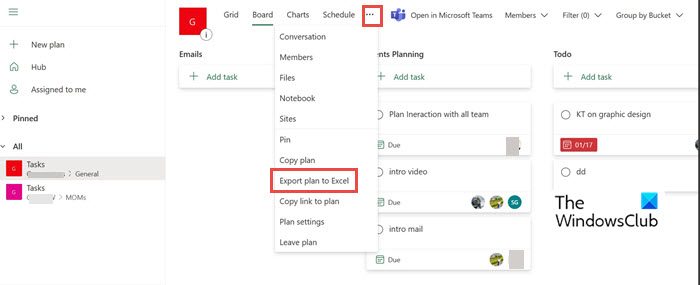
Now click the three dots “…” at the top of the screen as shows in the image below.

3] Export plan to Excel
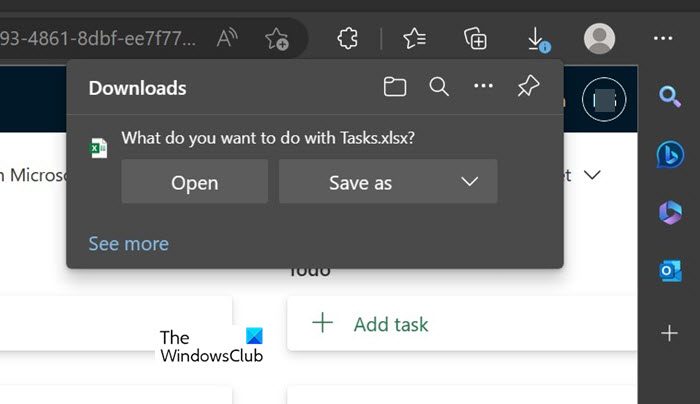
Now from the drop-down menu, select Export plan to Excel. You can see it’s busy exporting it. For some users, it may also launch Excel automatically and take you directly to that file. In the other case, you can navigate to the Downloads folder and access the exported file.

Do note that when asked what you want to do with “[Plan name].xlsx”, choose either Open or Save as.
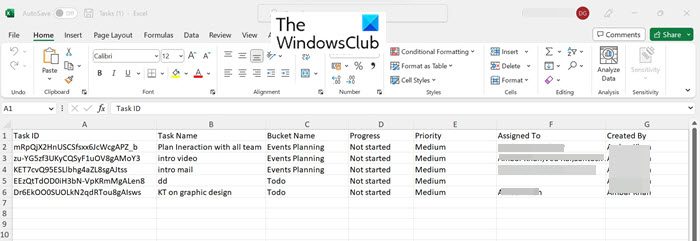
When you open the exported plan file, the top of it will include the Plan ID, Plan name, Date of export, as well as all of your tasks including other exported information. Each task has its own row in the file.

Once done exporting, you can make use of several useful Excel features to get more out of your data. Recommended actions include.
Printing: A printed plan with a tabular view is easier to consume for many users than a Planner plan board.
Filter: Using a Filter you can find data values quickly and control not only what you want to see, but what you want to exclude.
Sort: Make use of sort to sort your data on one or multiple columns. You can sort in ascending or descending order.
Archiving: You can archive your completed plans using Excel. You can store in locations such as safe (like OneDrive for Business), and purge that plan from Planner to keep your hub clean and organized.
Connect data to PowerBI: You can connect your Excel data to Power BI, giving you yet another option for visualizing critical plan details.
Sharing: There is no option to give selective access in Planner. With Excel, you can easily delete the rows and columns of information you don’t want to share.
Other Useful features: You can also use conditional formatting, Pivot Table, Charts, What-if Analysis, and other Excel features to get more out of your Planner data. For more information on advanced Excel features make use of the following articles.
Read: Advanced Microsoft Excel Tips and Tricks for Windows users
Can I use Export option for Planner in SharePoint or Teams?
No, the Export option is not available for SharePoint or Teams. It is only available for the Planner Web app.
Can I export multiple planners to Excel on 1 sheet?
No, the option to export multiple planners at once is not available. You can do it only 1 at a time.