External storage, such as an SD card, HDD, or SSD, gets slow with time or needs to be used elsewhere. A simple solution is to format the SD card, which will help to speed up as there are fewer data. It also ensures older files cannot be accessed anymore. In simple words, formatting an SD card removes all of the data, including any internal files that are often hidden. This is the ideal method for clearing or resetting an SD card, and you should do so as soon as you use a new card. This post explains how you can format an SD card using different methods.
What Is Formatting? Does It delete Data?
Formatting is the process of preparing a storage device, such as a hard drive, for use. The process creates a file system using a set of rules for organizing and accessing files on the device. The data will be erased if you format a storage device containing data. However, it’s not a foolproof method to ensure data cannot be recovered.
How to format SD Card on Windows PC
Here are three methods you can follow to format an SD card on your Windows computer, so use that works for you.
- Format using File Explorer
- Format using the DISKPART tool
- Format Using Disk Management Tool
Make sure to take a backup of data on the SD card and use an admin account.
1] Format using File Explorer
You can use File Explorer to format your SD card using a Windows desktop or laptop.
- Put your SD card in an external USB reader or the SD card reader on your computer.
- Open the File Explorer, and click on This PC or My Computer from the left pane.
- Under Devices and drives, select the inserted SD card.
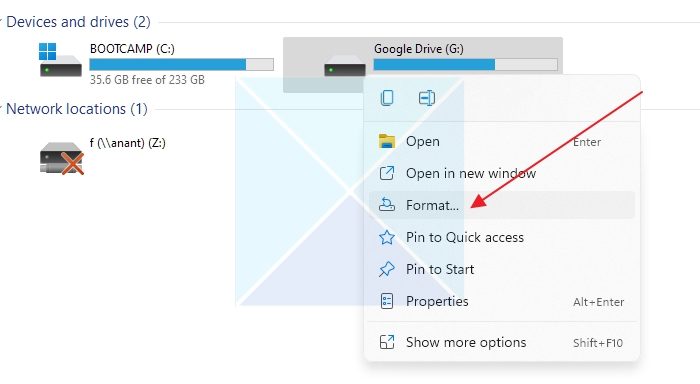
- Right-click on the SD card icon and click Format. A pop-up window will open.
- Next, click the drop-down menu under File System in the pop-up window. There are a few options available here; select NFTS if you only intend to use this card with Windows machines. Click FAT32 if you plan to use it on different types of devices.
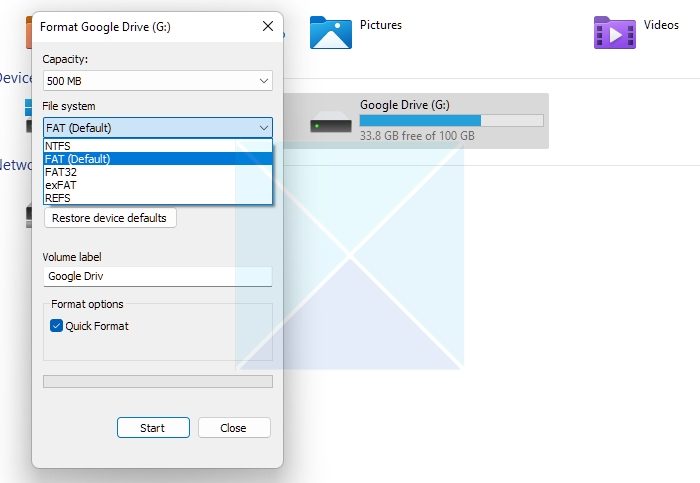
- Make sure the checkbox next to Quick Format is not ticked if this is your first time formatting an SD card. The Quick Format checkbox can be left ticked if you have previously formatted this SD card.
- Click Start to begin formatting.
- There may be one or two more pop-up windows. To continue, select OK.
Eject the SD card and take it out of your SD card reader once the procedure is complete.
Read: SD Card not detected in Device Manager of Windows
2] Format using the DISKPART tool
Connect your SD card to your computer and verify it is recognized before continuing. Follow the instructions given below:
- Press the Windows key + X and click on Windows Terminal.
- Next, type
diskpartand press Enter. - Next, type
list diskand locate your disk from a list of disks.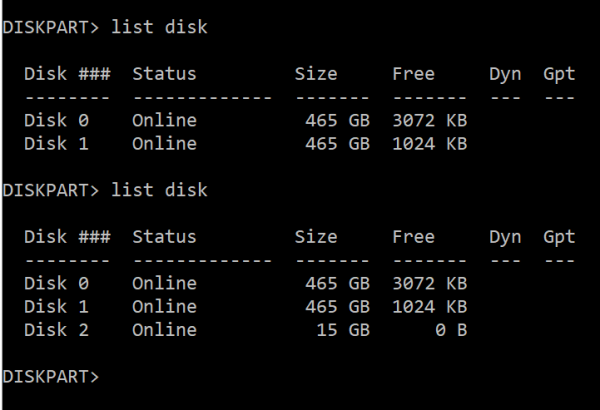
- Take note of your disk number and then type the command select disk followed by the disk number. This will select your SD card.
- Next, type the command
cleanand press Enter. This command will delete everything on the SD card. - The next step is to create a new partition on the SD card. To do this, type the command
create partition primaryand press Enter. - Next, type in the command format
fs=fat32and press Enter. If you want your SD card to store files over 4GB, format it using exFAT. - To complete the process, assign the SD card a drive letter (choose any letter), so you can access it from Windows Explorer. So, type
assign letter finto the Windows Terminal and press Enter.
So, this is how you format an SD card using Windows Terminal.
3] Format Using Disk Management Tool
Disk management makes it simple to format an SD card without worrying about complications. The tool can be used as follows:
- Press the Windows key + X and click on Disk Management from the list.
- Right-click the SD card partition and choose Format from the menu.
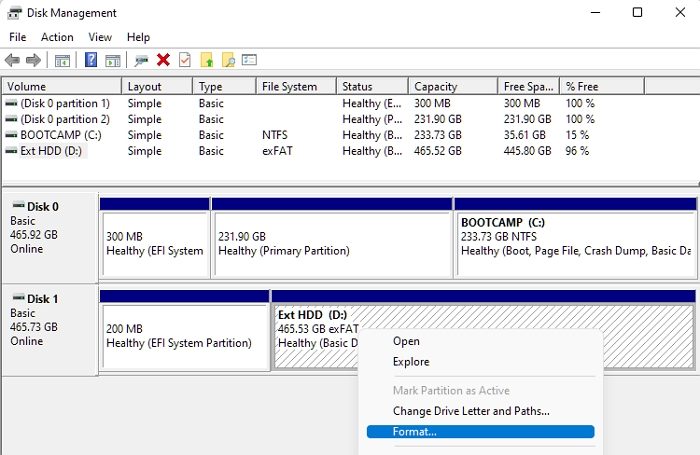
- Make sure that the Perform a quick format box is checked.
- Select a File system, choose an Allocation unit size, and click OK.
The formatting procedure will start right away.
What to do if your SD Card won’t Format?
When formatting, if you receive an error, follow these suggestions to fix the problem and format it.
1] Check if the card Is in a Read-Only State.
There is a possibility that the device won’t read your SD card when you insert it into the reader. It may be because the write-protect switch is on. Nothing on the SD card can be modified thanks to this switch. It is beneficial for securing your data but bad for formatting.
To turn it off, take the SD card out of the reader, then press the switch up toward the end that is inserted into the computer or card reader.
2] Run Check Disk Command
Run the check disk command to check for any damage to the SD card, then try formatting it again.
- Plug your SD card into the Sd card reader.
- Press the Windows key + X and click Windows Terminal.
- Type in chkdsk /X /f [SD card letter] and press Enter.
The SD card will be scanned to get rid of any corruption. Try formatting again.
So, we have described the various techniques to format your SD card on Windows 11, so you may use it with different device types. Any approach that appeals to you and is simple for you to apply can be chosen. I hope it helps!
How do I format my SD card to FAT32 on my PC?
In order to format your SD card to FAT32 format on your PC, you can follow the very first method. However, you need to make a tiny change while doing so. That said, you need to expand the File system drop-down menu and choose the FAT32 option. Following that, click the Start button.
What is the best format for SD card Windows?
There is no best or worst format for SD card for Windows 11/10. Different devices support different formats and it is recommended to follow that method to obtain the most suitable method for your device. However, when it comes to the Windows 11/10, you can use almost any method to transfer the files.
Leave a Reply