If you want to format a write-protected USB pen drive on Windows 11/10, here is how you can do that. There are three methods to format a write-protected USB flash drive, and all of them are built into either your system or the device you are trying to format. Whether it is a pen drive, SD card, or anything else, you can follow the same method.

Write-protection or read-only functionality is available in some USB pen drives and SD cards that protect your files from being changed, deleted, moved, or manipulated. In other words, users cannot copy any new file or move files from the USB drive when the write-protection is turned on.
However, at times, you might want to format a write-protected pen drive to store new files or due to some other reasons. If you follow the traditional File Explorer method, you will get an error message saying The disk is write-protected. Therefore, you need to these methods to bypass this error.
How to Format Write-protected USB Pen Drive in Windows
To format write-protected USB pen drive in Windows 11/10, follow these steps:
- Use write-protection switch
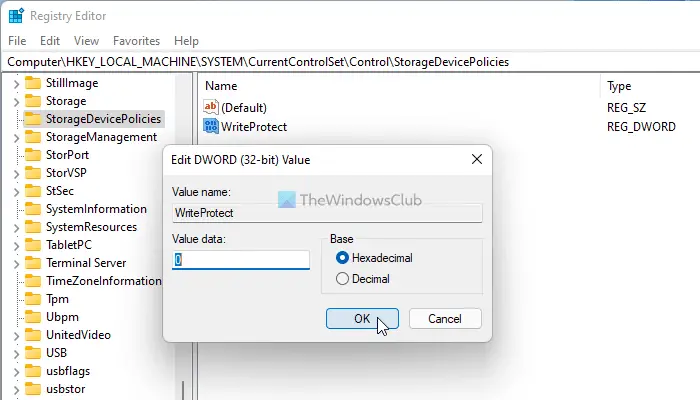
- Bypass write-protection using Registry
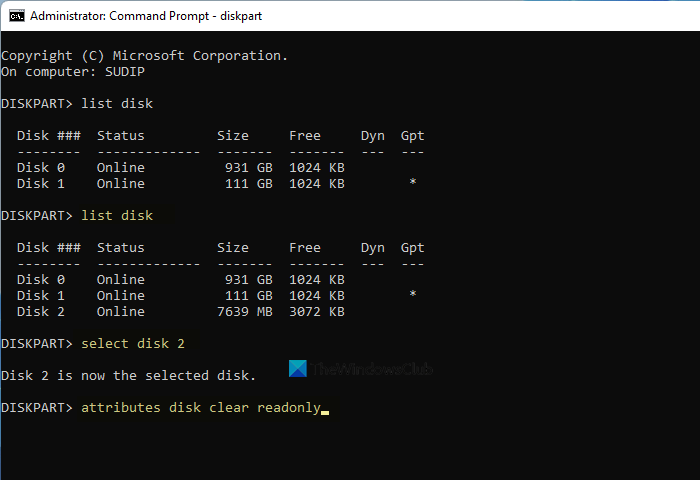
- Remove write-protection using DISKPART command
To learn more about these steps, continue reading.
1] Use write-protection switch
Some USB pen drives and SD cards come with a write-protection switch that turns on or off the protection as per your needs. Although it is not a safe feature to have on your device, some devices do have it. If your USB pen drive or SD card has a write-protection switch attached to it, you can use it to get the job done. All you need to do is to slide the switch to the other end to turn the protection off. Following that, you can use the native Format option in File Explorer to format the device.
2] Bypass write-protection using Registry

You can create a Registry key in a specific location to disable write protection from your USB device. For that, do the following:
Press Win+R to open the Run prompt.
Type regedit and hit the Enter button.
Click on the Yes option.
Navigate to this path:
HKEY_LOCAL_MACHINE\SYSTEM\CurrentControlSet\Control
Right-click on Control and select New > Key.
Name it as StorageDevicePolicies.
Right-click on StorageDevicePolicies and select New > DWORD (32-bit) Value.
Name it as WriteProtect.
Keep the Value data as 0.
Restart your computer and format the USB pen drive.
This method is probably the easiest when your device doesn’t have a physical write-protection switch.
3] Remove write-protection using DISKPART command

If the Registry method doesn’t work for you, you can always use the diskpart command in Command Prompt to remove the read-only attributes of a write-protected USB pen drive. For that, do the following:
- Follow this guide to open the elevated Command Prompt window.
- Plug in your USB device to your computer.
- Enter the diskpart command.
- Type list disk command to find out the list of all attached storage devices.
- Note down the disk number and enter this command: select disk [number]
- Enter this command: attributes disk clear read-only
- Close the Command Prompt window.
Now you can open the File Explorer and use the in-built Format option to format the pen drive.
How do I remove write protection on a USB drive?
There are multiple ways to remove write protection on a USB drive. For example, you can create the WriteProtect DWORD value in the StorageDevicePolicies sub-key in Registry Editor. Also, you can use the DISKPART utility to remove the read-only attributes.
How do you write-protect USB drive Windows 10?
You can use USB Write Protect, a tool to write-protect USB flash drives on Windows 11/10. It is the easiest method to write protect a USB pen drive, SD card, etc., on your Windows computer.
That’s all! Hope it helped.
Leave a Reply