The Snipping Tool can be used to create screenshots and screen snippets of a screen on your Windows computer. However, with recent feature updates of Windows 11/10, Microsoft has replaced it with the all-new Snip and Sketch app. But some users would prefer to use the good old Snipping Tool no matter what. It can be found when searched using the Windows Search Box, but for someone who wants to access it every now and then, it is very simple. A user would then consider pinning the Snipping Tool icon to the taskbar.
Pin Snipping Tool to Windows 11/10 Taskbar
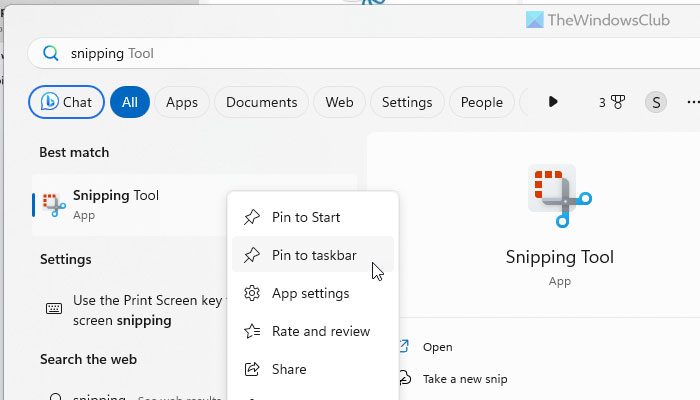
To get Snipping Tool on Taskbar in Windows 11/10, search for Snipping Tool in the Windows Search Box.

Once you find the appropriate result, right-click on it and select Pin to taskbar.
As soon as this is done, the Snipping Tool will be found on your taskbar.
In case you do not find Snipping Tool in the Windows Search Box search results, we have got you covered.
Open the Windows 11/10 File Explorer and navigate to the following path-
C:\WINDOWS\system32
Look for the file named SnippingTool.exe.
Right-click on it and select Pin to taskbar.
Once done, you will find the Snipping Tool icon in your taskbar like this,

You can now launch the Snipping Tool faster from the Taskbar of your computer.
Where is my Snipping Tool Windows 11/10?
Snipping Tool is available on Windows 11 as well as Windows 10. You can access this screen-capturing tool without any problem on your computer. To open the app, you need to search for snipping tool in the Taskbar search box and click on the respective search result. Then, you can use the options to capture your screen as per your requirements.
How do I create a shortcut for Snipping Tool in Windows 11/10?
As of now, there is no way to create a new shortcut for Snipping Tool in Windows 11/10. As it follows the minimalist workflow, there is no option to customize the existing shortcut in any way. However, you can use the Windows+Shift+S shortcut to capture a screenshot with the help of the Snipping Tool.
I hope this small tip helps you.
Leave a Reply