Sometimes you may have a lot of data in your document, and it can be difficult to read; luckily, Microsoft Excel has a feature called Group which you can use to organize your data into sections that you can easily show and hide certain sections in your spreadsheet, usually the section that you have chosen to group. You can ungroup if you wish to remove the sections in your spreadsheet.
Follow the steps below to group and ungroup rows and columns in Excel.
How to Group Rows and Columns in Excel

Open an Existing Spreadsheet.
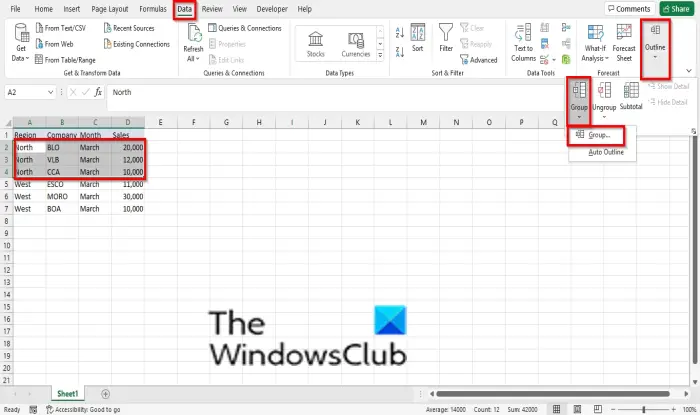
Highlight the row or column you want to group.
On the Data tab, click the Outline button on the right corner of the Excel interface.
Click Group.
In the Group menu, click Group.

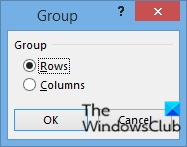
A Group dialog box will open, displaying the options Columns or Rows. Select the option you want and click OK.

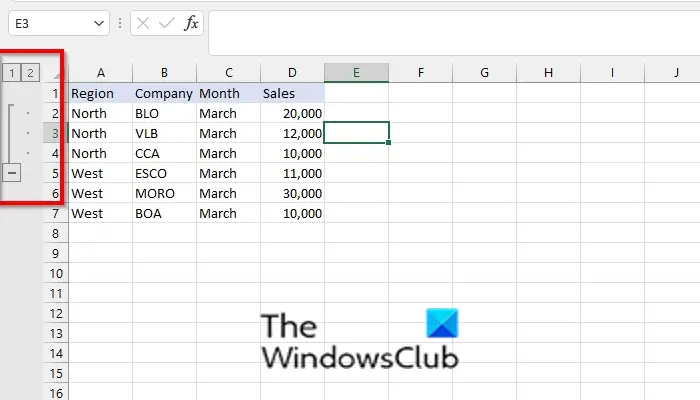
On the left of the spreadsheets, you will see buttons that you can use to hide the section you have grouped or unhide it.
Button 1 is to hide the group section, button 2 is to unhide the group section, the (–) button is to hide the group section, and the (+) button is to unhide the group section.
Once you click the (–) button, the group section will be hidden.
There is another method you can use to group columns and rows in Excel.
If you want to group a row or column quickly in your spreadsheet, you can use the shortcut combination keys Shift + Alt + Right arrow.
How to Ungroup Rows and Columns in Excel
To ungroup rows and columns in Excel.
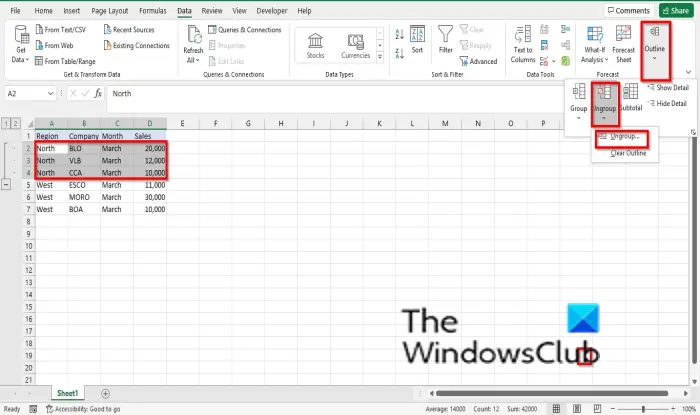
Highlight the row or column you have grouped.

On the Data tab, click Outline on the right corner of the Excel interface.
Click Ungroup and select Ungroup from its menu.
An Ungroup dialog box will open, select Row or Column, and click Ok.
If you want to group a row or column quickly in your spreadsheet, you can use the shortcut combination keys Shift + Alt + Left arrow.
Read: How to use Zoom In or Out feature in Microsoft Excel
How does Group and Ungroup work in Excel?
The Group feature allows users to group rows or columns or automatically create an outline, while ungroup is used to ungroup a range of cells that were previously grouped; this will remove all sections in your spreadsheet.
Can you Group Objects in Excel?
Yes, you can group objects in Microsoft Excel, but by a different method. Follow the steps below to group objects in Microsoft Excel:
- Insert two shapes in the spreadsheet.
- Put the shapes together.
- Hold down the Shift key or Ctrl key to select the two shapes.
- On the Shape Format tab in the Arrange group, click the group button.
- In the drop-down menu, select Group, the object is grouped.
We hope this tutorial helps you understand how to group and ungroup rows and columns in Excel; if you have questions about the tutorial, let us know in the comments.
Leave a Reply