In Windows 10, when you open multiple instances of the same application, notice how they start taking space on Windows 10. The default settings in Windows 10 groups the taskbar icons – but if that’s not happening for you, then in this post, we will show how to group taskbar icons in Windows 10.
How to Group Taskbar Icons in Windows 10
When the icons are grouped together, then it saves a lot of space. That said, it’s a personal choice. Many people still want their icons to be separately visible, but for those who have loads of apps open want similar icons to be clubbed together.
- Configure using Windows Settings
- Configure via Group Policy
- Configure via Registry
Make sure to take a restore point before making any changes in the Registry.
1] Configure using Windows Settings
Right-click on Taskbar, and click on Taskbar settings. Then, click on the dropdown under “Combine taskbar buttons.” You can choose between
![]()
- Always hide labels—It will automatically club icons from the same app into one. When you hover your mouse over the clubber icon, it will give you a preview of each window with the option to close it as you mouse-hover it.
- When the taskbar is full—If you have too many open, which takes a lot of space on the taskbar, then it will club them together.
- Never-When you set this, the ease window remains a separate window with individual buttons, and doesn’t combine with anything no matter how many windows are open. The drawback here is that icons on the taskbar will get smaller and smaller.
Depending on how you want it, you can choose between the first and second options.
Read: How to Ungroup WiFi, Sound, and Battery Taskbar Icons in Windows 11
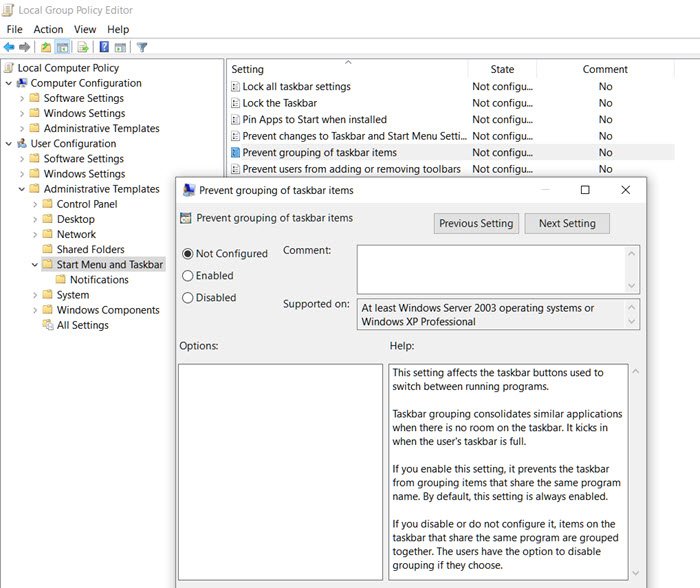
2] Configure via Group Policy
- Open Group Policy Editor by typing gpedit.msc in the Run prompt (Win+R) followed by pressing the Enter key.
- Navigate to User Configuration > Administrative Templates > Start Menu and Taskbar
- Locate and open Prevent grouping of taskbar items

If you enable this setting, it prevents the taskbar from grouping items that share the same program name. If you disable or do not configure it, items in the toolbar that share the same program are grouped together. The users have the option to disable grouping if they choose.
TIP: You can also use TaskbarGroups to group Taskbar shortcuts in Windows 10.
3] Configure Using Registry Settings
![]()
These are the two places where you need to change the Registry value. Look for a DWORD with the name NoTaskGrouping. If you delete the DWORD, it will set it as enabled, but if you set it to 1, it will be disabled.
HKEY_CURRENT_USER\Software\Microsoft\Windows\CurrentVersion\Policies\Explorer
- Open Registry Editor by typing Regedit in the Run prompt (Win +R) followed by pressing the Enter key
- Navigate to the mentioned path above and then make the changes.
- Exit registry and the change should be instant.
This method is useful when you need to make changes to multiple computers. You can export the key and import it on those computers. You can also remotely connect to other computers and make the changes.
Read: How to show Program icon names in Taskbar of Windows 11/10
How to disable taskbar grouping in Windows 11?
You should know that the taskbar button grouping option is no longer available in Windows 11.
How do I turn on Never combine taskbar buttons option in Windows 11?
Windows 11, by default, groups the taskbar buttons together, and you will not see any option in Windows 11 Settings to ungroup the taskbar buttons now.
I hope the post was easy to follow, and you were able to group and ungroup taskbar icons in Windows 10.
Leave a Reply