Whenever you type in Microsoft Word or any other word processor, you will notice that the cursor will move from one end of the document to the other. The cursor serves as a visual indication that indicates where you’re typing and in which direction. Even though most people find the cursor during typing to be distracting, you can easily hide it without losing sight of where it is. This article will show you how to hide the cursor while typing in Windows 11/10.
Why do I need to hide the Pointer when typing?
Everyone who uses a computer regularly knows the importance of keeping personal information confidential. To prevent someone from snooping on you while you’re typing, you should hide your cursor while you’re working. Displaying the cursor may seem unhelpful or even troublesome at times. If you share your computer with other people, hiding your cursor helps keep confidential information safe from prying eyes and potential intruders. The Windows operating system gives users several options to maintain their privacy during typing. Read this article to know how to hide the cursor while typing in Windows 11/10.
How to hide Pointer while Typing in Windows 11/10
If you don’t want someone to peek at what you’re typing, keep your cursor hidden at all times when working. Let’s see how to hide the cursor in Windows 11/10 while typing. If you have upgraded to Windows 11, follow these steps to hide Cursor while Typing:
- Open the Settings app.
- Select Bluetooth & devices > Mouse.
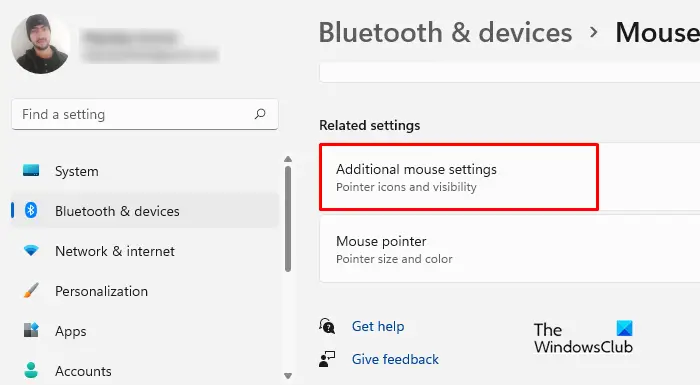
- Under Related settings, click on Additional mouse settings.
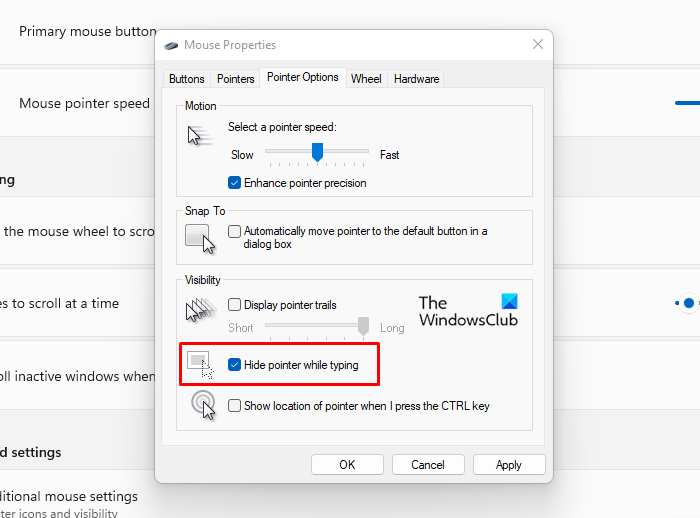
- Click on the Pointer Options tab.
- Check Hide pointer while typing checkbox.
- Click Apply > OK.
For a detailed explanation of the steps above, please refer to the below section:
To get it started, open Windows Settings first. For this, press the Windows key + I keyboard shortcut to access the application directly. Additionally, you can right-click on the Start button and select the Settings option to accomplish the same task. On the left side of the screen, select Bluetooth & devices. You can then choose the Mouse tab on the right side of the page.

The next step is to scroll down to Related settings and select Additional mouse settings to access the Mouse Properties window.

On the next page, switch to the Pointer Options tab. Then go to the Visibility section and mark the checkbox next to the “Hide pointer while typing” option.
Now that you have performed the above steps, it’s time to save all of the changes. So, choose Apply and click OK to complete this process.
If you’re using the Windows 10 operating system, just a few changes are needed, and the rest is the same as before. Here are the changes you need to make for Windows 10. Follow these steps to hide Cursor while Typing:
- Launch the Settings menu.
- For quick and easy access to Windows Settings, press the Windows+I keys at the same time.
- Next, select Devices from the menu that appears.
- On the left side of the following window, you will find the option to select the mouse.
- From the right pane, scroll down and click Additional mouse options.
- When the pop-up window appears, select the Pointer Options tab and check the Hide pointer while typing.
- Once you have changed the settings, make sure you click on Apply and then OK.
This way you can quickly hide the cursor while typing in Windows 11/10.
Thank you for reading this post. I hope you find it useful.
Read: How to hide the mouse cursor on Windows using AutoHideMouseCursor
What causes the cursor to jump while typing?
If your cursor moves or jumps randomly when typing, there are a few possible reasons for this:
- A sensitivity setting on the touchpad may cause this problem. For such a problem, you could try changing the Touchpad sensitivity and see if that helps.
- Corrupted mouse drivers are another possible cause of this issue. This can be resolved by updating the mouse driver.
- Another possibility is that there is a problematic background application causing the issue. In order to diagnose this issue, you should try troubleshooting your computer into a clean boot.
If you’re still facing the issue, you might be experiencing it because of apps running in the background.
How to display Mouse trails in Windows 11
The mouse cursor sometimes disappears from the screen when you move it, especially if you have multiple windows open. In such a case, the pointer will be easier to see if you have enabled the display mouse trails on your computer.
- Right-click on Start and select Settings.
- In the Settings menu, select Bluetooth & devices.
- Now go to the right pane, and click on Mouse > Additional mouse settings.
- Switch to the Pointer Options tab.
- Check the box next to Display Pointer trails.
- Click Apply > OK.
Related Post: The mouse cursor jumps or moves randomly while typing in Windows.