Discord is the platform many gamers around the world have chosen as their default place to communicate. And we can understand why because the service is excellent. Additionally, businesses tend to use Discord as well. Not a lot, but the number is ever-growing.
Now, while the platform is quite impressive, it does have its own share of issues. For example, there are times when the audio does not work as intended. So, what do we do when this happens? Well, there are quite a few options to take.
How to download the Discord app
Downloading the Discord app is very simple. You can visit the official website to locate the Windows 10 app. However, it would help if you went to the Google Play Store or the Apple App Store in order to get it on Android and iOS, respectively.
How to improve Discord audio quality on PC
Having many problems with audio when using Discord is a pain. The information below will aid in you having a good time:
- Turn on Noise Suppression
- Choose a different Bitrate
- Make changes to the Advanced Voice Processing settings
- Activate Push to Talk
1] Turn on Noise Suppression

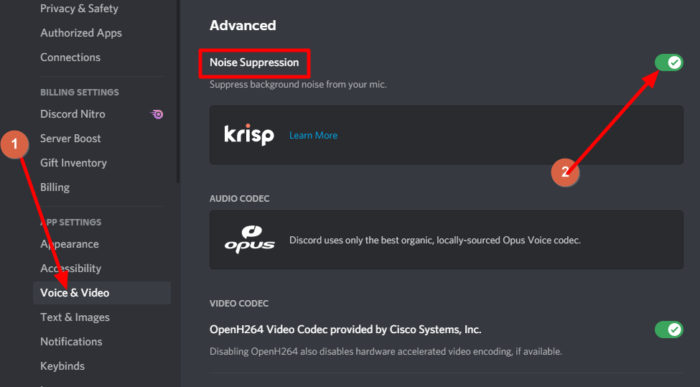
If you want to reduce background noise, then we suggest taking advantage of the Noise Suppression feature that works quite well. The thing is, it will not completely reduce background noise, but it can dampen the noise just enough for others not to hear.
For those who want to enable Noise Suppression, please navigate to the Settings area, then from there, choose Voice and Video. Scroll until you come across the Noise Suppression feature. Make sure it is toggled to on, and from now on, Discord will be sure to block background noise.
2] Choose a different Bitrate
The bitrate determines the quality of the audio. The higher the bitrate, the better the quality. But not only that, it will increase your data throughput. So, if you have a data cap, you may not want to increase your bitrate at all.
OK, to choose a different bitrate, the user must hover over a channel and select Edit Channel. Next, you should see the bitrate slider for that channel. Drag it down to decrease and up to increase. Save your changes, and that’s it.
Bear in mind that all Discord channels support bitrates from 8kbps to 96kbps. However, if enough Nitro Boost is available, users can gain access to 128, 256, and 384kbps.
3] Make changes to the Advanced Voice Processing settings

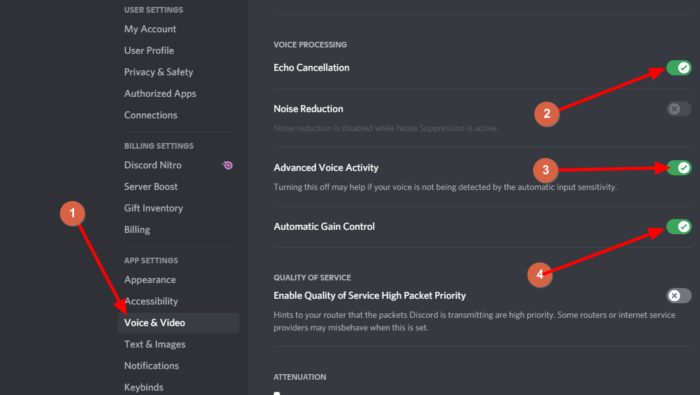
Users with microphone input problems on Discord can clear up much of their issues by simply making use of advanced voice processing features. With this feature activated, your cheap mic can sound like something more on the professional side.
To do this, navigate to Settings > Voice & Video. Scroll down until you’ve come across Voice Processing, and make sure Echo Cancellation is enabled. You will also want to toggle on both Automatic Gain Control and Advanced Voice Activity.
Bear in mind that if noise suppression is turned on, it will automatically be disabled when these features are active.
4] Activate Push to Talk

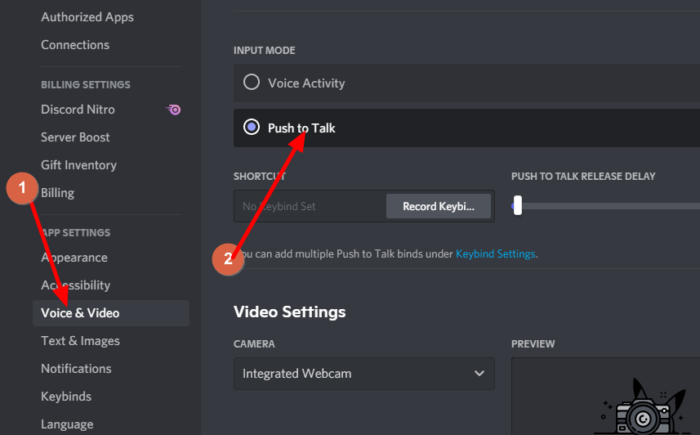
Not everyone might know this, but Discord supports Push to Talk. This is a great feature because instead of others constantly hearing what is going on your end, it is possible to simply press a button when you’re ready to talk.
Basically, this feature ensures unwanted sound never escapes through your mic unless you want it to.
Enable this feature by going to Settings > Voice and Video > Push to Talk.
Once there, select the Shortcut option and choose which key you want to use Push to Talk effectively.
Read next: How to set up Discord Streamer Mode.
Leave a Reply