For Windows users, Microsoft Store is the go-to place to download and update Windows 11/10 apps and games. Microsoft Store runs on Azure, an online cloud service platform, due to which, if the Azure cloud server faces high traffic, you will experience high downloading time. However, some users reported that, even when the server is up and running fine, they experience slow download speed. In this article, we will discuss the factors that affect the speed and how we can increase download speed in Microsoft Store.

Increase Download Speed in the Microsoft Store
If you want to increase your download speed in the Microsoft Store, follow the solutions mentioned below to do the same.
- Check the network bandwidth
- Close network extensive apps
- Disable metered connection
- Increase the background download bandwidth
- Flush Microsoft Store cache data
- Switch your DNS
- Re-Register your Microsoft Store
- Use Network Reset feature.
Let’s talk about the troubleshooting guide in detail.
1] Check the network bandwidth
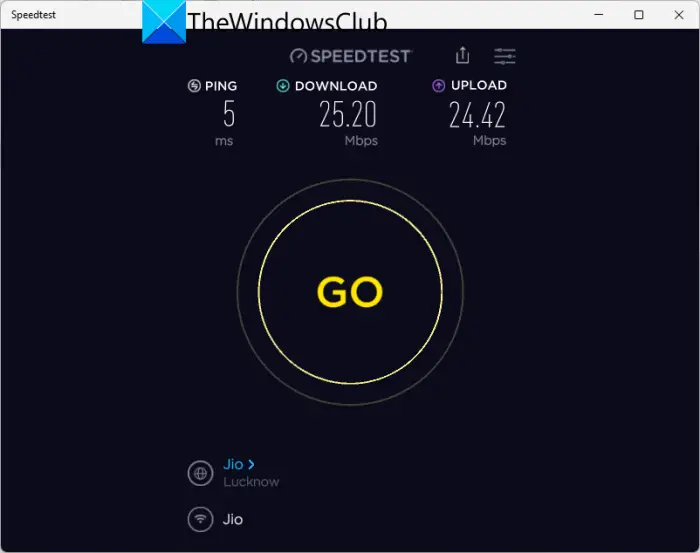
It’s far better to start with easy solutions, such as ensuring that there are no issues with the Internet speed and that it’s working fine. You can run speed tests and find out if it is working at its usual speed. If the internet connection is slow, you must fix the internet problems to get full download speeds.
2] Close network expensive apps
Next, we are going to quit tasks that are running in the background and consuming a lot of network bandwidth. Click Ctrl + Shift + Esc to open Task Manager, select network-extensive tasks, and then click the End button for each task. Additionally, make sure that you are not running Windows Store in efficiency mode. For that, right-click on the Microsoft store in Task Manager, and select the Efficiency mode option. Now restart your PC and see if this resolves the issue.
3] Disable metered connection
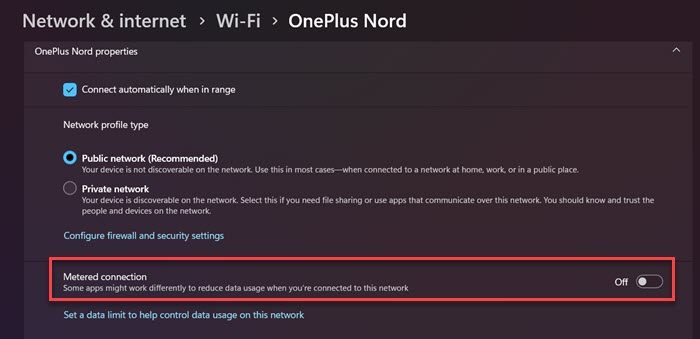
A lot of Windows users enable the metered connection feature to save data, as it prevents apps from using the available bandwidth. However, this can be why you are facing slow downloads in Microsoft Store. If you are just browsing, the metered connection is fine, but when downloading something from the Store, it is advised to disable the feature. So follow the step below to disable the feature.
- Click Win+I to open Settings.
- Select Network & Internet option and then click on WiFi.
- Select your WiFi connection or go to the properties of connection WiFi and then disable the toggle key of Metered connection button.
Hopefully, this will do the job for you.
Fix: Slow Internet speed on Windows computer
4] Increase the background download bandwidth
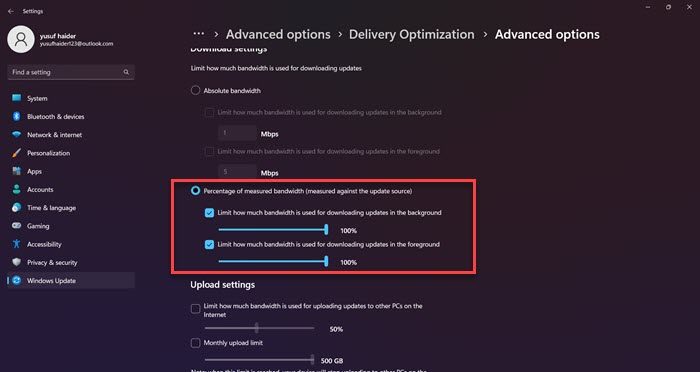
In Windows, users can limit their background download bandwidth, and this can be one of the reasons among many others leading to the error in question. Therefore, we recommend you increase the Microsoft Store’s download bandwidth, and here’s how you can do the same:
- Press Win+I to open Settings and then click Windows Update.
- Select Advanced options, and in Additional options, select Delivery optimization option.
- Now, click on Advanced options, and select the Percentage of measured bandwidth.
- Tick and drag the slider of both Limit how much bandwidth is used for downloading updates in the background and Limit how much bandwidth is used for downloading updates in the foreground to 100%.
Note: You don’t have to drag it to 100%; make adjustments based on your need or the speed of download you are experiencing.
Now, see if there’s any improvement in the speed or not.
5] Flush Microsoft Store cache data
You may want to clear the Microsoft Store cache. Maybe its cache got corrupted. In such cases, resetting and clearing the cache is the smart choice.
You can use the built-in command-line tool known as WSReset.exe. Go to the Start search box, type wsreset.exe and hit Enter.
Once done, see if downloading is still slow or if the issue is resolved.
6] Switch your DNS
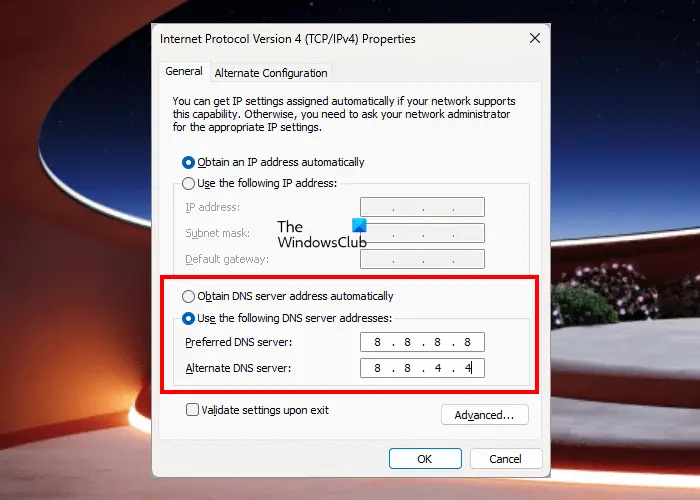
If you can’t resolve your said error through the above methods, changing your DNS server to a different server is what you need. We are changing the default DNS to a reliable public DNS server, since Google is one of the most recommended DNS servers by users, we are using the same. Follow the steps prescribed below to change to Google DNS Server.
- Click Win+ R to open the Run dialog.
- Type ncpa.cpl and then press Enter button to launch the Network Connections window.
- Choose and right-click on your current active internet connection.
- Now, click on the Properties option from the appeared context menu.
- Select the Internet Protocol Version 4 (TCP/IPv4) option and click on the Properties option.
- Click on the Use the following DNS server addresses option and then type the following addresses in the respective fields:
Preferred DNS server: 8.8.8.8
Alternate DNS server: 8.8.4.4
- After that go back to the previous screen and select the Internet Protocol Version 6 (TCP/IPV6) option and click on Properties.
- Choose the Use the following DNS server addresses option and enter the below addresses in the given fields:
Preferred DNS server: 2001:4860:4860::8888
Alternate DNS server: 2001:4860:4860::8844
- Finally, click on the Apply > OK button to switch to Google DNS Server.
Hopefully, this will do the job for you. Do keep in mind, this is not just going to help you in increasing the download speed of most apps.
7] Re-Register your Microsoft Store
If you are facing issues when downloading an app from the MS Store, it is very likely that there is something wrong with the Store itself. In that case, we have to re-register the store. To do this, launch PowerShell with administrative privileges. Copy and paste the following text into the PowerShell screen and hit the ENTER button.
PowerShell -ExecutionPolicy Unrestricted -Command “& {$manifest = (Get-AppxPackage Microsoft.WindowsStore).InstallLocation + ‘\AppxManifest.xml’ ; Add-AppxPackage -DisableDevelopmentMode -Register $manifest}
After it runs, close the command-line interpreter and restart your computer to finalize the re-registering operation.
8] Use Network Reset feature
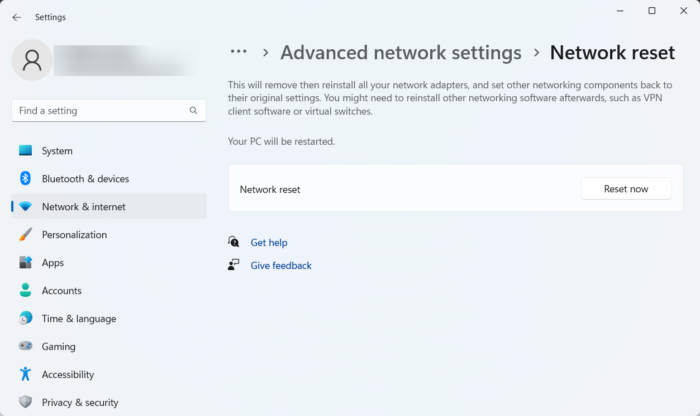
Last but not least, if the Internet condition remains the same even after doing the above-mentioned solutions, then there can be issues within your network settings, and we will recommend you reset it. Here’s how to do the same:
- Click Win+I to open settings and then click on Network &Internet.
- Click on the Advanced network settings and then select the Network reset option.
- Finally, select the Reset now button.
Hopefully, this will do the job for you.
Also read: How to increase upload and download speed in Windows.
Leave a Reply