When you connect a new storage device (HDD or SSD), you may notice that Windows File Explorer doesn’t display it. While it is visible in the BIOS/UEFI, it stays hidden in the File Explorer. It happens because a new hard drive needs to be initialized before it can be used on the Windows PC. This post will share how to initialize a hard drive in Windows 11/10.

Why do we need to initialize a Hard Drive?
Windows can only detect and display hard drives with a valid disk signature attached to the OS. The signature is applied to the drive during the initialization process, followed by formatting and assignment of a drive letter, making it accessible in File Explorer.
How to initialize a Hard Drive in Windows 11/10
Disk management is a Windows program allowing users to manage drives and different PC partitions. It can create, delete, format, convert MBR to GPT, and perform other operations. Due to its graphical user interface, however, it is more practical and user-friendly than Command Prompt. Follow the instructions below to initialize a disk using Windows Disk Management.

- Press the Windows key + R to open the Run dialogue box
- Type diskmgmt.msc and press OK to open the Disk Management window.
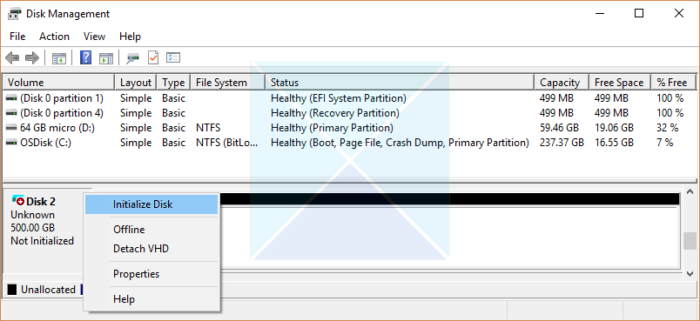
- Right-click on the hard drive that needs to be initialized and click on the Initialize Disk option from the context menu.
- If the disk is labeled as Offline, right-click it once, then choose Online from the context menu.
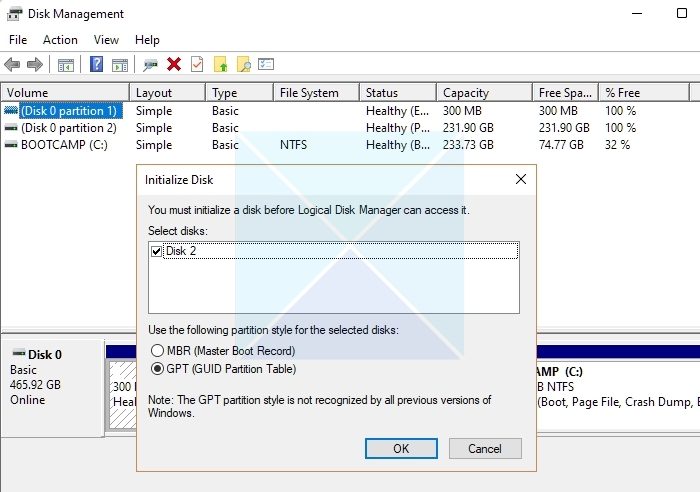
- In the Initialize Disk pop-up window, choose the appropriate disk format (MBR or GPT) and click OK to initialize the process.

During this process, the Master Boot Record (MBR) or GUID Partition Table (GPT) is created. These partitioning schemes define how the disk’s space will be divided into logical partitions.
Note:
- Be aware that specific USB devices only get formatted, and a drive letter can be assigned; they do not have the choice to be initialized.
- If your disk already has files you care about, don’t initialize it – you’ll lose all the files.
2] Creating a New Partition

Once the MBR or GPT has been created, the next step is to create a new partition on the disk. A partition is a logical division of the disk’s space, which can be used to store data or install an operating system. The disk management tool helps you set up the space.
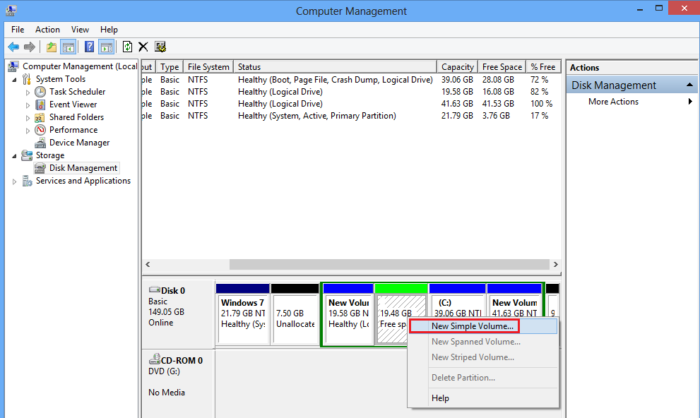
- Open the Disk Management tool and right-click on the unallocated space on the hard drive.
- Click on the New Simple Volume option from the context menu.
- Select Next, enter the volume size (preferably the default volume) and click Next again.
- Assign the drive letter you want to give the volume.
- Specify the desired file system (often NTFS), click Next, and Finish.
Note: Formatting a partition creates a new file system that enables the disk to store and access files.
Will initializing a disk and remove all of its data?
Both Yes and No are appropriate answers to this question; in particular, initializing the disk will not delete its data. But in the meantime, you must also format the hard drive and add partitions to use it, which will also result in data loss. So, remember to check the hard drive for errors and back up important data.
Should I initialize the disk as MBR or GPT?
Most PCs use the GUID Partition Table (GPT) disk type for hard drives and SSDs, especially now that most PCS are 64-bit. MBR is now slowly replaced with GPT as the latter supports UEFI, and you can have more than four partitions on each disk. GPT is also required for disks larger than two terabytes.
Does converting to GPT from MBR wipe all the data?
All the data will be wiped out if you convert existing MBR-based storage to GPT. However, Microsoft offers MBR2GPT.EXE that can convert a disk from the Master Boot Record (MBR) to the GUID Partition Table (GPT) partition style without modifying or deleting data on the disk. However, the process is complicated, and you must create a system image or backup of all the data on the drive.