In this article, we will explore how to install and configure File Server on Windows Server and install the necessary roles, configure shared folders, manage permission, and ensure security.
Suppose your business manages multiple digital files that need to be shared across departments and locations and you use file sharing over your company’s network. In that case, you must set up a Windows file server. Installing and configuring a file server on a Windows server is a straightforward process, and if you are interested in it, we have you covered here.
What is File server system?
A File server system is a computer or server that stores and manages files, allowing users on networks to access, share, and store data efficiently. It provides a central location where users can upload, download, modify, and organize files without needing to store them locally on individual devices.
Read: Difference between NTFS, FAT, FAT32 and exFAT file systems
Install and configure File Server on Windows Server?
If you want to install and configure File Server on Windows Server, follow the steps mentioned below:
- Install File Server
- Set Network File Sharing
- Configure Advanced Network File Sharing Settings
- Map the network folder and access it
Let’s get started.
1] Install File Server

First of all, we need to install the File Server role on your computer. The role allows us to manage shared folders and enable users to access files over the network. Follow the steps mentioned below to do the same.
- Launch Server Manager, select Add Roles and Features, and then the Next button.
- Click on Role-based or feature-based installation, then click on Select a server from the server pool option, and select a host to which we will add the services, followed by clicking the Next button.
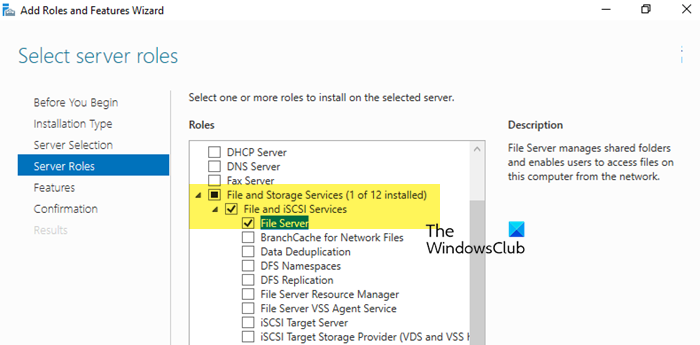
- Click on File and Storage Services > Files and iSCSI services, then click the File Server option. Continue to hit the Next button after every step.
- Now, select one or more features to add to the installation on the selected server, such as .NET Framework 4.7 Features, if needed.
- Lastly, hit the Install button, and once done click on the Close button.
Wait for some time and allow your system to install those features.
Read: How to set up an FTP Server on Windows 11
2] Set Network File Sharing

Once the server file is installed, the next step is configuring basic network file sharing. This makes the folder available to network users, allowing them to access and collaborate on shared files.
- Navigate to the folder that needs to be shared, right-click on it, and select the Properties option.
- Navigate to the Sharing tab, click on the Share button, and select users or groups to whom you want to share the access.
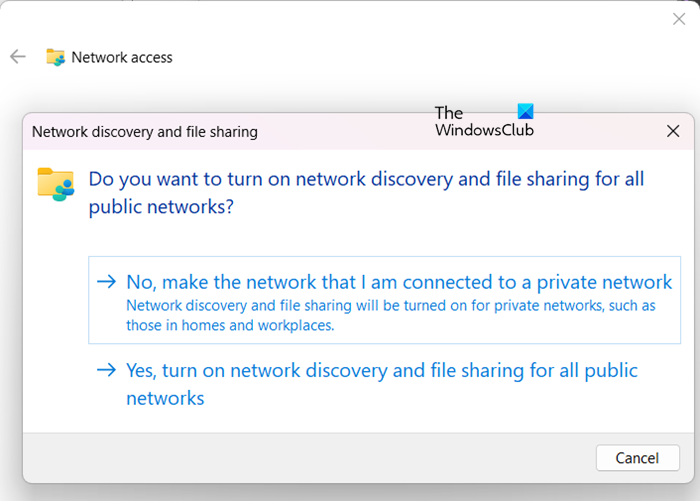
- To set the Access permission, select one option in the Network Discovery and File Sharing window and hit the Done button.
In case, you want to give permission to everyone, you can use the clause “Everyone” when asked to Choose people to share with.
3] Configure Advanced Network File Sharing Settings

For more granular control over the files, users can optimize advanced settings to refine permission and access. This configuration ensures precise control over who can access and modify files, enhancing security and usability.
- Right-click on the folder, select Properties and navigate to the Sharing tab.
- Click on the Advanced sharing button, tick the Share this folder box, and provide a name for the share in the Share Name field.
- Select the Permission option, and click the Remove button to remove the by default option if you don’t want to add Everyone.
- Now, click on the Add button, enter the usernames, and click on Ok.
- Set the necessary permissions for the added users, and then hit the Done button.
- Once again right-click on the folder, select Properties, and navigate to the Security tab to add NTFS access permission.
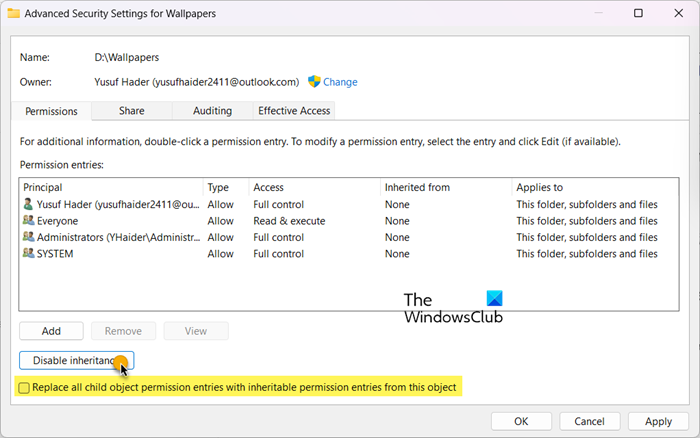
- Click on Advanced Sharing, follow it by clicking Disable Inheritance (if needed), and then select Convert inherited permissions into explicit permissions on this object.
- Then click the Remove button to remove unnecessary permissions. Once done select Add to add the appropriate users or groups.
- In the next window, click on Select a Principal and input the user or group.
- Set specific permissions, and lastly, select the OK button to save the changes.
After these steps, the sharing and NTFS permissions are set.
4] Map the network folder and access it

To access shared folders on the network, users can map the shared folder to a drive letter through File Explorer. This allows easy and persistent access to the folder as if it were a local drive. Here’s how to do so.
- Click Win +E to open File Explorer, right-click on Network, and click on Map network drive option.
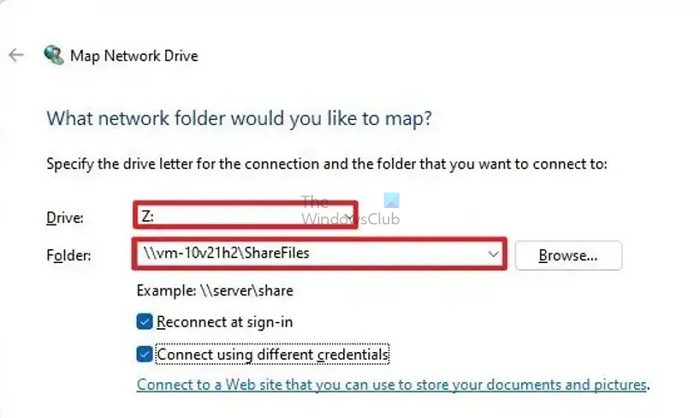
- In the Drive field, choose the desired drive letter, enter the path to the shared folder in the format, and then hit the Finish button.
- Finally, type in the credential when the user authentication prompt appears on the screen.
Once authenticated, the shared folder will be accessible.
Alternatively, users can also assign direct access to shared folders without assigning a drive letter. Here’s how to do the same:
- Click Win + R to open the Run dialog box, and then type in the network path and share folder in the following format:
\\server name\(Share Name) - Click on Enter, and if required, enter the credentials when the user authentication prompt appears.
- Once authenticated, the shared folder can be now opened.
Users can now read, write, or modify files within the shared folder based on the permissions they have been granted.
Read: Encrypting File System (EFS) on Windows explained
How do I install and configure a file server?
To install and configure a file server, users first need to install a Windows server by either installing it from an ISO or installation media. The next steps include adding file server roles, creating and configuring shared folders, and setting NTFS permission. To learn step-by-step instructions on how to set up a file server on a Windows server, check out the guide mentioned above.
Read: How to enable or disable NTFS File Compression in Windows 11
How to install a file server in Windows Server?
To install a file server in Windows Server, you first need to install the File Server role from the Server Manager, configure the properties of the folder you want to share, grant access to the required users, and map the network drive. We recommend following the steps mentioned earlier to do the same.
Also Read: Setup Branch Cache in Windows Server.