Rufus is a popular software used to create bootable USB flash drivers to install Windows or another operating system on a computer. It is a free and open-source utility. It is available in both portable and standard versions. In this article, we will show you how to install and use Rufus software on a Windows PC.
How to install Rufus on a Windows PC
Installation of Rufus is easy. Above, we have explained that Rufus is available in both standard and portable versions. The portable version, as the name implies, does not need any installation. You can launch it simply by double-clicking on the executable file. However, when I ran the standard version of Rufus, it also launched immediately without the installation. This means you can run Rufus simply by double-clicking on the downloaded file.
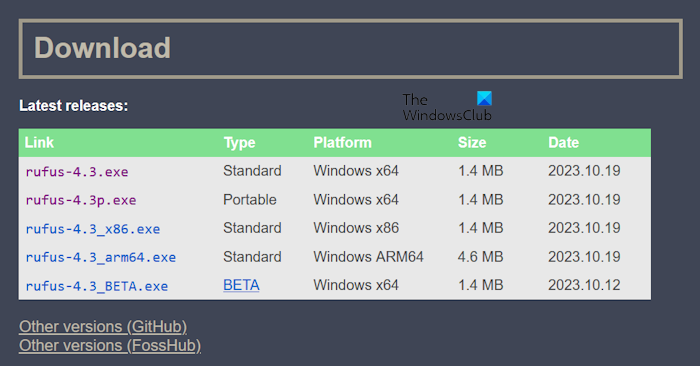
To download Rufus on your Windows PC, follow the steps provided below:
- Visit its official website.
- Scroll down to the Download section. You will see the latest releases of Rufus there.
- Download the version depending on your system’s architecture.
Its other versions are also available on GitHub and FossHub. Hence, if you want to download its older version, you can download it from GitHub or FossHub. After downloading the file, double-click on it to launch Rufus software.
How to use Rufus on a Windows PC
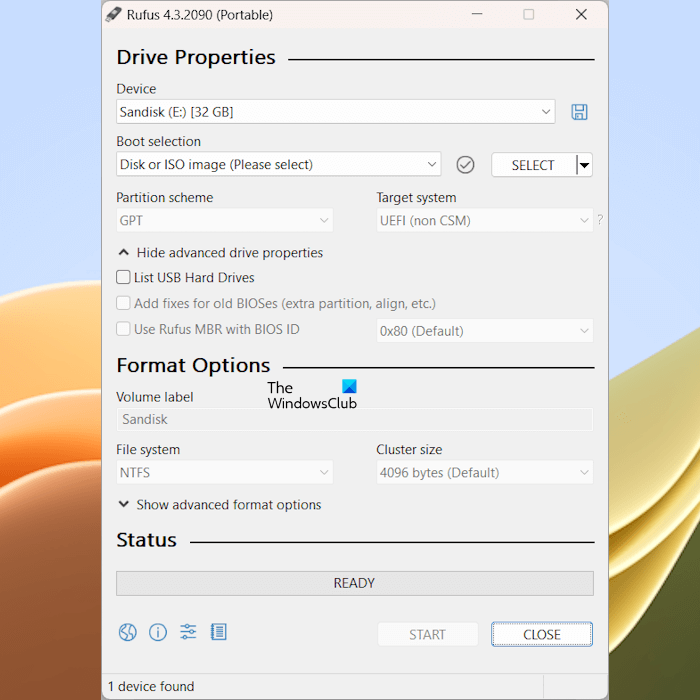
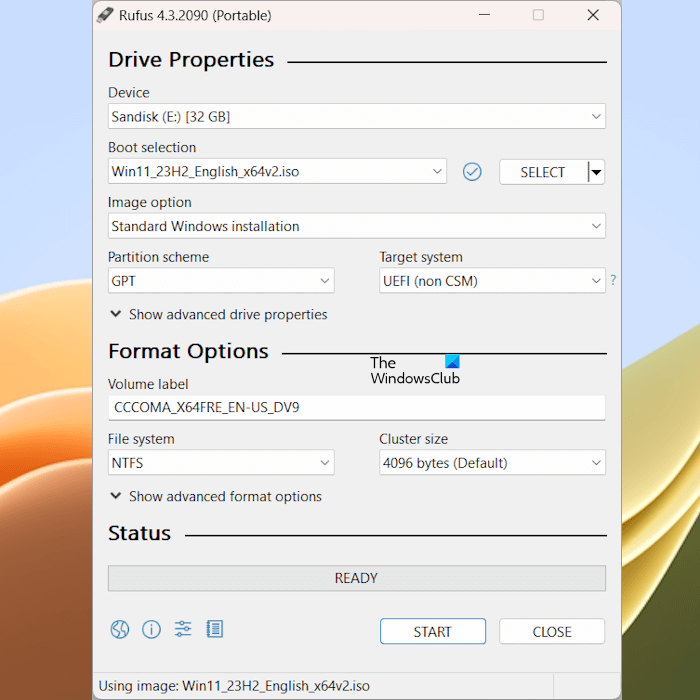
The Rufus software has an interface as shown in the above image. It automatically detects the USB flash drive(s) connected to your system. You can also select a USB flash drive by clicking on the Device drop-down menu.
On the bottom left side, you will see some options. These are:
- Rufus application language
- Rufus information
- Application settings
- Application logs
Hover your mouse cursor to read the name of a particular option. Rufus software is available in more than 30 languages. You can change the display language of Rufus by clicking on the respective icon.
A blue icon is also available next to the Device drop-down. It is to create a disk image of the selected device. You can read its name by hovering your mouse cursor over it.
Download Windows ISO using Rufus
Rufus has the following two options when it comes to installing the Windows operating system on a computer.
- SELECT
- DOWNLOAD
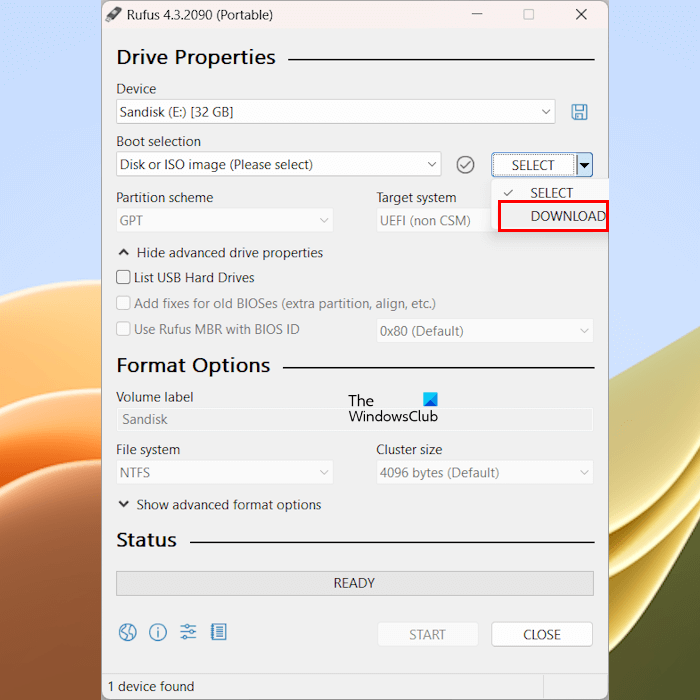
To download the Windows ISO file using Rufus, click on the drop-down arrow on the SELECT button under the Boot selection section and select DOWNLOAD. After selecting DOWNLOAD, click on the DOWNLOAD button. Now, Rufus will display an on-screen wizard. Follow that wizard to download the Windows 11/10 ISO file. In the end, it will also show you an option to download the ISO file using a web browser. If you select that checkbox, it will open your default web browser to download the Windows ISO file.
After the download is complete, you can continue installing the Windows operating system on your computer.
Create a bootable USB flash drive with Rufus
To install the Windows operating system on a computer, you should have a bootable USB flash drive. After making a USB flash drive bootable, you have to change the boot order to make your computer boot from an external USB flash drive. Rufus software helps you create a bootable USB flash drive easily. To create a bootable USB flash drive with the Windows operating system using Rufus, follow the steps provided below:
- Connect your USB flash drive to your computer.
- Open Rufus.
- Rufus will automatically detect the USB flash drive connected to your computer. If not, select it from the drop-down.
- Now, click SELECT. Select the Windows ISO file from your computer.
- Select the partition scheme and other options. When you are done, click START.
You will receive a message that Rufus will format the selected USB flash drive. Click Yes to continue. After that, the process will start.
This post will help you if RUFUS is not working in Windows 11.
Install Windows To Go with Rufus
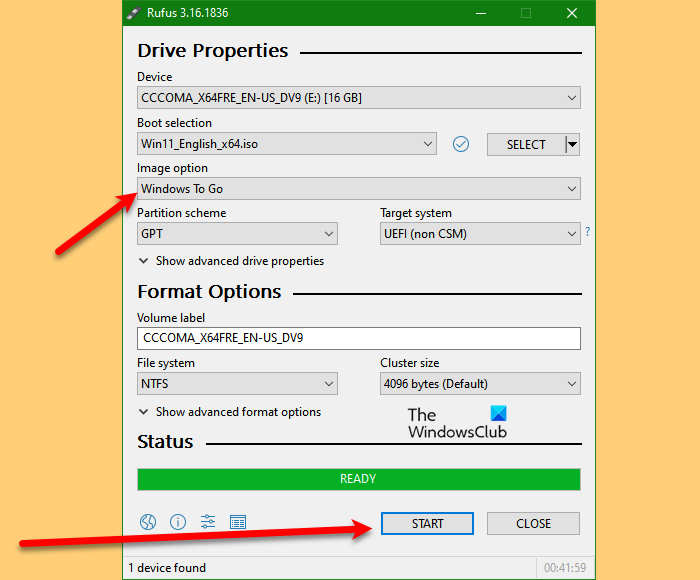
Windows To Go is a feature in Windows 10 Enterprise and Windows 10 Education that allows users to create a To Go workspace that can be booted from an external USB device. Microsoft discontinued it in 2019. However, with Rufus, you can create Windows To Go.
Install Windows 11 by bypassing the requirements with Rufus
Windows 11 has some hardware requirements. If your computer does not fulfill those hardware requirements, you cannot install Windows 11 on it. TPM and Secure Boot are among these requirements for Windows 11. However, Rufus made this easy. Rufus allows you to bypass TPM and Secure Boot, so you can install Windows 11 on your computer.
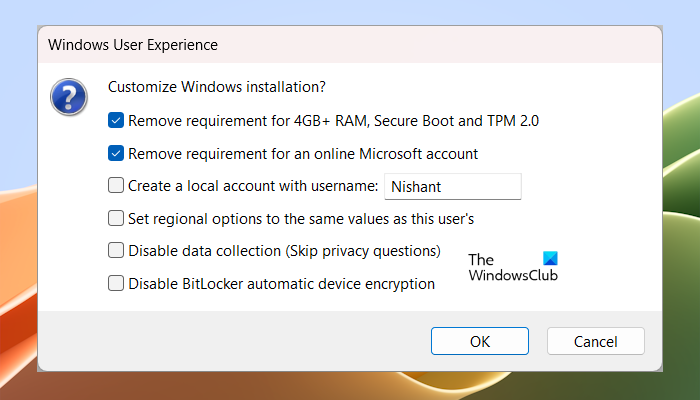
It shows these options when you click on the START button to create a bootable USB flash drive. You can also select other options besides removing the requirements for Secure Boot and TPM (refer to the above screenshot).
This is all about installing and using Rufus on a Windows PC.
How do I activate Windows with Rufus?
You cannot activate Windows with Rufus. Rufus is software that allows you to create a bootable USB flash drive to install the Windows operating system on your computer. To activate Windows, you should have a valid license key.
How to make a Windows bootable USB?
There are many free tools available online that you can use to convert your USB flash drive into a Windows bootable USB flash drive. After creating a bootable USB flash drive, you can use it to install Windows on different computers.
Read next: Best free ISO Maker tools for Windows.
Leave a Reply