The Android SDK, short for Android Software Developer Kit, is arguably the most powerful software utility widely used by programmers who indulge in Android app development. The Windows version of this toolkit serves as a helping hand to developers, and ships several other features like launching apps on the side using the Windows CMD. If you think that this could be of help to you, you can follow this guide to download and use Android SDK and Android Studio on Windows.
How to download and use Android SDK on Windows
The Android SDK by Google allows developers to create Android apps in a very simplistic manner, without them having to be full-blown experts at developing apps. It packages inside the Android Studio, which is Google’s own IDE, and several other necessary libraries. Although there is an option for users to download the SDK without Android Studio, most developers prefer to create with it. We will be looking at how you can use Android SDK both, with Android Studio and without it.
Use Android SDK command line version on Windows (Install Java)
If you’re just interested in the Android SDK to execute command lines, you’re required to download and install the latest version of Java first.
- Visit the official Java downloads page at Oracle.com and click on the Windows tab
- Here, download the ‘x64 MSI Installer’ file and install it
- Once you’re done installing Java, its time for you to install the SDK Command Line
- Visit the Downloads page on developer.android.com and click on Download options
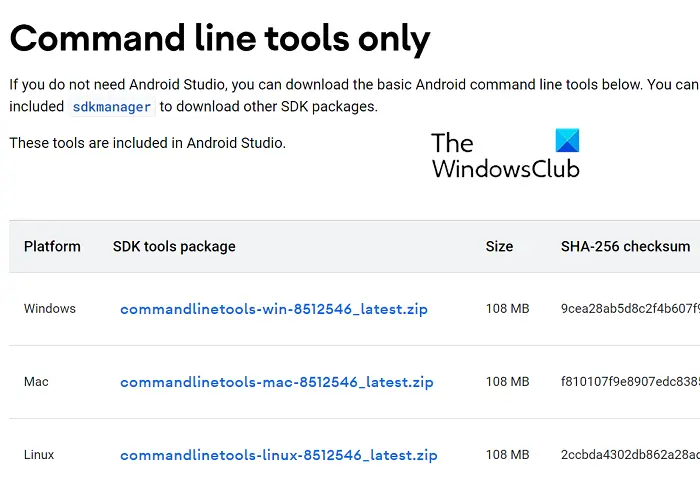
- Scroll down to find the ‘Command Lines Only’ head and download the ‘.zip’ file for Windows

It will take a few minutes for the ‘.zip’ file to download, after which you can extract it and find the “cmdline-tools” program available inside it. Now, go to your C: Drive and create a folder named ‘Android’. Inside it, create a folder named “cmdline-tools” and inside that folder, another new subfolder by the name of “tools”. In this final subfolder, paste all the contents that you’ve just extracted from the SDK Command Line folder.
Let us now see how you can initiate the process of using SDK’s Command-Line version. To do that, follow the steps below:
- Run Command Prompt as administrator
- Now paste the following command line:
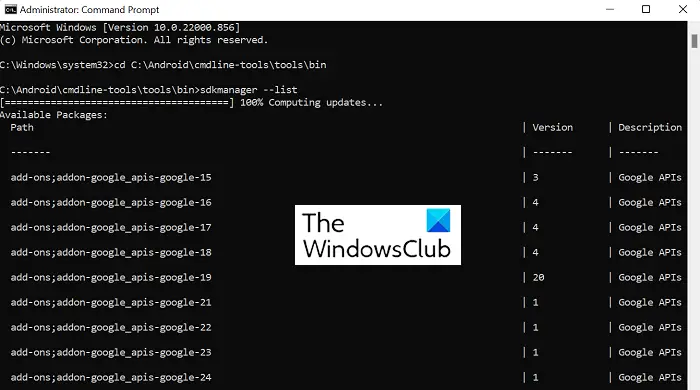
cd C:\Android\cmdline-tools\tools\bin
- This will open the bin folder in the tools directory we just created. Now, given that you have downloaded and installed Java, paste the following line of code and press enter:
SDK manager –list
- This command will show you the list of installed and valid commands that came with the SDK Command Line
- If you are interested in installing platform tools as well, execute the following command
sdkmanager "platform-tools" "platforms;android-33"

Once you do that, you’ll find a “platform-tools” folder automatically created in your Android folder.
How to install Android Studio on Windows
Let’s look at the flip side now, where you would want to use Google’s Android Studio for your app development processes. The reason we suggested why you may wish to omit to install Android Studio is that it takes up a lot of space, but the convenience and easy-to-use UI it brings along makes it worth it.
- Visit the Android Studio download page as we’d done above, click on “Download Android Studio” and follow the steps as will be shown subsequently
- This version accompanies a feature called Android Virtual Device. Developers use this to test their prototypes and products, but you don’t need to download this along with the main file
- Select the directory in which you want to save this app, or select the option that you don’t want to import any previous settings, and follow the setup wizard by continuing to click on ‘Next’
- Select the theme you want to run with your Android SDK and if there are any extra components that you’re interested in
- Finish the process once all the components are done downloading by clicking on Finish
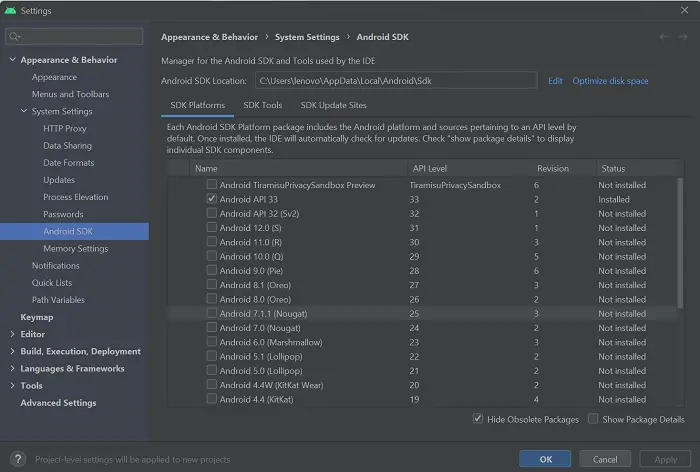
Once this process is finished, you are pretty much good to get the ground running and start with your first project on Android Studio. You can do so by clicking on ‘Create New Project’ and selecting the template of your choice. You also get an option to play around with the SDK Manager. Click on “More Options” and select SDK Manager from this drop-down. In this SDK Manager window is a list of all the installed and non-installed packages that came with this file. You can further filter them out based on obsolete packages.

Where is Android SDK installed in Windows 11/10?
There can be confusion on your mind as to where the Android SDK application file is stored upon being downloaded since the network of files can often get very elaborate and complicated. A way to ensure you remember where it is stored is to manually select the directory in which you want to install it. Alternatively, you can resort to its default saving location:
c:\Users\username\AppData\Local\Android\Sdk.
How do I install platform tools on Windows?
The Android “platform-tools” is a command line functionality used almost exclusively by app developers. Usually accompanied by the Android SDK Manager, they come in handy for complicated tasks like developing and debugging apps. If you find yourself in a situation where you have to download and install platform tools separately on your Windows PC, you can get a ‘.zip’ file for the same from an online repository. Alternatively, the platform-tools utility can also be installed while running the SDK Command-line version.
How do I fix the “SDK tools directory is missing” Error?
You may face the “SDK tools directory is missing” error while starting Android Studio on Windows. To fix that, you have to open the SDK Manager, deselect the ‘Hide obsolete packages’ option on the bottom-right corner, and further, install the Android SDK Tools(obsolete) folder. A new folder by that name will be placed in the same directory as the main Android Studio files.
We hope that you find this post helpful.
Leave a Reply