If you want to install DHCP server in Windows Server, here is how you can do that. It is possible to install and uninstall the DHCP server with the help of Server Manager and PowerShell.
What is DHCP server?
A DHCP or Dynamic Host Configuration Protocol server helps you configure an organization’s network of computers by assigning IP addresses to the client’s computers. As this process happens in automation, you do not need to do anything else apart from setting things up.
How to install DHCP server in Windows Server
To install the DHCP server in Windows Server, follow these steps:
- Open the Server Manager on your computer.
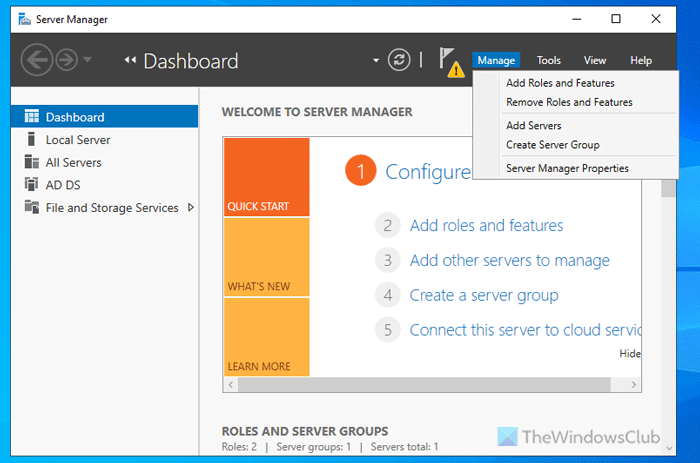
- Click on Manage > Add Roles and Features.
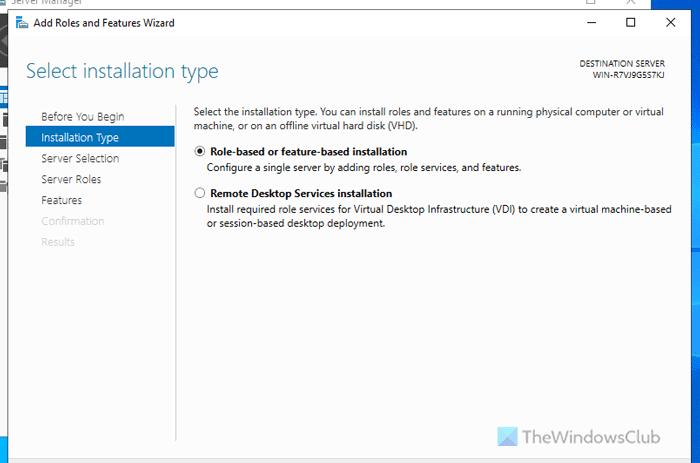
- Select the Role-based or feature-based installation option.
- Choose the server from the server pool.
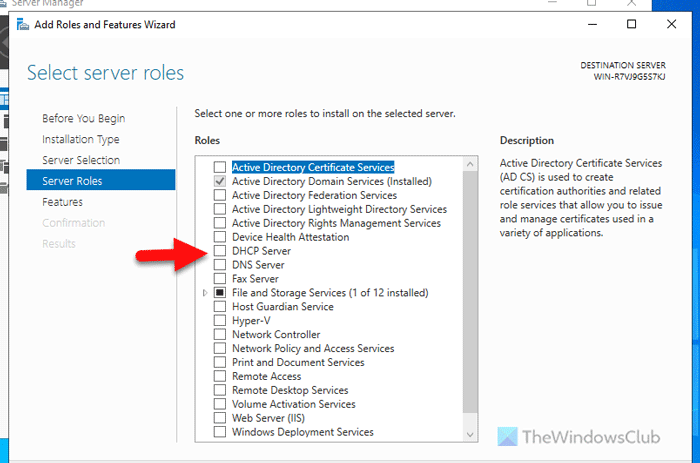
- Tick the DHCP Server checkbox in the Server Roles tab.
- Click on the Add Features option.
- Click on the Install button.
Open the Server Manager and click on Manage > Add Roles and Features.
Then, choose the Role-based or feature-based installation option and click the Next button.
Next, choose the desired server from the server pool. However, if you have only one server, you do not need to do anything else except click on the Next button.
Following that, tick the DHCP Server checkbox and click the Next and Add Features button.
Finally, click the Install button to start the installation process. Once done, you can close all the windows.
How to install DHCP server in Windows Server using PowerShell
To install DHCP server in Windows Server using PowerShell, follow these steps:
- Search for powershell in the Taskbar search box.
- Right-click on it and select Run as Administrator option.
- Click the Yes button.
- Enter this command: Install-WindowsFeature DHCP -IncludeManagementTools
To know more about these steps, keep reading.
To get started, you need to open the PowerShell with administrator permission. For that, search for powershell in the Taskbar search box, right-click on it, select the Run as Administrator option, and click on the Yes button.
Once it is opened, enter this command:
Install-WindowsFeature DHCP -IncludeManagementTools
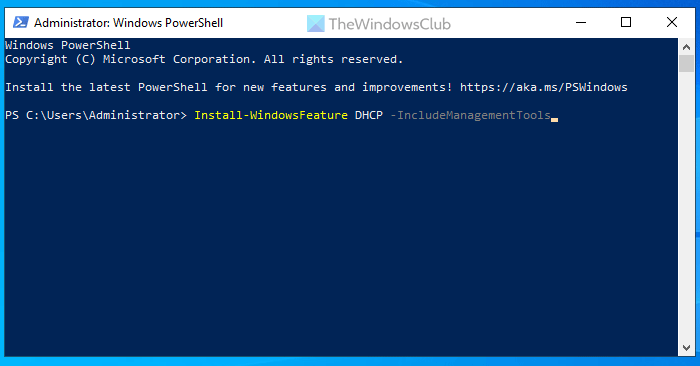
Let it be finished. Once done, you can close the PowerShell window.
How to uninstall DHCP server from Windows Server
To uninstall DHCP server from Windows Server, follow these steps:
- Open the Server Manager.
- Click on Manage > Remove Roles and Features.
- Select the server from the server pool.
- Remove the tick from the DHCP Server checkbox.
- Click on the Remove Features button.
- Click the Next button in the Features tab.
- Click the Remove button on the Confirmation tab.
- Close all windows and restart your server.
Open the Server Manager on your computer and click on Manage > Remove Roles and Features.
Then, choose the server from the server pool and click on the Next button. Following that, remove the tick from the DHCP Server checkbox.
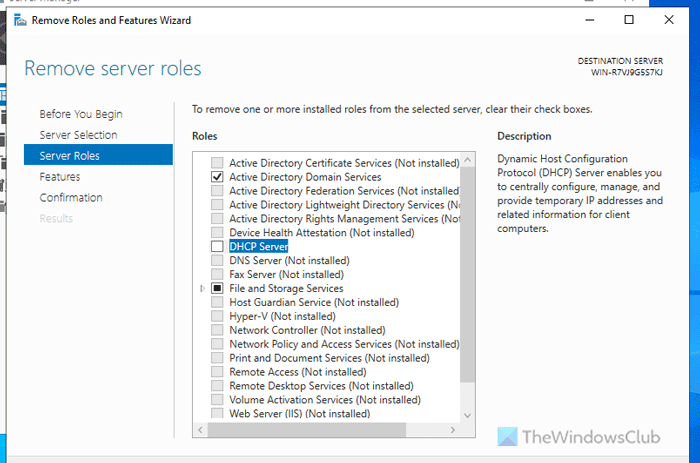
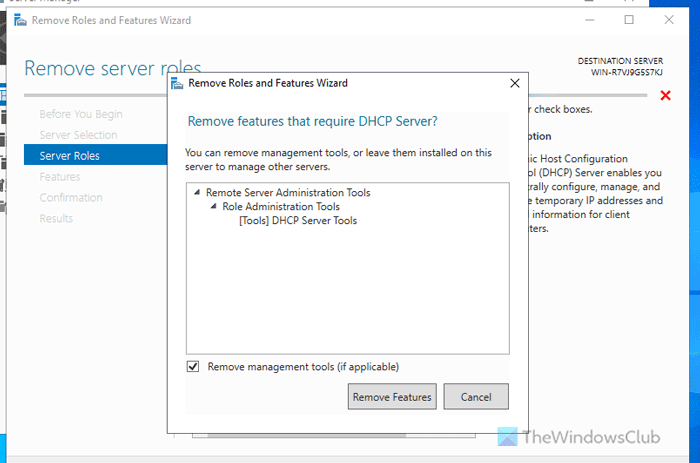
Once done, it will display a window showing all the DHCP tools installed on your server. You can expand the list to view them all. Finally, click the Remove Features button.
It will redirect you to the Features tab. You do not need to do anything else except click on the Next button.
Then, click the Remove button on the confirmation window.
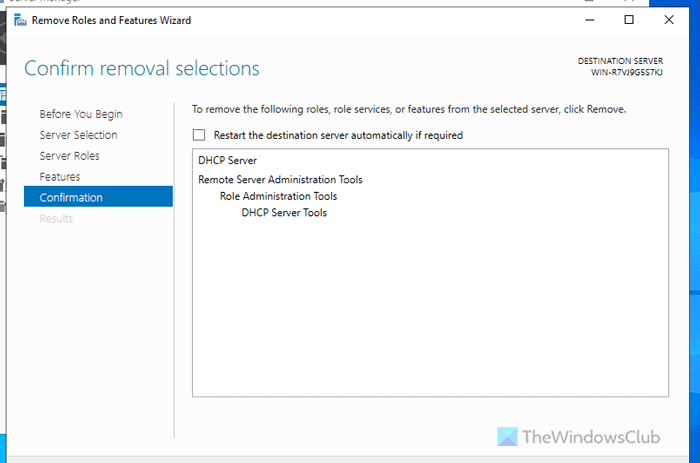
Once done, close all the windows and restart your server. Alternatively, you can also tick the Restart the destination server automatically if required checkbox before clicking the Remove button as it does the same thing.
Read: Disable or Enable DHCP for Ethernet or Wi-Fi in Windows
How do I get to DHCP server?
To get the DHCP server, you can use the Server Manager. For that choose the Role-based or feature-based installation option and select the server from the server pool. Next, tick the DHCP Server checkbox and choose the features you want to install. Finally, click the Install button to get the job done. Alternatively, you can open the PowerShell with administrator privilege and enter this command: Install-WindowsFeature DHCP -IncludeManagementTools.
How to enable DHCP in cmd?
It is not possible to enable DHCP using CMD on the Windows Server. However, you can use the Install parameter in PowerShell to get the job done. For that, search for PowerShell in the Taskbar search box, right-click on it, select the Run as Administrator option, and click the Yes button. Then, enter this command: Install-WindowsFeature DHCP -IncludeManagementTools. It takes a few moments to complete the installation.
Read: Fix Unable to contact your DHCP Server error on Windows.
Leave a Reply