JDK (Java Development Kit) is a collection of tools required for developing and testing programs in the language. It is a package consisting of Java development tools like java compiler and JRE. It is used for building applications using Java Programming Language. Java is an Object-Oriented Programing language that programmers use to develop java software. Java was developed by James Gosling, and it is owned by Oracle Corporation and Sun Microsystem. It is a platform-independent language. Java 18 is the latest JDK Development Kit for Windows, Linux, and macOS platforms. So without any delay, let us walk you through the process to download the JDK installer for Windows 11/10.

How to download and install Java JDK on Windows 11/10
Here are the steps to install JDK (Java Development Kit) on Windows 11/10 computer systems:
- Check your Computer Compatibility
- Install JDK on the Computer
- Set up a Path in Environment Variable
- Check for JDK installation
1] Check your Computer Compatibility

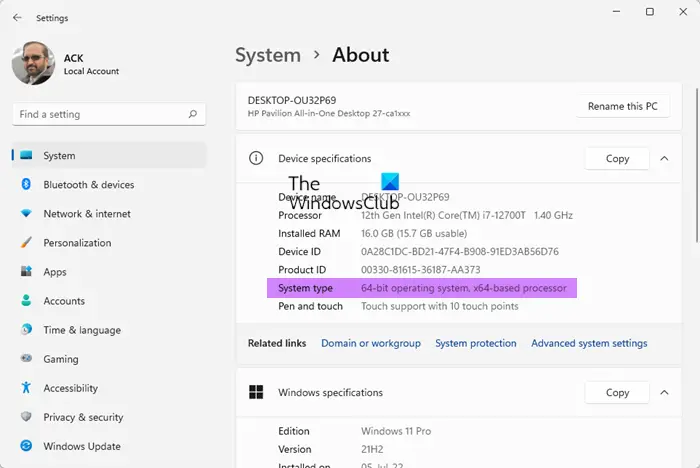
Before installing JDK, it’s imperative to check whether your computer is compatible with the JDK version. JDK is compatible with Windows 11/10/8/7, but you need to be running the 64-bit version of the OS. Check if your system runs on the 32-bit or 64-bit OS, and then you can install JDK if you are on 64-it OS. If your system is 32-bit you need to either upgrade your system or go with a different version of JDK that supports 32-bit architecture.
Once you have verified that your system is compatible with JDK, let’s go straight to the process of downloading the JDK installer in Windows 11/10.
2] Install JDK on the computer

To install the latest version of Java JDK, follow the below process.
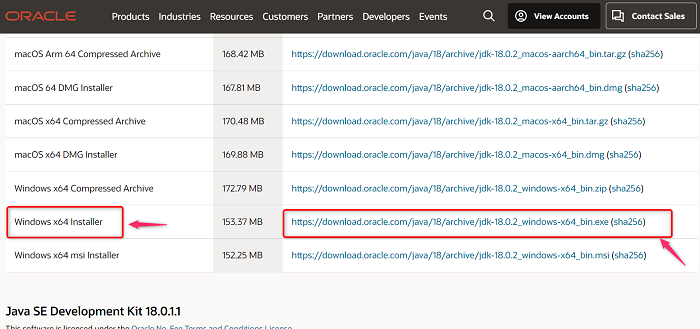
- First, to get the latest version of Java JDK, open the Java JDK 18 download page
- Now, in the Product/File Description go to the Windows x64 Installer
- And click on the Download link associated with Windows x64 Installer
- Check the box for I reviewed and accept the Oracle Technology Network Licence Agreement for Oracle Java SE
- And click on the Download button at the bottom
- Once, the download is completed, click on File Explorer > Downloads
- Now, double-click on the downloaded file of Java JDK (version may differ) to open it
- Click Yes on the UAC (User Account Control) prompt that pop up
- Click on the Next button
- You can click on Change to select an alternative folder to install Java SE or click on Next to continue with the default location file
- The installation is running, wait for the complete
Once done, you have completed half of the process, i.e., download and install JDK in Windows 11/10. However, you still have to set up a path variable for it. So, follow the next steps to do it.
3] Set up a Path in Environment Variable

In the above steps, you have checked your system and downloaded java JDK for your OS. You need to set up a path in Environment Variable to get things up and running. So, follow the below steps to perform this task.
- Press the Window key to open the Search menu
- Now, type View advanced system settings and open the first result
- On the System Properties page, go to the Advanced tab
- Then, click on the Environment Variables button
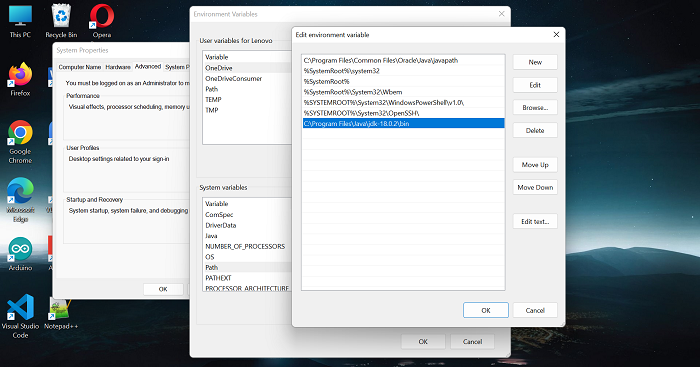
- Go to the System variable section, select the path variable and click on the Edit button
- Next, click on the New button on the right
- Copy the below JDK bin folder path and past it over here (For JDK version 18)
C:\Program Files\Java\jdk-18.0.2\bin
- It may differ on your computer if you have changed the location earlier during the installation process, so make sure to verify it once
- Click the OK button after past the bin folder path
- Again go to the Environment Variable page and click on the New button in the System variables
- Now, on the New System Variable page set the Variable name which you want
- Copy the below path and past it to the Variable value (For JDK version 18)
C:\Program Files\Java\jdk-18.0.2
- And click on OK
That’s it, Java JDK has been installed on your computer now you can start working on it right away.
Also read: How to set Java_HOME in Windows
4] Check for JDK installation
Many users have doubts and want to check whether the JDK is installed on their computer or not. If you also want to check, follow the below steps
- Click on the Windows icon and just type cmd in the search bar
- Open the Command Prompt and type the below command and hit Enter
Java -version
- If the Command Prompt lists the version number along with other relevant information, you have JDK installed on the computer
- But, if you receive a response that Java is not recognized as an internal or external command, operable program, or batch file, it means that you don’t have JDK installed yet. In this case, you need to uninstall JDK first and install it again by following the above steps
How do I update my JDK to the latest version?
Follow the below steps to update JDK to the latest version.
- Click on the Windows start button > Settings > Control Panel
- Now, in the Control panel list, click on the Java icon
- Select the Update tab then click the Update Now button
- Click Yes to allow changes
Also read: Understand and Manage Java settings in Windows
How do I check my version of Java?
Follow the below steps to check the version of Java JDK version.
- Open the Window search menu and type cmd
- Open the Command Prompt and type
java -versioncommand - After that, click on Enter button
- Now, you can see the JDK version installed on your computer
You can also use Taskbar search and search for About Java and click on the result to see the Java version.
Also read: Java Virtual Machine Launcher Error, Could not create the Java Virtual Machine.
Leave a Reply