Microsoft Windows allows you to create multiple copies of the same Printer, so that, you can share it among multiple users. In this post, we post we will see how you can install multiple copies of the same Printer on a Windows 11/10 computer.

Install multiple copies of same Printer with different settings
If you want to install multiple copies of the same Printer, you can follow the steps mentioned below.
- Find the Printer Port and Driver
- Create a copy of the Printer
- Use a copy of the Printer
- Use the second Printer
Let us talk about them in detail.
1] Find the Printer Port and Driver

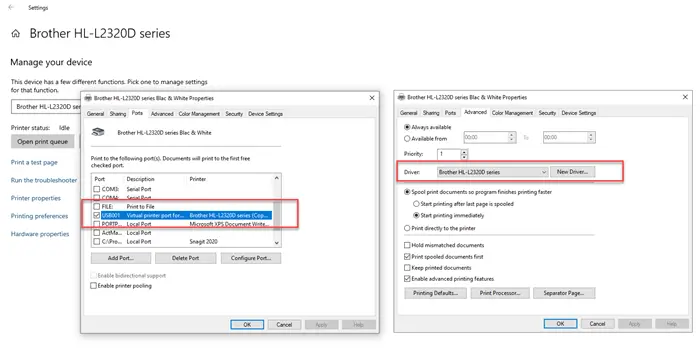
Open Windows Settings (Win + I), and then navigate to Bluetooth & devices > Printers & scanners (Windows 11) or Bluetooth > Printers and scanners (Windows 10). Select the Printer and click on the Manage button. It will open the Printer Management, and then click on Printer Properties.
In the Properties window, switch to the Ports. Note down the selected Port. Then switch to the Advanced section and note down the Driver listed in the dropdown. In my case, it is the USB001 Port and Brother HL-L2320D Series.
2] Create a copy of the Printer
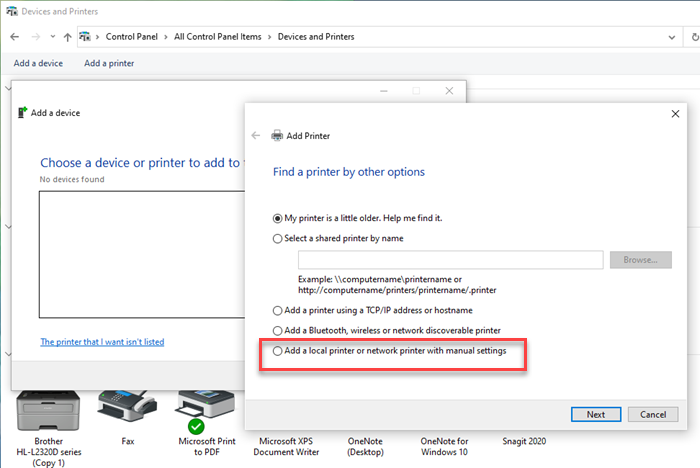
Open the Control Panel and navigate to Devices and Printers. Click on Add a Printer to open the installation wizard. Immediately click on “The printer that I want isn’t listed.” Select the radio button next to the option “Add a local printer or network with manual settings” and click on the Next button.

In the next screen, select the radio button that says “Use an existing port,” and then click Next to select a driver. Make sure to select the same manufacturer and printer driver we noted in the first section. Then choose the option “Use the Driver that is currently installed.” Click on the Next button.
Finally, add the Printer’s name on the next screen. Lastly, press the Finish button to complete the process.
3] Use a copy of the Printer
Now that we have copies of the Printer, it’s time to configure its features, which you can choose to share. In Windows 11/10, You don’t get to see multiple copies of the same Printer right up front. Instead, if you right-click on the listed Printer and select properties, you get to see all of them under Hardware Profile.
The further set of details will change based on what OEM has customized. Right-click on the Printer, select Printing preferences from the menu, and then select the copy of the Printer. Here you can customize resolution, paper size, advanced options offer you to select Printer functions, and so on.
4] Use the second Printer

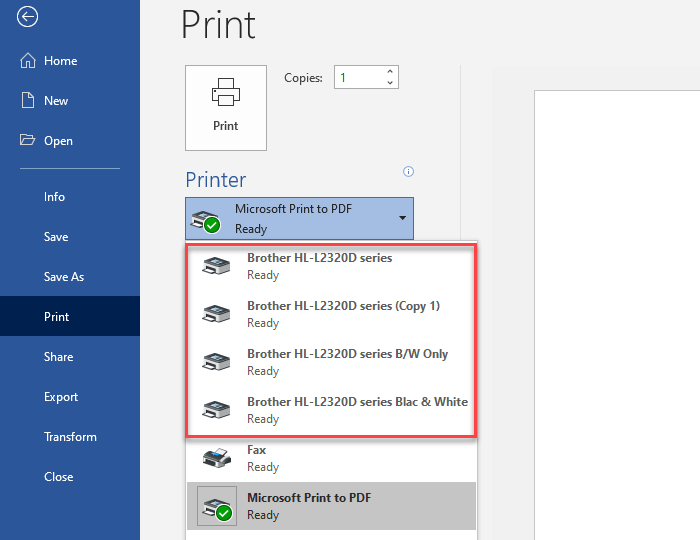
Open a text file or word file, and choose to print. The option where you can choose the Printer, you will have all the copies of printers you had created on Windows. Select it, and it will print in the same profile it was configured.
Creating a copy of the printer using this method comes with a lot of advantages. You can create a profile for a different type of printing; you can share profiles instead of the main Printer, and more.
I hope the post was easy to follow, and that you were able to install the same printer with different settings multiple times on Windows.
Related read: Can’t print documents, Printer Driver is unavailable.