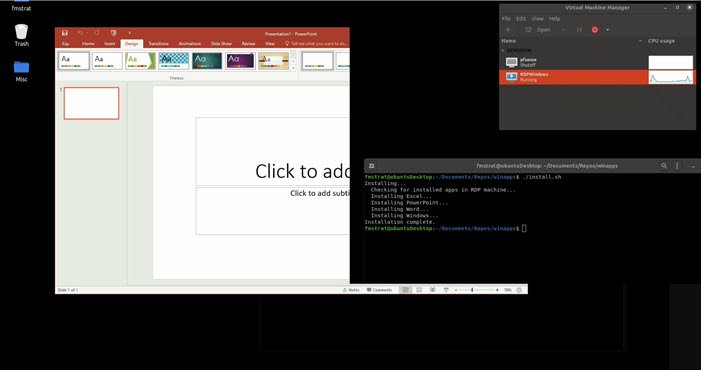
Linux has its own user base even if not by much, it’s there, and if you are using it, and always wanted to run Windows applications on it, then the recent application on Github — WinApps — brings a lot of promises. The software implements in such a way that Microsoft Office apps and Adobe Apps feel native, but do remember it is still virtualized. Along with it, the software also supports IE, Explorer, Powershell, Visual Studio, and Windows Full RDP.
How does WinApps work?
It’s a neat trick, and it’s well implemented. You will need to install Windows on a Virtual Machine in Linux and then install the supported applications like Office, Adobe, etc. That done, you will have to configure the username and password of the Windows user and connect through RDP. There are a few more steps, and when done that, you will be able to access the applications instead of going through the VM natively. Here is a quick demo

You can search for files and programs and then click to open it.
How to Install Office on Linux
First, download WinApps from Github.com. Having done that, follow these steps:
1] Creating WinApps configuration file
This configuration file will hold the RDP username and password to connect with Windows running on a virtual machine. Here is the location followed by details in the configuration file:
Location:
~/.config/winapps/winapps.config
Configuration File:
RDP_USER="MyWinUserName"
RDP_PASS="MyWinPassword"
#RDP_DOMAIN="MYDOMAIN"
#RDP_IP="192.168.123.111"
#RDP_SCALE=100
#MULTIMON="true"
#DEBUG="true"
You can change these as required by the configuration setup you have on the Linux.
2] Clone WinApps git repo and install KVM and RDP
sudo apt-get install -y freerdp2-x11
git clone https://github.com/Fmstrat/winapps.git
cd winapps
3] Setting up your Windows VM
If you already have an RDP server or a VM, you can skip to section 4, but if you don’t, I suggest you look at all the commands you can use there.
4] Configuring Windows VM
The next step involves merging a registry in the Windows VM so the applications can be opened. You will also have to rename the PC name to RDPWindows if you are using KVM to allow WinApps to detect the local IP.

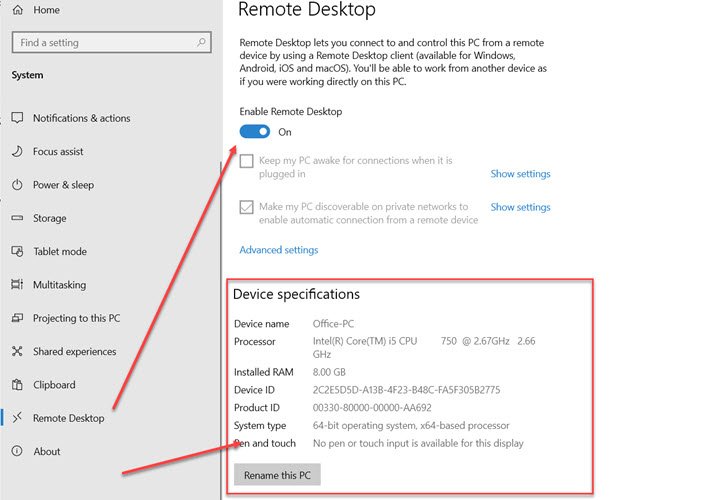
Press the Windows key, and type ABOUT in the search box. When the section shows up, click on it to open the About section. You can also go to Windows 10 Settings (Win + I) and then navigate to System > About. Click on the Rename this PC button to change the name.
In the System section, click on Remote Desktop, and then toggle on the Enable Remote Desktop option.
Lastly, merge kvm/RDPApps.reg into the registry to enable RDP Applications
5] Connect GNOME/KDE to your Windows VM with shortcuts and file associations
Lastly, check that FreeRDP can connect with using the command:
bin/winapps check
There will be output from FreeRDP, followed by a prompt that you need to accept a certificate to add to a trusted source. Next, you should see a Windows Explorer window. This confirms that the connection is made. Close and cancel the FreeRDP output

6] Run the installer
Then the final step is to run the installer:
$ ./installer.sh --user
Removing any old configurations...
Installing...
  Checking for installed apps in RDP machine (this may take a while)... Finished.
  Configuring Excel... Finished.
  Configuring PowerPoint... Finished.
  Configuring Word... Finished.
  Configuring Windows... Finished.
Installation complete.
Currently, the following apps are supported:
- Adobe Acrobat Pro
- Adobe After Effects
- Adobe Audition
- Adobe Bridge
- Adobe Creative Cloud
- Adobe Illustrator
- Adobe InDesign
- Adobe Lightroom
- Adobe Photoshop
- Adobe Premiere Pro
- Command Prompt
- Windows Explorer
- Internet Explorer
- Microsoft Access
- Microsoft Excel
- Microsoft Word
- Microsoft OneNote
- Microsoft Outlook
- Microsoft PowerPoint
- Microsoft Project
- Microsoft Publisher
- Microsoft
- Powershell
- Visual Studio
- Windows OS.
Is this new? It doesn’t feel like, but the implementation is better. Also, it is very different from WSL. Since it is done through VM, there are going to be overheads and will consume extra resources. That is something you will have to keep in mind. So unless you want something like this, you are better off with a VirtualBox’s Seamless Mode or VMware’s Unity Mode.
Leave a Reply