Vagrant is a powerful tool for managing virtualized development environments, and it works seamlessly with Hyper-V on Windows 11/10. The combination of Hyper-V and Vagrant allows users to create and manage virtual machines efficiently without relying on third-party software. This guide will show you how to install Vagrant on Hyper-V on Windows 11/10.
How to install Vagrant on Hyper-V in Windows 11/10
Execute the steps mentioned below to install Vagrant on Hyper-V in Windows 11/10.
- Enable Hyper-V and SMB
- Install Vagrant’s executable file
- Configure Vagrant
Let’s get started with the guide.
1] Enable Hyper-V and SMB

Before installing Vagrant, the first step is to ensure that Hyper-V and SBM are enabled on the Windows system. SBM enables file sharing between the host and Virtual Machines. Follow the steps mentioned below to do the same.
- Go to the Search bar, search and open Control Panel, and then click on Programs and Features.
- Click on the Turn Windows Features On or Off option from the left side of the screen, and then try to find Hyper-V once the Windows Features window appears on the screen.
- Expand Hyper-V, tick both the boxes of Hyper-V Management Tools and Hyper-V platform, and hit the OK button.
- Next, look for SBM 1.0/ CIFS File Sharing Support, expand it, and check all three boxes: SMB 1.0/CIFS Automatic Removal, SMB 1.0/CIFS Client, and SMB 1.0/CIFS Server, and click the OK button.
- Lastly, hit the Restart Now button to reboot the PC to complete the installation.
Alternatively, users can also enable Hyper-V and SMB by running the following commands in elevated PowerShell:
Enable-WindowsOptionalFeature -Online -FeatureName Microsoft-Hyper-V -All
Enable-WindowsOptionalFeature -Online -FeatureName "SMB1Protocol" -All
Restart the PC when prompted.
The next step is installing Vagrant’s executable files.
2] Install Vagrant’s executable files

Next, we have to install Vagrant’s executable files after enabling Hyper-V and SBM. The steps are as follows:
- Navigate to the Vagrant official website (developer.hashicorp.com), and download the Vagrant Installer for Windows.
- Once downloaded, navigate to the location where it is downloaded and double-click on it to start the installation process.
- Click on More info when the message window appears, followed by clicking the Run Anyway button.
- Hit the Next button twice, select a different location, or leave it as it is, click Next, and then select the Install button.
- Wait for the process to complete, and then click the Finish button.
- To verify that Vagrant is installed properly, run the following command:
vagrant –version
Restart the device to apply the changes.
3] Configure Vagrant

To begin configuring Vagrant, we must set up a workspace and define the parameters. These steps involve creating a Vagrantfile, which acts as the blueprint for the development setup. We will specify the base box, provider, and any additional settings.
By default, Vagrant uses VirtualBox as the provider; therefore, we need to specify Hyper-V to use it.
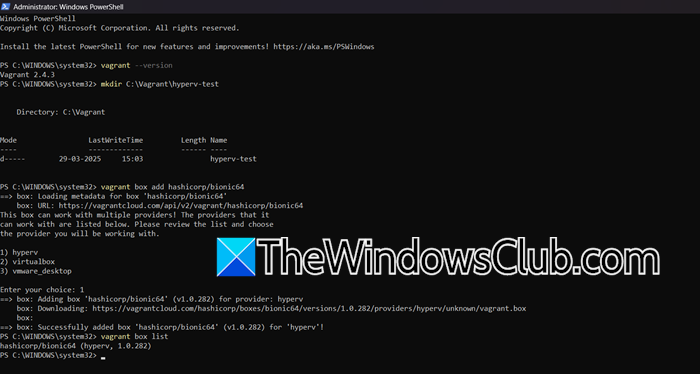
- To verify that Vagrant is installed properly, run the following command:
vagrant --version
- Open PowerShell with admin rights and run the following command to create a new project file for the vagrant setup:
mkdir C:\Vagrant\hyperv-test
- Next, run the commands respectively to initialize a Vagrant environment with a compatible box and confirm that the download is successful.
vagrant box add hashicorp/bionic64
vagrant box list
- Once the download is complete, go to the folder where you want to install the Vagrant file and run the following command to initialize the Vagrant box:
vagrant init hashicorp/bionic64
- Now, we can start the Virtual Machine in the project folder by running the following command:
vagrant up --provider hyperv
Note: The first boot might take some time.
- Once the VM is running, use the following command to connect:
vagrant ssh
Launch Hyper-V Manager, and the VM will be present under the ‘Virtual Machines’ section. This is the complete guide to installing Vagrant on Hyper-V in Windows 11.
Read: How to enable Hyper-V in Windows
What is better, Hyper-V or VMware?
The answer depends mainly on the users’ specific needs. Included with Windows, Hyper-V is a cost-effective solution that integrates well with Microsoft environments. Although VMware requires separate licensing, it offers robust features, flexibility, and high performance, especially for enterprise-grade virtualization. Hyper-V is ideal for budget-conscious users or those in the Microsoft environment, whereas VMware excels in multi OS environments or complex infrastructure needs. Therefore, the better choice depends on scalability, features, and compatibility requirements.
Read: How to install Linux Ubuntu on Hyper-V in Windows
Is Docker better than Vagrant?
Docker and Vagrant serve different purposes, so the choice depends on the user’s needs. Docker specializes in lightweight containerization by isolating apps with shared OS resources, making it a great option for scaling and deploying apps quickly. On the other hand, Vgarant excels at creating consistent development environments, often through virtual machines. Therefore, the choice depends on the project’s needs, as sometimes they even work well together.
Also Read: Install macOS in Hyper-V on Windows.