When Windows 10 launched, it included a smart system called Microsoft Fluent Design System. Obviously, it was the first wave with promises to improve upon it with simultaneous updates. Of all the smart features, conscious controls are among the most prominent. They help recognize movements across the system and try to judge the user’s intent so that the controls adapt to the environment and respond accordingly.
One of the conscious controls is the conscious scrollbars. They appear when the user scrolls the mouse to the exact location of the scrollbar, thus giving the system the impression that the user wants to use it. Perhaps Microsoft’s intention while designing such a structure is to avoid any distractions for the user while working. However, the company’s noble intentions apart, many users weren’t happy with the changes. Two reasons were that most presumed they actually lost the scrollbar forever when they didn’t find it initially and secondly that the response of the scrollbars re-appearing was slow.
Keep Scrollbars always visible in Windows 10
With the Windows Update v1803 in April 2018, Microsoft acknowledged the feedback and made it optional for those who wanted to fix the scrollbar at its place.
To access this setting, you have to click on the Start button and then the gear-like symbol to open the Settings app.
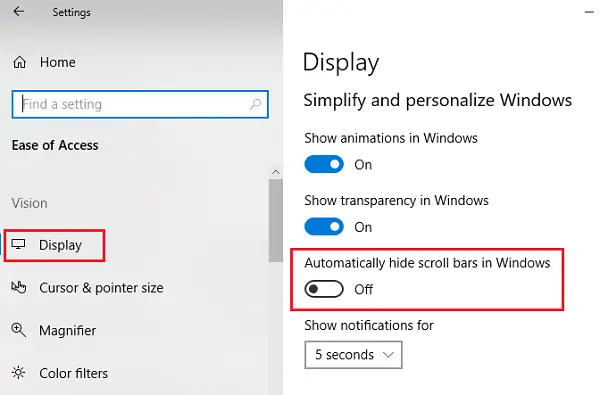
Next, choose Ease of Access from the options.
Among the tabs on the left-hand side, select Display.
Under “Simplify and personalize Windows,” find the Automatically hide scrollbar in Windows toggle switch and switch it to Off.

Close the Settings app.
Now, the scrollbars will be visible with whatever app we open on the system going forward.
Always show Scrollbars in Windows 11

To make Windows 11 always show the scrollbars, do the following:
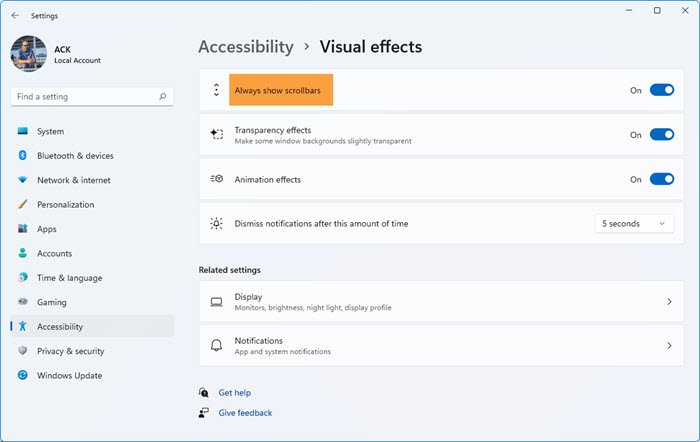
- Open Windows 11 Settings
- Click Accessibility settings
- Click open Visual Effects
- Here turn on the switch against Always show scrollbars
Windows 11 will now keep Scrollbars always visible.
You can enable Always show scrollbars in Windows 11/10 using Registry Editor as well. If you do not like to use the Windows Settings method or want to apply this setting across all the user accounts, you can use the Registry Editor method instead of the Windows Settings panel. Before following the REGEDIT method, it is recommended to create a System Restore point or backup all Registry files to be on the safe side.
How to enable or disable Always show scrollbars using Registry
To enable or disable Always show scrollbars using Registry in Windows 11 and Windows 10, follow these steps:
- Press Win+R to open the Run prompt.
- Type regedit and hit the Enter button.
- Click the Yes button.
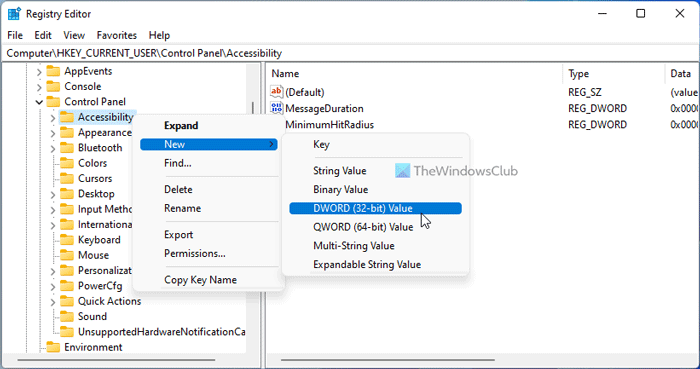
- Navigate to Accessibility in HKCU.
- Right-click on Accessibility > New > DWORD (32-bit) Value.
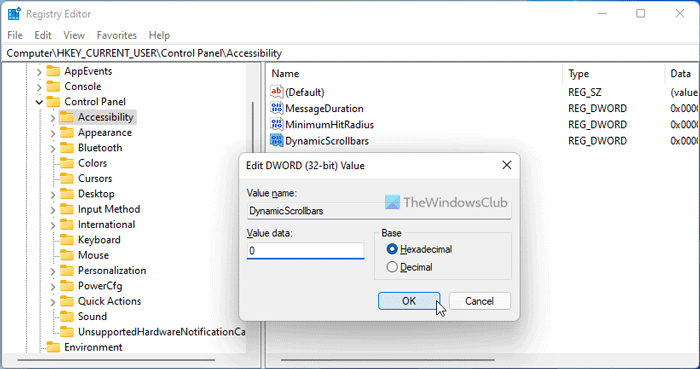
- Name it as DynamicScrollbars.
- Set the Value data as 0 to enable and 1 to disable.
- Click the OK button.
- Restart your computer.
To learn more about these steps, continue reading.
To get started, you need to open the Registry Editor on your PC. For that, press Win+R to display the Run prompt, type regedit, and hit the Enter button. If the UAC prompt appears, click the Yes button to open Registry Editor.
Once it is opened, navigate to the following path:
HKEY_CURRENT_USER\Control Panel\Accessibility
Here you need to create a REG_DWORD value. For that, right-click on the Accessibility key, select New > DWORD (32-bit) Value, and set the name as DynamicScrollbars.

By default, it comes with a Value data of 0. If you want to enable the Always show scrollbars setting, you need to keep the Value data as 0. However, if you want to disable the Always show scrollbars setting in Windows Settings, you need to set the Value data as 1. For that, double-click on the REG_DWORD value and set the Value data as 1.

Click the OK button to save the change and restart your computer.
How do I always show scrollbar?
To always show the scrollbar, you need to enable a setting in Windows Settings. For that, press Win+I to open Windows Settings and go to Accessibility > Visual effects. Then, Toggle the Always show scrollbars button to turn it on.
Related: How to change the Scrollbar width in Windows 11
How do I show the scrollbar in Windows 11?
To show the scrollbar in Windows 11, you can use the Registry Editor or Windows Settings. In the Registry Editor, navigate to this path: HKEY_CURRENT_USER\Control Panel\Accessibility and create a DWORD (32-bit) Value named DynamicScrollbars. To show the scrollbar, you need to keep the Value data as 0.
Leave a Reply