Teams and Outlook are two great tools of Microsoft. The former is known for hosting and scheduling meetings while the latter helps users to get email messages. However, some users reported that their status is not showing active or green. In this article, we are going to find out how to keep Teams and Outlook status active and green.
Keep Teams and Outlook status Active or Green
In order to keep Teams and Outlook status always active or green we can do the following things.
- Ensure that the PC is not going into Sleep mode
- Manually change the status: Teams and Outlook
- Host a private meeting
- Use Mouse Moving app
Let’s talk about these solutions in detail.
1] Ensure that the PC is not going into Sleep mode

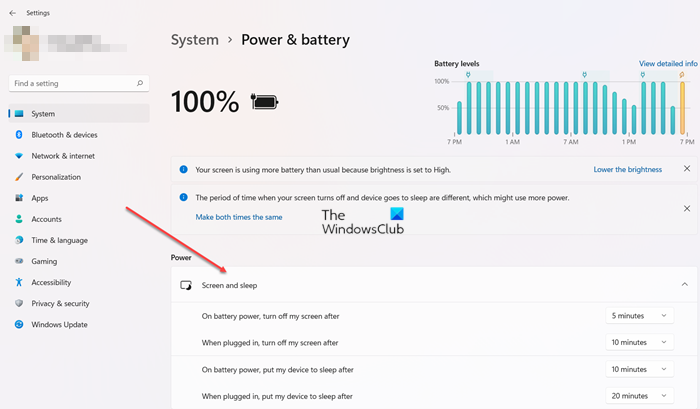
If you don’t want your social media to show inactivity, just don’t be inactive. Even though it is easier said than done, we can configure the sleep mode and increase the acceptable inactivity period. Follow the steps mentioned below to do the same.
- Click Win + I to open Settings and select System.
- Now, click on the Power and Battery option and go to the Power tab.
- Open the drop-down menu for Screen and Sleep, and change the timing.
After changing the timing, it would be easier for you to mana
2] Manually change the status of Teams and Outlook

In this solution, we are going to manually change the availability status as doing so keeps Teams and Outlook status green and other users will see us as available even if we are not actively working on the apps.
Follow the steps prescribed below to manually change the status:
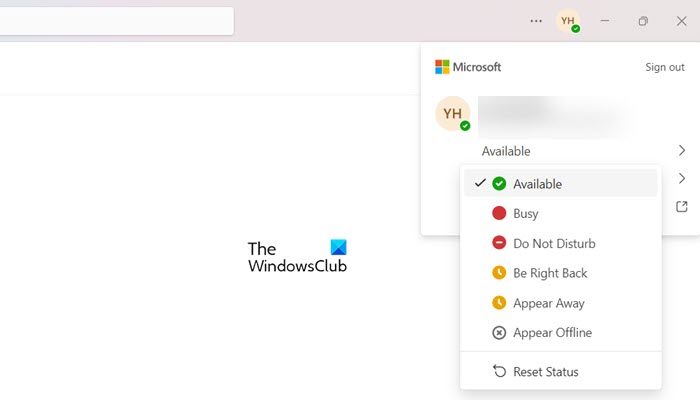
How to make your Microsoft Teams status always Available
- Launch the Microsoft Teams app, and from the top-right corner of the screen, click on the Profile icon.
- In the Availability status, select the Available option.
- Now, click on the Duration option, and set the duration during which you’ll appear active to other users.
How to make your Outlook status always Available
- Launch Outlook, and then click on the File tab.
- Click on Options and then on People.
- Now, tick the box next to the ‘Display online status next to the name’ option.
Every time a message is received, a status update will pop up.
3] Host a private meeting
Hosting a private meeting on Teams and Outlook allow users to show their availability status as active by pretending to host a fake meeting and be in it.
TEAMS
Launch Teams, click on the Calendar option, and select the New Meeting button. Add the information and join the meeting.
OUTLOOK
For Outlook, launch the app and then go to the Calendar view. Select the Meet Now button, add the info for the meeting, and click on the Start the call button. Doing so allows us to pose as active users on the app.
4] Use Mouse Moving App
Even though this is not recommended, you can use an app such as Wiggler to automate the movement of the mouse. This will ensure that your computer doesn’t sleep and your status always show active. However, one big downside of this tool is that it consumes a lot of batteries. Just think about it, a tool that keeps your mouse moving by running in the background and doesn’t allow your monitor to sleep, do the maths yourself. If you want, go to apps.microsoft.com and download Wiggler.
How do I get Microsoft Teams to show the status in Outlook?
Getting Outlook to show Microsoft Teams’ status is pretty simple, and if you are wondering the same thing, follow the steps mentioned to do the same:
- Launch Team, go to its upper right corner, and click on the Ellipsis next to the profile.
- Now, select the Settings icon, and go to the General tab.
- Tick the box next to the ‘Register Teams as the chat app for Office’.
And that’s it. This enables us to see Microsoft Teams’ status in Outlook.
Read: How to clear Microsoft Teams Cache on Windows 11/10
How do I show Microsoft Teams’ status as always available?
Teams offer various privacy settings and one of them is to set the availability status. We can change our status options and set it as per our choice, and to do so, go to the top right corner, and click on the profile picture. Now, select the status indicator, and select one of the following options: Available, Busy, Do not disturb, and so on.
Leave a Reply