On Windows 11/10, you have the ability to customize your Start menu. The customizations come very easily and variedly, helping you design the layout most suitable for you. If you are someone who doesn’t like to have his work setup played around with, you can lock the items and layout of your Start Menu so that no other user can change it. In this article, we will be explaining exactly that. Today, we’ll show you how you can lock the layout of your Start Menu.
Let me talk a bit about what these customizations may actually look like first. You can unpin the default tiles on your Start Menu if you don’t use them often enough or pin the ones that you do. You can also resize and change their positions to suit your preferences.
How to lock the Start Menu layout in Windows 11/10
Windows allows users to lock the Start Menu layout so none of these customizations can take effect. The Start Menu’s tiles will simply be unresponsive to any actions that one may take to resize or pin/unpin a tile. The options to unpin a tile will vanish. This change can be implemented via the Registry Editor or Group Policy Editor.
Read: How to Import, Export Start Menu layout in Windows using PowerShell.
Using Group Policy Editor

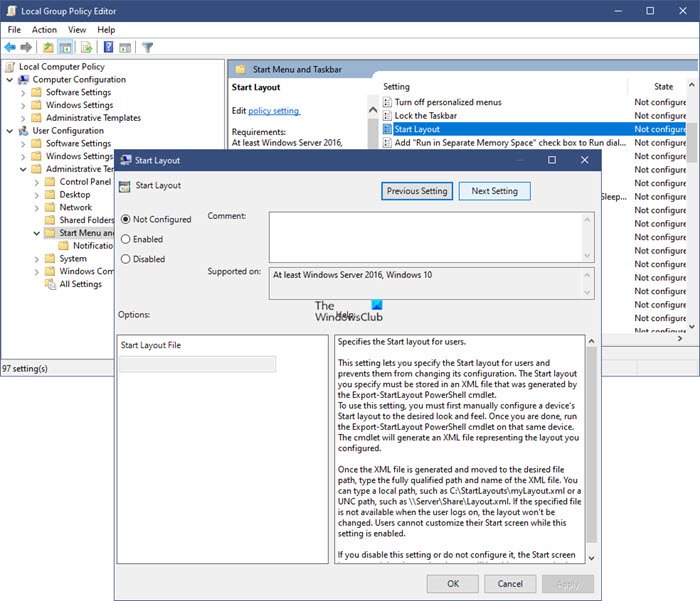
To lock the Windows Start Menu layout using the Group Policy Editor:
- Open Group Policy Editor
- Expand User Configuration
- Select Task Menu and Taskbar
- On the right side, double-click on Stary Layout
- Select Enabled
- Upload the XML file
- Click Apply and exit.
This setting lets you specify the Start layout for users and prevents them from changing its configuration. The Start layout you specify must be stored in an XML file that was generated by the Export-StartLayout PowerShell cmdlet. To use this setting, you must first manually configure a device’s Start layout to the desired look and feel. Once you are done, run the Export-StartLayout PowerShell cmdlet on that same device. The cmdlet will generate an XML file representing the layout you configured.
Once the XML file is generated and moved to the desired file path, type the fully qualified path and name of the XML file. You can type a local path, such as C:\StartLayouts\myLayout.xml or a UNC path, such as \\Server\Share\Layout.xml. If the specified file is not available when the user logs on, the layout won’t be changed. Users cannot customize their Start screen while this setting is enabled.
If you disable this setting or do not configure it, the Start screen layout won’t be changed and users will be able to customize it.
That’s it.
Read: How to customize Windows Start layout by replacing the .xml file.
Using Registry Editor
Here are the steps you need to lock the Windows Start Menu layout using the Registry Editor:
- Open the Registry Editor via the Run command
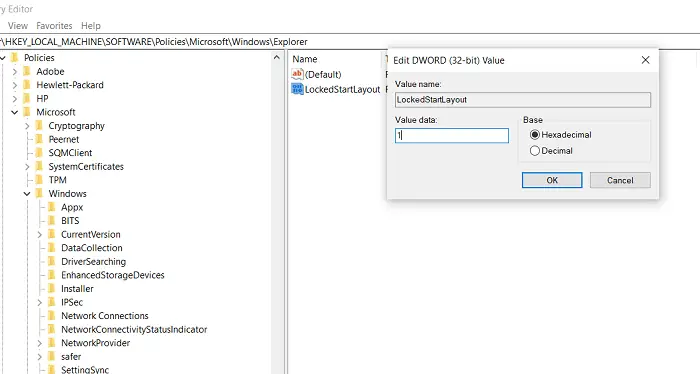
- Visit the Windows folder and create an Explorer key & DWORD value
- Change the Value Size from 0 to 1 to activate it
- Restart your PC to effect the change

As always, since we’re making changes to the Registry here, you’re advised to be very careful and back up your existing Registry in case something goes wrong. Here’s what you have to do:
Press the Windows and ‘R’ key together to open the Run command and in the blank field type ‘Regedit’. This will open the Registry editor. Now, navigate to the following key.
HKEY_CURRENT_USER\Software\Policies\Microsoft\Windows\Explorer
It is possible that your Registry may not have an Explorer key, in which case you can open the parent Windows key and create an Explorer key there. If you want to lock your start layout only for the current user account, copy and paste the following location
HKEY_CURRENT_USER\Software\Policies\Microsoft\Windows
But if you want the start menu to be locked for all user accounts, visit the following key:
HKEY_LOCAL_MACHINE\SOFTWARE\Policies\Microsoft\Windows\
Once you’re there, right-click anywhere on the blank space to open the context menu, select New and click to create a new Value. Name this value as Explorer. When you’re in the Explorer key, select New again and create a DWORD (32-bit) value. Name this value as LockedStartLayout.
Now, right-click on this D-WORD value and select Modify. Change the value data from 0 to 1 and save these changes.
To make these changes take effect you will have to either restart your device or log off and on to your device. Alternatively, you can restart the Explorer or the Start Menu too.
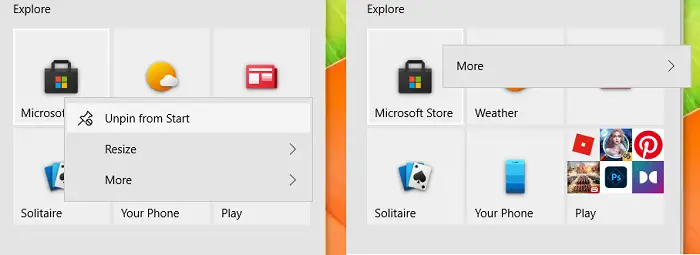
Once you do so, all the options to pin/unpin or move app tiles will be gone. The change is fairly strict since once implemented, you can’t make any modifications whatsoever. On the bright side, as you can see, it can be easily reverted to its default setting. All you have to do for that is change the value data back to 0 and restart the explorer.exe.
This is what your tiles will look like after you right-click on them, post creating and modifying the Lock Start Menu key.

We hope that this article was of help to you and that you are now able to lock your Start Menu as and when you want to.
Related: How to Backup, Restore, Reset Start Menu layout.