In this post, we will show you how to lower your GPU temperature on a Windows 11/10 computer. If GPU temperature rises a lot while using some GPU-intensive applications (some video editors) or games, then the solutions covered in this post will be helpful. If you have some doubts, first, you should check your GPU temperature while playing a game or working with a GPU-intensive application. If you find that the temperature is beyond the normal range always, then you need to take the necessary actions.

How much GPU temp is OK?
While your GPU temperature may range between 65°C and 85°C normally, it still depends on your graphics card. Depending on the GPU, a temperature around 90°C should also be fine. However, if the temperature goes beyond 100°C and remains increased until you are playing a game or using an application, then it is a matter of concern as it can do some serious damage to your graphics card or decrease the GPU lifespan.
Why is my PC GPU temp so high?
If the GPU airflow is obstructed and it cannot throw out the heat from the computer case, then it may raise the GPU temperature including the overall temperature of your computer. In addition, overclocked GPU and dried thermal paste could also be why your GPU temperature is so high.
How to lower your GPU temperature on a Windows computer
To lower GPU temperature and maintain good GPU temperature in your gaming Windows 11/10 PC, use the solutions added below:
- Clean the dust
- Use a case with better airflow
- Undervolt your graphics card
- Set Maximum Frame Rate cap
- Disable overclocking
- Change the thermal paste.
1] Clean the dust
This is a very simple solution but can be very helpful in lowering the temperature of your graphics card. You should clean the dust from the cabinet or case as well as from the graphics card. Dust can affect the fan speed of the GPU as well as airflow in the case, which in turn can increase the heat level.
Unscrew or remove the side panel or main cover of your computer case and use some compressed air can or spray to blow off the dust, a paintbrush, or a soft cloth for cleaning the GPU fans, other parts, and the case. Do this carefully. Check for other obstacles or blockages (if any) in the airflow and remove them.
2] Use a case with better airflow
Make sure you are using a computer case with better airflow that will be helpful to maintain the temperature. If you have a computer case with only one fan that isn’t sufficient, as the GPU won’t get enough airflow, you should consider adding more fans or installing a large fan instead (if possible). That will help maximize the airflow, which will ultimately help lower the temperature as much as possible inside the computer case and GPU.
3] Undervolt your graphics card
GPU undervolting is another effective solution that can help lower the GPU temperature. This process involves lowering the GPU’s operating voltage from factory or default settings to an optimal level while keeping the core clock speed or frequency unchanged. With low voltage, power consumption is reduced, GPU fans make less noise, and heat generation is also reduced, which will ultimately lower the GPU temperature.
4] Set Maximum Frame Rate cap
Limiting the peak frame rate can help keep your GPU cool as it will consume less power, generate less heat, and fans will be less noisy. If some games can run smoothly with 70 FPS (frame rates per second) or 80 FPS and you are using uncapped FPS or the frame rate limit is set to 100 or more, then you may be consuming more power than is required for a smoother game experience. So, you can set a maximum frame limit for playing games. Both NVIDIA and AMD graphics cards support the maximum frame rate limit. Let’s check how to do this for both graphics cards separately.
Set Maximum Frame Rate in NVIDIA graphics card

Here are the steps:
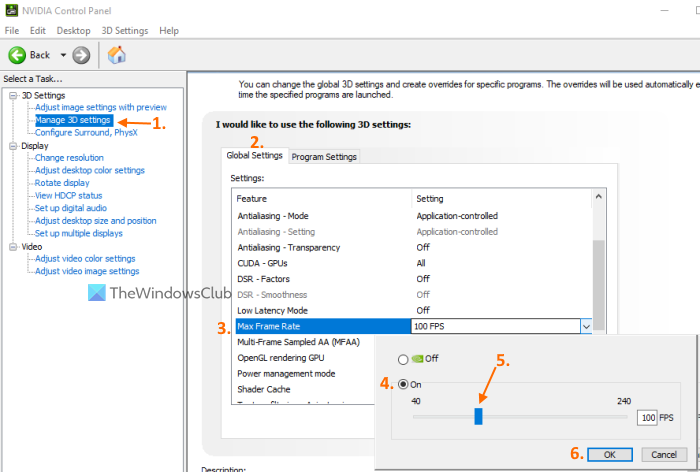
- Open the NVIDIA Control Panel window
- Expand the 3D Settings section
- Click on the Manage 3D settings option
- On the right-hand section in the Global settings tab, use the drop-down menu available for Max Frame Rate option. A box will pop up. If you want to apply the maximum frame rate limit for a specific game, then switch to the Program Settings tab, select the game using the drop-down menu, and then use the drop-down menu available for Max Frame Rate option. A pop-up will be there
- Use the On button in that pop-up
- Move the available slider to set the maximum frame rate
- Press the OK button.
If you face any trouble in playing the game(s), you can use the above steps to change the maximum frame rate or turn off this setting.
Use Frame Rate Target Control for AMD graphics card

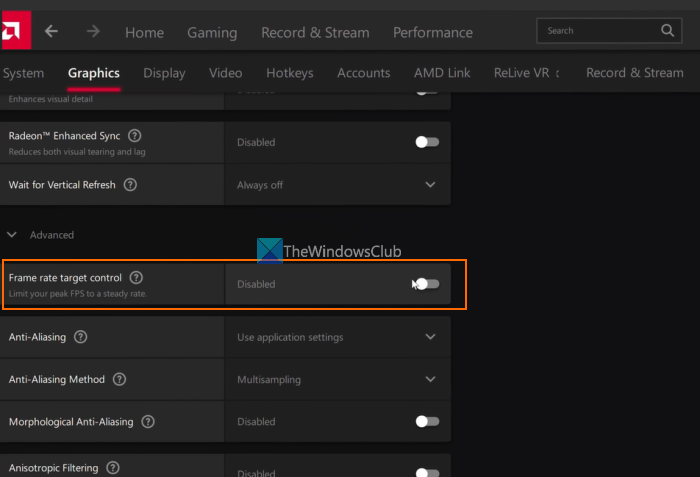
AMD Radeon users can also use a native Frame Rate Target Control feature of AMD Software: Adrenalin Edition to set the maximum frame rate. These are the steps:
- Download the AMD Radeon software from the official website (if you haven’t already) and install it
- Launch the software interface
- Click on the Settings icon available on the top right part
- Switch to the Graphics menu
- Select the Custom option from the right-hand section
- Expand the Advanced section
- Toggle the Frame rate target control button
- Now you will see a slider that you can move to set the peak frame rate
- Click on the Apply Changes button on the top right part.
In case the peak frame rate limit causes any issue, use the steps mentioned above to turn off the Frame rate target control option or change the peak frame rate.
Related: How to check GPU health on a Windows computer
5] Disable overclocking
If you have overclocked your GPU, then that can also be one of the main reasons why your GPU temperature is higher. Though GPU overclocking helps boost performance, it also raises the GPU temperature. Therefore, you should disable the GPU overclocking if it is causing any trouble and set it back to the factory settings. In addition to that, you can also underclock GPU by lowering the core clock speed of the GPU. After underclocking the GPU, you should check if everything works fine. If not, you should revert the changes and keep the core clock speed to default settings.
6] Change the thermal paste
A thermal paste (or thermal compound) in a GPU is a cooling agent placed between the GPU and the cooler for heat transfer. It helps cool the GPU and increase its overall lifespan. But if the thermal paste is dried out or its performance decreases over time, then it may result in GPU heating. So, you need to change the thermal paste.
While this solution will surely benefit you, you should use this option very carefully. Or else, it is better to head to an authorized service center for this. Do not do it by yourself if the graphics card is in warranty (as the warranty will be void) or if you have any doubts. Here are the steps:
- Remove the computer case and unscrew or detach the graphics card
- Place the graphics card on a surface
- Remove the GPU backplate (if available). Use a screwdriver and start removing all the screws. Not all GPUs have back plates on them though
- Now you can see the PCB (Printed Circuit Board) of the GPU. Unscrew the screws available on the PCB board
- Detach the fan cables and then carefully separate the PCB part with the GPU chip and cooler part
- You will see a silver-gray type substance over the GPU chip and cooler plate or cooler part. That is the thermal paste. Clean it properly. You can use cotton swabs, cotton cloth, etc.
- Use a good-quality thermal paste and apply it on the GPU part. Put it just a little so that it will cover the entire surface of the chip
- Now start the reassembly process. Plug back the fan cables
- Connect the PCB board with the cooler part of the GPU and put the screws back in their places
- Attach the back place of the GPU.
Finally, you can attach or connect the GPU to your computer.
That’s all! I hope this will help you.
How to maintain Good GPU temperature in your Gaming PC?
To maintain a good GPU temperature in your gaming PC, clean it regularly, ensure proper airflow, optimize fan speeds, reapply thermal paste, and undervolt your GPU. This post covers most of the suggestions in detail.
Read next: GPU keeps crashing or freezing in Windows PC.
Leave a Reply