Here is a guide for your to make a video presentation with audio narration on your Windows 11/10 PC. A video presentation is a multimedia presentation in which each presentation slide appears for a particular duration. Now, if you want to create a video presentation with recorded voiceover narration, you can refer to this detailed tutorial. In this article, we are going to discuss different ways to make a video presentation with audio narration on your Windows 11/10 PC. Let’s discuss the methods now.
How do I make a PowerPoint video with voice?
You can make a PowerPoint video with voice using the Add Audio/ Record Audio feature in Microsoft PowerPoint. Record your voice narration in the presentation and then save the video PowerPoint presentation in WMV or MP4 video formats. Also, there are some other third-party software that allows you to make PowerPoint video presentations with voice narration. We have shared the detailed procedure below that you can check out.
How to make a Video Presentation with Audio Narration in Windows 11/10
We will show you how to make a Video Presentation with Audio Narration using PowerPoint, ActivePresenter or WPS Office in Windows 11/10.
1] Create a video presentation with audio narration in Microsoft PowerPoint
You can use Microsoft PowerPoint to create video presentations with audio narration. In PowerPoint, you can record audio narration or even add an existing audio file to a presentation and then export the presentation to a video file with your audio. Let us check out how!
How to create a video presentation with audio narration in Microsoft PowerPoint:
These are the basic steps to make a video presentation with a voiceover or audio narration in Microsoft PowerPoint:
- Launch the Microsoft PowerPoint app.
- Create a new presentation or import an existing one.
- Select a slide to which you want to add a voiceover narration.
- Go to the Insert tab.
- Click the Audio > Media > Record Audio or Audio on My PC option.
- Record the audio narration or import it from an audio file.
- Customize various audio playback options.
- Export the presentation to a video file.
Now, let us discuss the above steps in detail.
Firstly, launch the Microsoft PowerPoint application on your PC. Then, open a PPT, PPTX, or any other supported presentation file or create a completely new presentation from scratch.
Now, select a slide to which you want to add or record audio narration and go to the Insert tab. From here, click on the Media > Audio > Record Audio option. If you have an audio narration saved in a local audio file, use the Audio > Audio on My PC option.
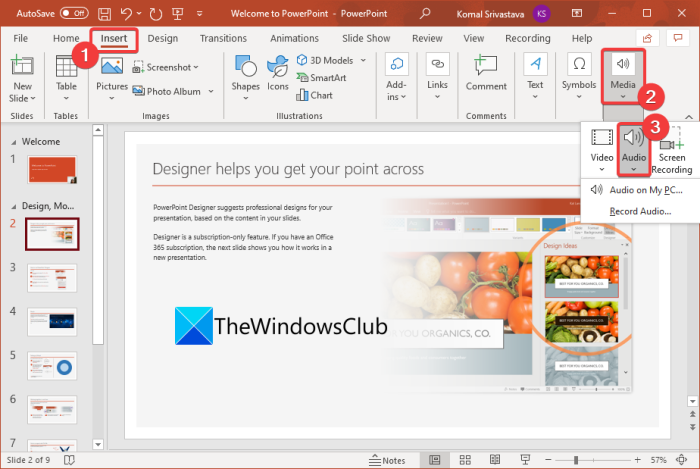
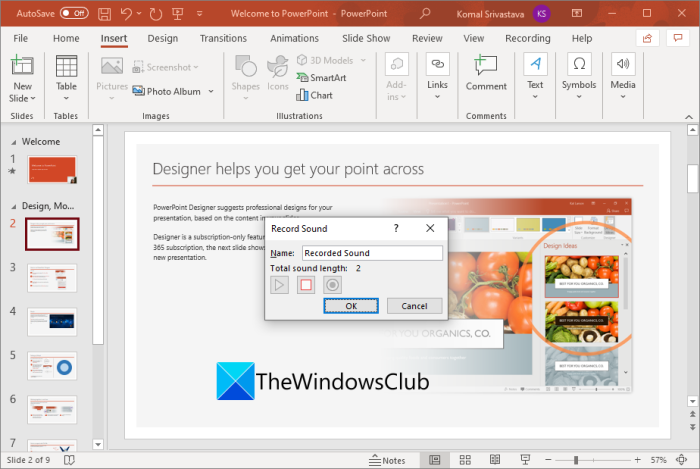
Next, record the audio using your mic; tap on the record button and when done, click the stop button and press the OK option. This will add an audio narration element to the slide.
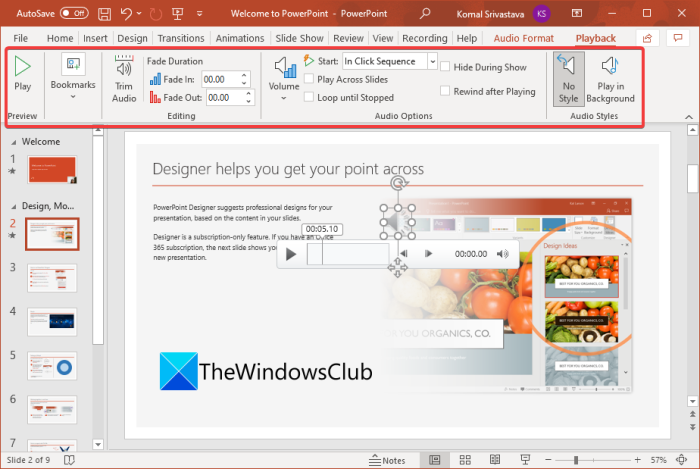
You can select the audio narration and then edit some audio options from the Playback tab. You can trim audio, enter the fade duration, customize the volume, make loop audio, select start event, and customize some more settings.
After that, you can record narration or add audio to all your slides in a presentation.
Now when you are done, you need to save the presentation in a video format. For that, you can go to the File menu and select the Export option. Then, click on the Create a Video option and select video quality. Also, make sure the Use Recorded Timings and Narration option is selected.
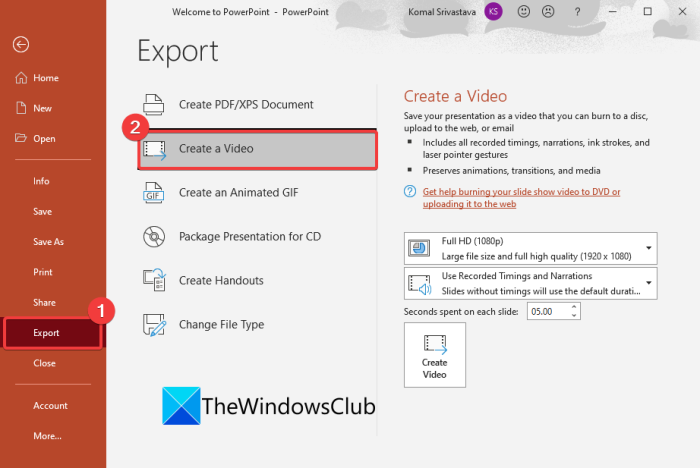
Finally, select an output file format from MP4 and WMV to save the video presentation.
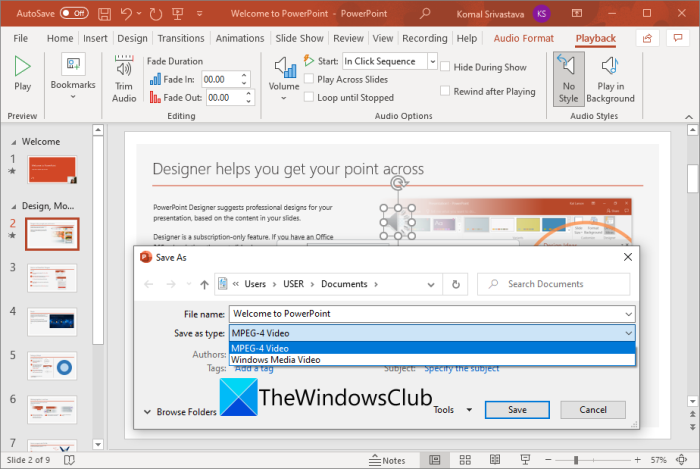
So, this is how you can generate video presentations with voice narration in Microsoft PowerPoint.
Read: How to use the Slide Master in PowerPoint.
2] Make a video presentation with audio narration in ActivePresenter
Another method to create a video presentation with audio narration is using free third-party software called ActivePresenter. ActivePresenter is primarily an eLearning authoring software using which you can create video tutorials, video presentations, record screen videos, and more. Using it, you can make a video presentation with a recorded voiceover narration on your Windows 11/10 PC. It provides a timeline editor for creating video presentations and tutorials. Let us check out how you can record narration in your presentation and export it to a video.
Here are the basic steps to create a video presentation with voice narration using ActivePresenter:
- Download and install ActivePresenter.
- Launch this software.
- Create a new project or import a PowerPoint file.
- Select a particular slide.
- From the timeline, click on the Record Narration button.
- Now, record your voice through the mic.
- Repeat steps (4) and (5) for all the other slides.
- Preview the presentation with audio narration.
- Export the video presentation from the Export tab.
Firstly, you need to download and install ActivePresenter and then launch the main GUI of this application.
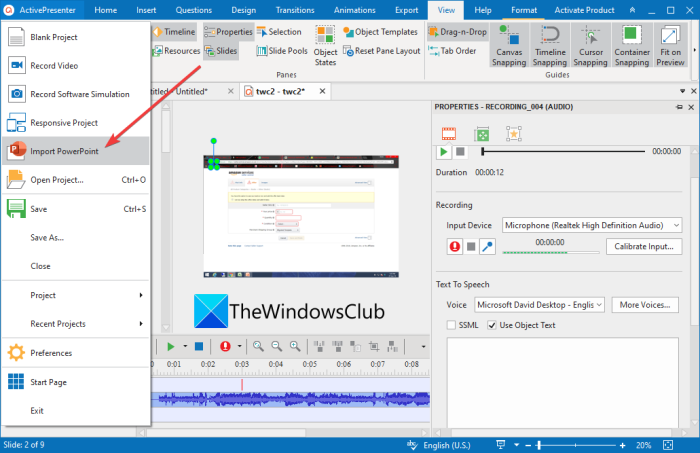
Now, you can start with a new blank project and make a completely new presentation from scratch. You can also import a PPTX presentation by using the Import PowerPoint option from the main menu.
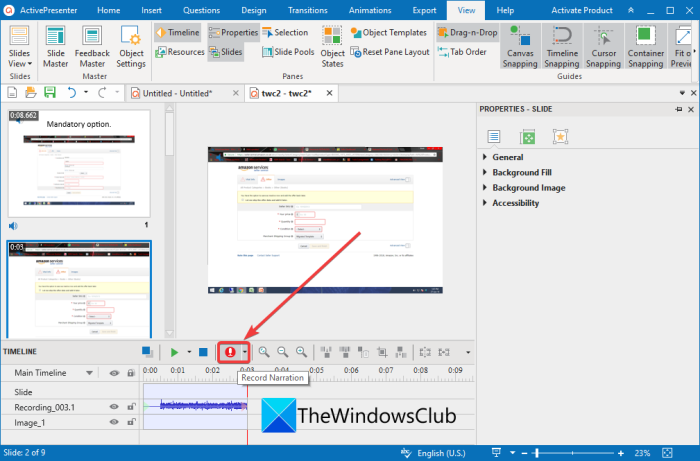
Next, select a slide in your presentation to which you want to add a voiceover narration. And, from the below timeline, click on the Record Narration button.
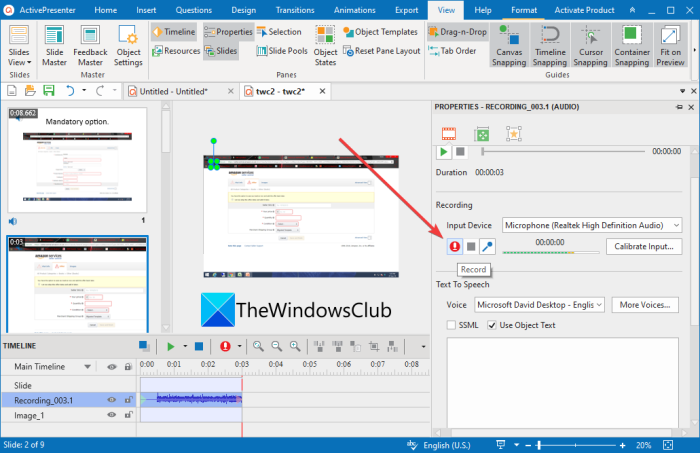
After that, from the Properties panel on the right-hand side, select the input device and then press the record button to start recording an audio narration.
It also provides a Text to Speech feature using which you can type text in the box and then click on the Generate button to add it to your presentation. So, you don’t need to narrate the slides yourself. You can just enter your text, convert it to speech, and then add it to the background of your presentation.
Record the audio narration for all slides in your presentation and then preview the video presentation from the main screen.
At last, you can export the video presentation by going to the Export tab.
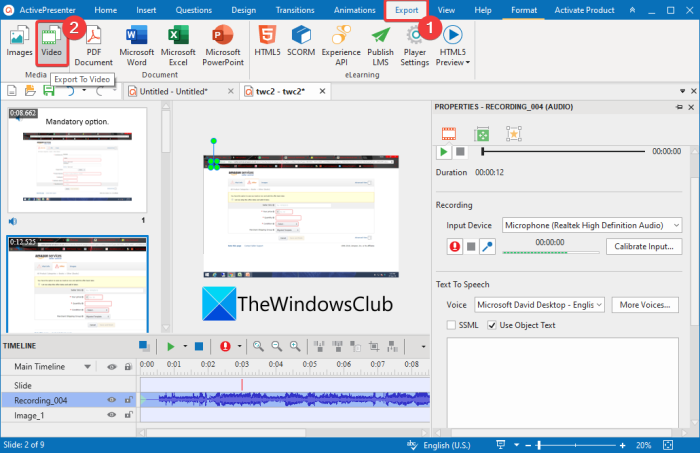
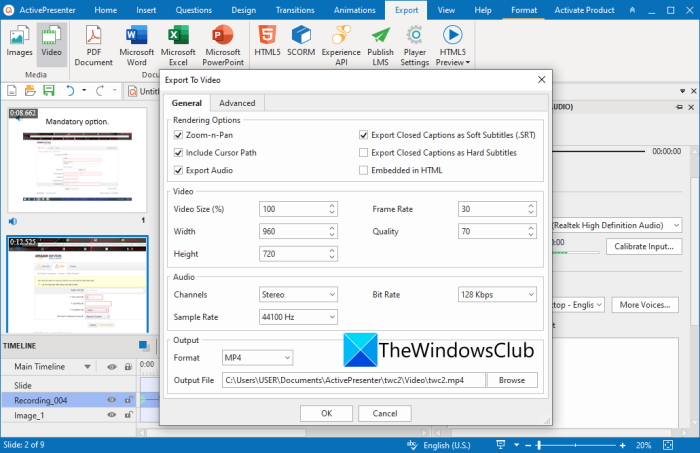
Click on the Video option and then set up output video configurations including output video format (MP4, AVI, WebM, WMV, MKV), video size, framerate, audio channels, zoom n pan, include cursor path, etc. Ensure that the Export Audio option is enabled under the Rendering Options.
After setting up all the output options, enter the output video file format and then press the OK button to start the video presentation creation process.
Apart from video presentations, it also lets you create PDF, Word, PowerPoint, HTML5, and some other formats.
ActivePresenter is one of the best video presentation and tutorial software that can be used for free only for non-commercial use. You can download it from atomisystems.com.
See: How to convert OpenDocument Presentation to Video in OpenOffice.
3] Create a video presentation with audio narration using WPS Office
You can also use this free office suite called WPS Office to generate video presentations with audio narration. It is a complete office package that comes with a word processor, spreadsheet maker, presentation designer, and a PDF editor. Using its presentation designer module, you can create regular as well as video presentations on your Windows 11/10 PC. It lets you add audio narration to a presentation from an existing audio file and then export the video presentation.
Let’s discuss the detailed procedure now.
How to make a video presentation with audio using WPS Office
Follow the below steps to make a video presentation with voiceover narration in WPS Office:
- Download and install WPS Office.
- Start this office app.
- Click on the Presentation option from the home screen.
- Import an existing presentation or make a fresh one.
- Choose a slide and go to the Insert tab.
- Press the Audio button and add audio or background music from a file.
- Customize the added audio from the Audio Tools tab.
- Save the presentation in a video file.
Firstly, you need to have WPS Office installed on your Windows 11/10 PC. Then, start this software to use it.
From the home screen, select the Presentation option and then open a presentation file or create a new one.
Now, select a presentation slide and then move to the Insert tab. Click on the Audio drop-down option and press the Insert Audio or Background Music option.
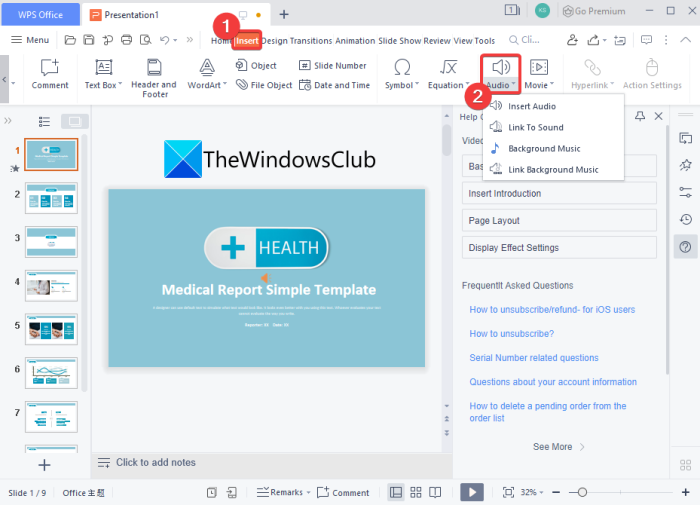
Browse and import an audio file in formats like MP3, M4A, WAV, AAC, WMA, and more. If you haven’t recorded narration, you can use the built-in Voice Recorder app or a free audio recorder software to record audio and then import it to your presentation in WPS Office.
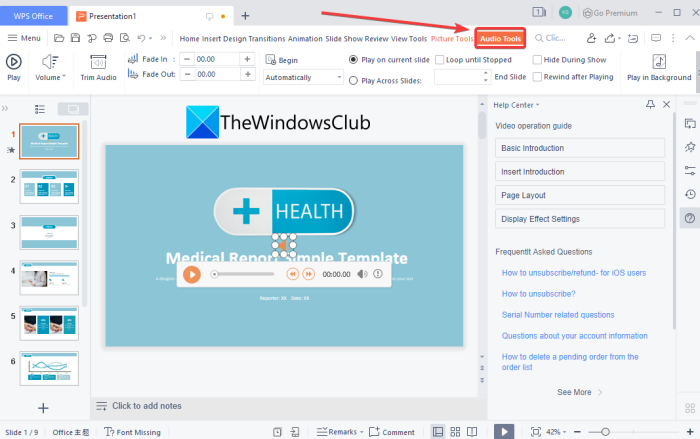
Next, select the added audio file and an Audio Tools tab will appear on the ribbon. Go to this tab and edit the audio file using options like Trim Audio, Volume, Fade-in/ Fade-out duration, Hide During Show, and more. You can also select the slides across which you want to play the added audio file.
Repeat the above steps for other slides as well.
When done, go to the three-bar Menu option and click on the Save As > Video Exporting option.
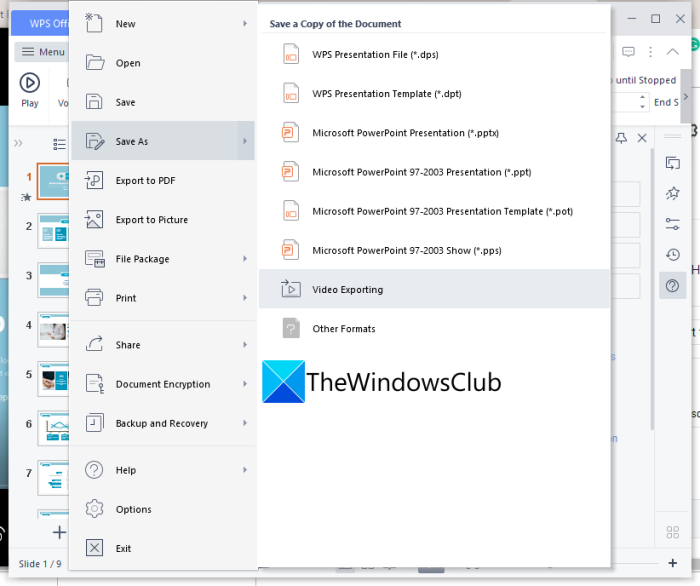
You will then be able to export the video presentation with audio narration in MPEG-2 Video (TS) format.
See: How to add YouTube videos to Microsoft PowerPoint presentations.
Can you record a presentation in Microsoft Teams?
Yes, you can record a presentation or meeting in Teams. It provides a Start Recording feature using which you can record your Teams meetings. Here is the full guide to record your presentations or meetings in Microsoft Teams.
That’s it!
Now read: Best free software to sync Audio and Video in Windows.