Since Windows 10, has changed dramatically. In Windows 11, like Windows 10, managing notifications has become easy. If you have moved from Windows 7 to Windows 11, you might not know how to manage notifications productively. That is why this article will teach you all the things about managing notifications in Windows 11 so that you do not waste any time.
How to manage Notifications in Windows 11
Managing notifications in Windows 11 is relatively straightforward if you know the game. The best thing about this section is that you can manage what you want to get and what to ignore. Even if you have a rough idea about the Notification Center in Windows 11, you can follow this guide. This guide will help you manage your notifications irrespective of the app. From setting priority to enabling Focus assist, you can learn every aspect of managing notifications in Windows 11 using this step-by-step tutorial.
How do I view notifications in Windows 11?
To get started, you must know how to open the notifications panel in Windows 11 and view all the notifications. It is quite easy, as mentioned above. Earlier, in Windows 10, there was an Action Center icon visible on the Taskbar. However, in Windows 11, there is no such thing. You need to click on the date and time to show the notification panel.
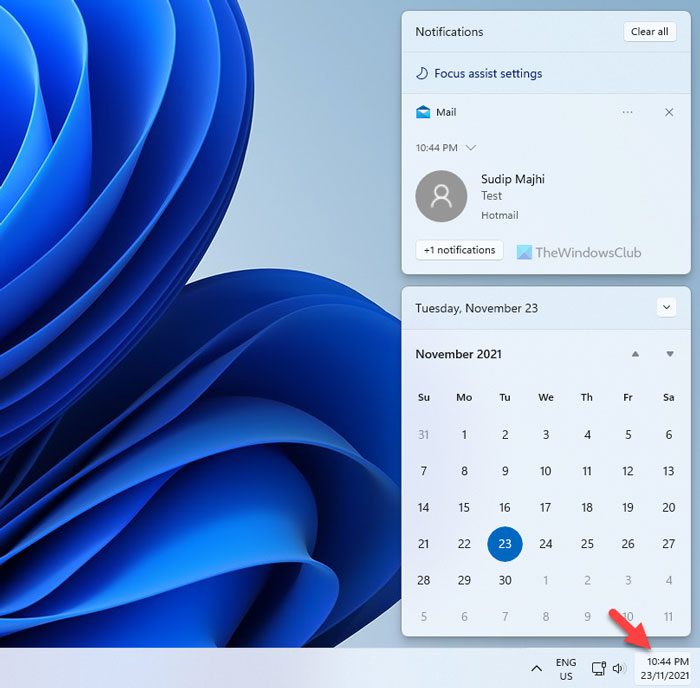
After that, you can manage everything as per your requirements.
How to enable or disable Notifications in Windows 11
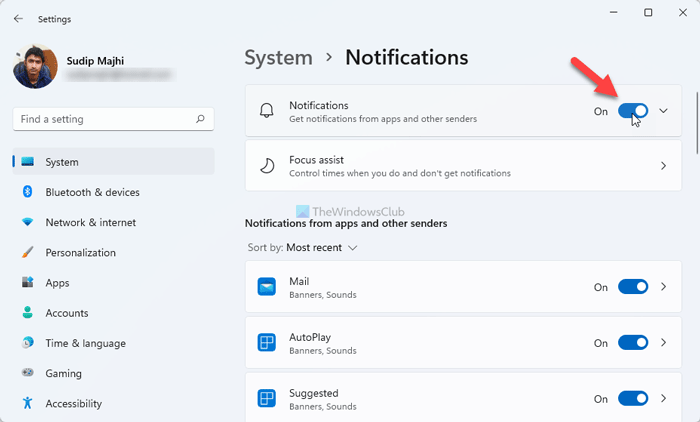
At times, you might not get notifications in Windows 11 due to various reasons. If so, the first thing you need to check is whether the notifications are enabled or not. If this setting is not turned on, you won’t get any notifications and vice versa.
To enable or disable notifications in Windows 11, do the following:
- Open Windows Settings on your computer.
- Go to System > Notifications.
- Toggle the Notifications button to turn it on.
After that, you can find notifications from apps and games. On the other hand, if you do not want to receive any notifications, you can toggle the same button to turn it off.
How to turn off Notifications from specific apps in Windows 11
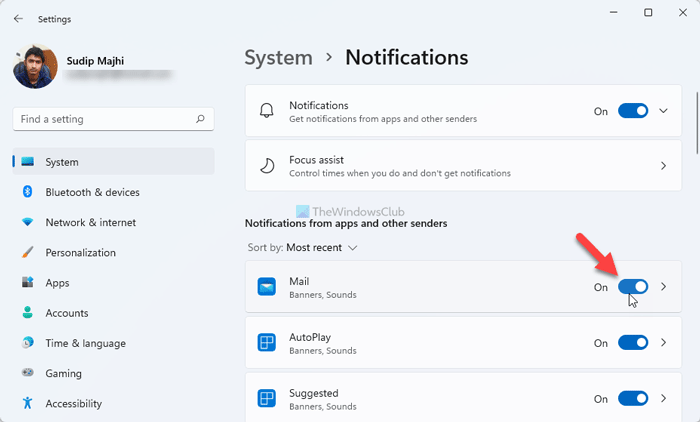
Many times, you install an app, and it starts showing notifications frequently for any reason. If the same thing happens with you and is distracting, you can disable the notifications from that particular app. Whether it is an email app, browser, or anything else, the settings apply to all of them.
To turn off notifications from specific apps in Windows 11, do the following:
- Press Win+I to open Windows Settings.
- Ensure that you are in the System tab.
- Click on the Notifications menu on the right side.
- Find out the app from the Notifications from apps and other senders section.
- Toggle the corresponding button to turn it off.
After that, you won’t get notifications from that particular app on your computer.
How to clear one or all Notifications in Windows 11
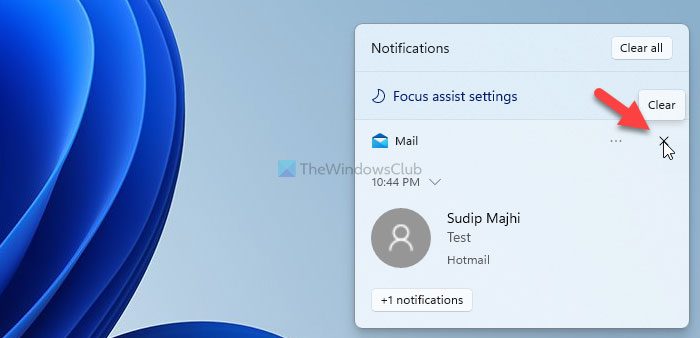
Let’s assume that you have got an email and you want to read it later. Therefore, it is better to clear that notification to make space for another one. As the space is pretty limited, you might often need to clear some old notifications to get new ones.
To clear one notification from the notifications center, follow these steps:
- Click on the date and time to open the notifications panel.
- Select the notification you want to clear.
- Click on the cross (X) sign.
However, if you want to clear all notifications at once, you need to click on the Clear all button visible in the top right corner.
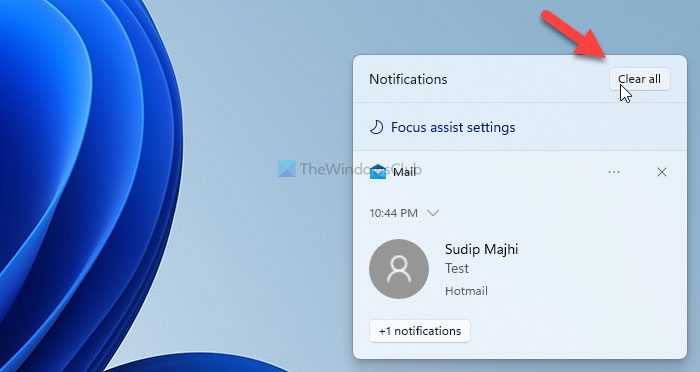
Then, all the notifications will be removed at once.
It is also possible to clear all notifications from one particular app. It is handy when you want to remove all the notifications from any particular app, such as Outlook, Google Chrome, etc.
For that, you need to open the notifications panel, select the notification from the desired app, click on the three-dotted icon, and select the Turn off all notifications for [app-name].
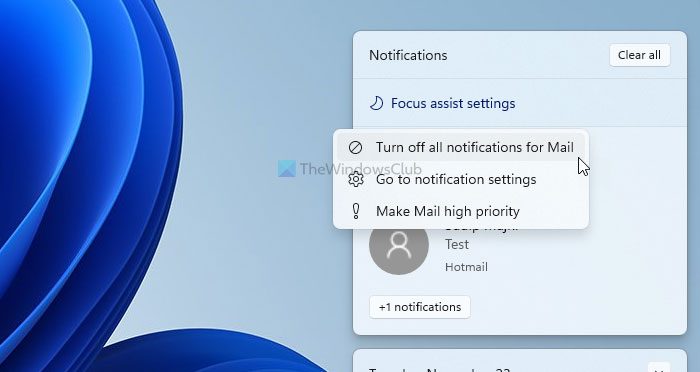
If you do so, it will clear all the notifications for the particular app.
Notifications settings for apps
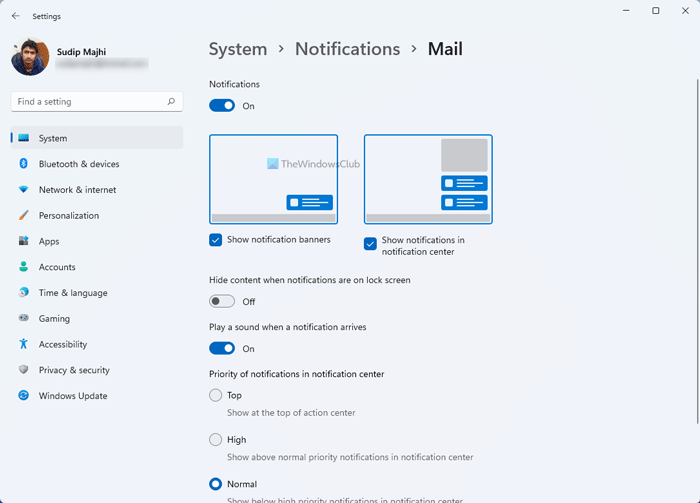
Windows 11 offers a lot of notification settings for apps. The best thing is that you can customize notifications for each app separately.
To manage notifications settings for apps in Windows 11, follow these steps:
At first, you need to open Windows Settings and go to System > Notifications. After that, choose an app to manage or customize notifications for. Here you can find the following setting:
- Show notification banners or Show notifications in the notification center. There are two types of notifications you can display in Windows 11, and you can choose one option between these two.
- You can play a sound when a notification arrives. If you want to play the notification sound, you need to toggle the Play a sound when a notification arrives.
- You can set priority for notifications. There are three tiers: Top, High, and Normal. You can choose one tier as per your requirements. Depending upon the setting, Windows 11 will show the notifications from the selected app in the notification center.
How to disable or hide notifications on the lock screen
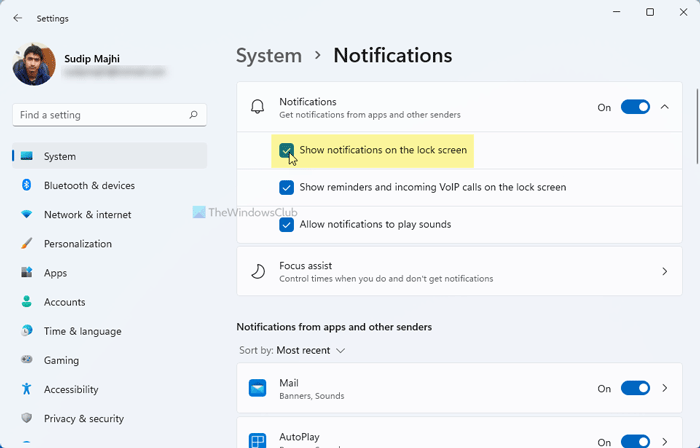
By default, Windows 11 displays notifications on the lock screen. At times, you might find it cluttered right after turning on your computer. If you want to hide such notifications from the lock screen to make the display uncluttered, here is how you can hide them:
- Press Win+I to open Windows Settings.
- Go to System > Notifications.
- Click on the arrow icon to expand this section.
- Tick the Show notifications on the lock screen checkbox to enable and remove it to disable.
After that, you cannot find any notifications on the lock screen on your Windows 11 computer.
Related: How to manage Notification settings in Windows 10
How to enable or disable notifications sound in Windows 11
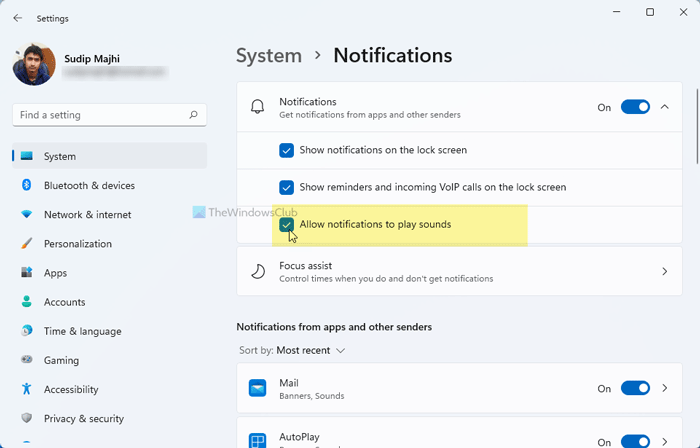
Whenever you receive a new email or any other notifications, Windows 11 plays a sound so that you can know about it. If this sound makes you distracted, you can disable notifications sound in Windows 11 using this guide:
- Open Windows Settings.
- Navigate to System > Notifications.
- Expand the Notifications section.
- Tick the Allow notifications to play sounds checkbox.
However, if you want to enable or disable notification sound for a particular app, you need to open an app from the Notifications from apps and other senders section and toggle the Play a sound when a notification arrives button to turn on or off.
Windows 11 will play the notifications sound depending upon your setting.
How to use Focus assist to manage notifications in Windows 11
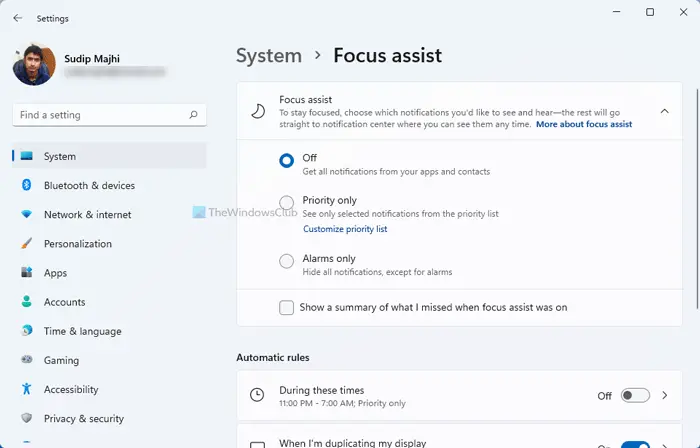
Focus assist is equally responsible for showing or hiding notifications on your computer. It disables all the notifications at once. You can choose between Priority only and Alarms only options.
If you choose the former option, you can select the priority list. However, if you select the latter option, you won’t get any notifications other than your alarms.
Set Automatic rules for notifications in Windows 11
Automatic rules are the last thing you need to check in order to manage notifications in Windows 11. You can enable or disable certain types of notifications at a predefined time using this setting. It is recommended to read this article to know more about Automatic rules of Focus assist in Windows 11.
Why can’t I turn off notifications on Windows 11?
If you cannot turn off notifications on Windows 11, you need to check the Windows Settings panel first. As it allows users to enable or disable notifications for specific apps, you need to check individual settings. Following that, it is suggested to check the Focus Assist settings as well.
That’s all! Hope this guide helped you manage notifications in Windows 11. However, if we missed anything, do comment below to let us know.
Related reads:
Leave a Reply