WebDAV is an HTTP extension, and you need it to manage your server remotely. In this guide, we are going to see what is WebDAV Drive and how to map WebDAV in Windows 10.
What is WebDAV?
WebDAV is an abbreviation of Web Distributed Authoring and Versioning. It is an HTTP extension and is used to give a platform to edit and manage a remote web server.
WebDAV is used for maintenance of properties about an author or modification date, namespace management, collections, and overwrite protection. It is a collaborative platform and helps the site owner to manage these things efficiently and without any hassle.
In this article, we will be configuring WebDAV Drive on your computer.
How to map WebDAV as a Network Drive in Windows 11/10

To map WebDAV in Windows 11/10, you can follow the given steps.
- Launch File Explorer by Win + E.
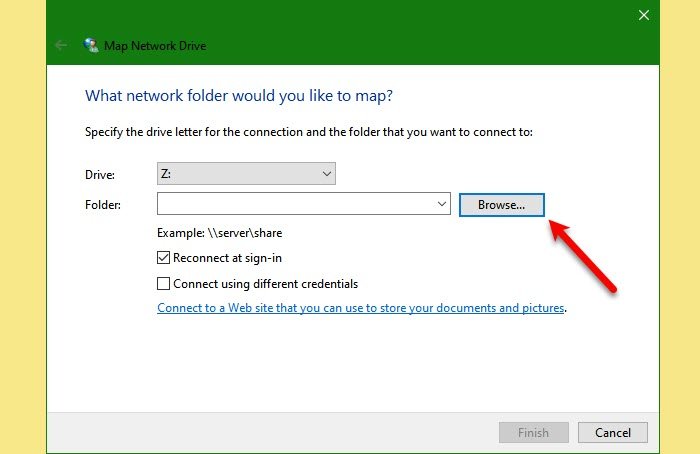
- Right-click on This PC and select Map network drive.
- Select the Drive letter you want.
- Click Browse and select the folder where you want to add or edit WebDAV files on your system.
- Tick the “Reconnect at sign-in” and “Connect using different credentials”
- Click on the link “Connect to a web site that you can use to store your documents and pictures.”
- Click Next > Choose a custom network location > Next.
- Finally, enter your credentials and follow the on-screen instructions.
This way you can easily configure WebDAV on your system. However, many users are seeing the “Network discovery is turned off” error but we will solve it hereinafter.
Related: How to map or add a Network Location or Map FTP Drive.
Fix Network discovery is turned off
If you are seeing the following error while configuring WebDAV on your computer, read this section to troubleshoot it.
Network discovery is turned off. Network computers and devices are not visible. Please turn on network discovery in Network and Sharing center.

Pretty clear from the error itself, you can resolve it by enabling “network discovery”. So, follow the given steps to fix the error.
- Launch Settings by Win + I.
- Click Network & Internet > Network and Sharing Center.
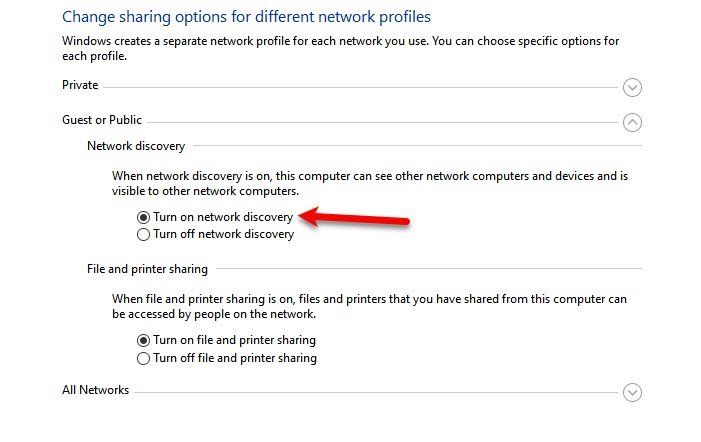
- Click “Change advanced sharing center”.
- Click on the drop-down menu of “Guest or Public” and select Turn on network discovery.
- And click Save changes.
This will fix the error for you.
Cannot connect to WebDAV Directory
If you can not connect to WebDAV Directory then the “Value data” of Basic Authentication Level is not set to 2. Which it should be, otherwise, you will see the error.
So, we will be altering a registry policy “BasicAuthLevel” and fix the error. So, launch Registry Editor from the Start Menu and navigate to the following location.
HKEY_LOCAL_MACHINE\SYSTEM\CurrentControlSet\Services\WebClient\Parameters
Double-click on BasicAuthLevel, set the Value data to 2, and click Ok.
Hopefully, now you know what is WebDAV and how you can map it in Windows 10.