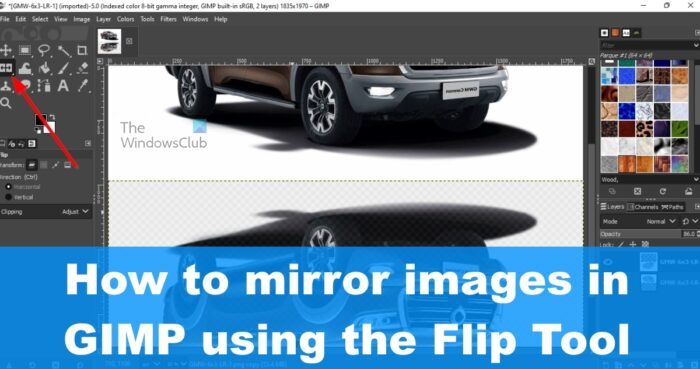
One of the most popular image editing tools is GIMP, and there are good reasons why this is the case. Yes, it is not as easy to use when compared to Photoshop, but we cannot complain about that because it’s free, and it relies on the open-source community for updates and new features. Now, one of the things you can do with GIMP is to mirror images by using the Flip Tool. It only takes a few clicks of the mouse, so ensure you have the right image in mind and then we can move forward with explaining what you need to do.

What is flip in GIMP?
OK, so the Flip Tool is designed to give users the ability to flip selections and layers horizontally or vertically with the mere click of the mouse. Now, whenever a selection is flipped, a new layer with a floating selection is created. Use this tool, then, to create reflections if you so wish.
How to mirror images using GIMP
To learn how to mirror images with the free image editing tool known as GIMP, please follow the steps below:
- Download and open GIMP
- Select Open in GIMP
- Click on Canvas Size
- Change canvas size
- Select Duplicate Layer
- Drag the image to the preferred position
- Reduce the Opacity
- Use the Flip Tool
- Export as JPG
1] Download and open GIMP
For those who have yet to download GIMP to their computers, we suggest visiting the official website at GIMP.org/Downloads. Bear in mind that GIMP can use up a lot of space on your computer, so if you plan on using it on a regular basis, then ensure you have a huge hard drive.
- Next, locate GIMP on the desktop.
- Double-click on it to open the app.
- You can also choose to open the GIMP image editor via the Start Menu if you so wish.
2] Select Open in GIMP

After you’ve fired up the popular image editor, it is now time to add the photo you want to mirror.
- Click on File.
- From there, go on ahead and select Open.
- Alternatively, you have the option to click on CTRL + O.
From the Open Image window, select your photo, then add it to the work area.
3] Click on Canvas Size

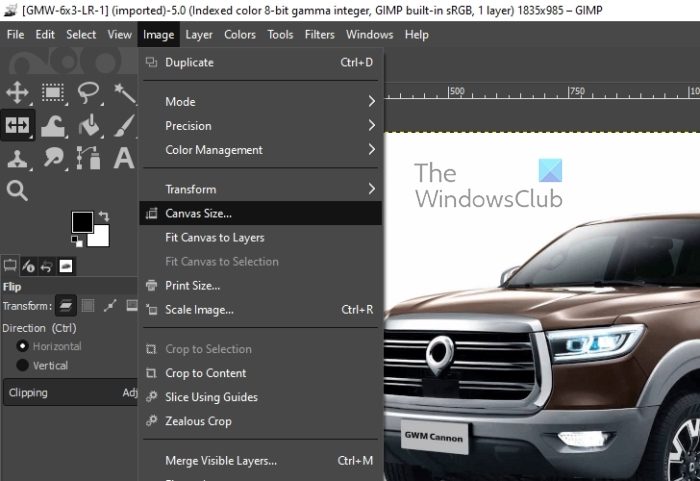
You are required to expand the height and width of the image’s canvas. To do this, you must launch the Canvas Size window.
- To do this, click on Image.
- After you’ve done that, please select Canvas Size from the context menu.
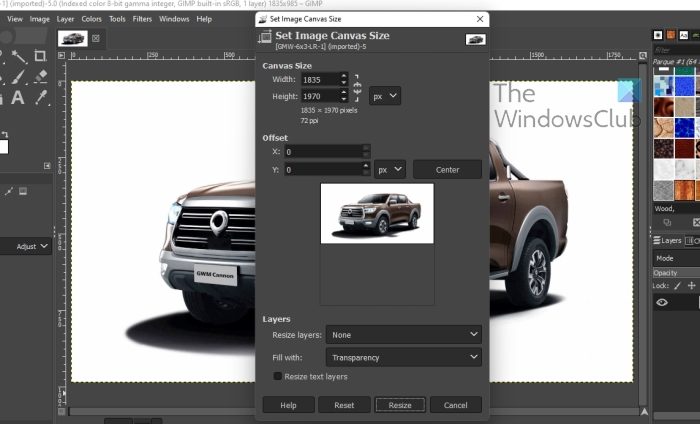
A new window should now appear with all the tools needed to increase the canvas size.
4] Change canvas size

The next step here is to change the canvas size to one that is more fitting. For example, both the width and the height must be expanded to hold a duplicate image.
- In order to do this, we suggest doubling either the Width or the Height, depending on the shape of the photo.
- Once done, look at the preview area to see if things are up to your standard.
- Finally, click on the Resize button to complete this task.
5] Select Duplicate Layer

We need to create a duplicate layer in order to copy the current image so that it will fit perfectly in the same work area.
- Click on the Layer tab.
- A drop-down menu will appear.
- From that menu, then, please click on Duplicate Layer.
- Alternatively, you could right-click on the image, then select Layer > Duplicate Layer.
6] Drag the image to the preferred position
Once the duplicate layer has been created, it is now time to have two of the same images visible in the same space.
- First, you must click on the Move Tool.
- After that, use the mouse to drag the image.
- You should now see a second photo.
- Release it at the preferred position.
- For us, we choose to drop below the original.
7] Reduce the Opacity
After the original and duplicate images are in place, we suggest reducing the opacity of the below photo.
- Simply select the Duplicate Layer recently created.
- From there, reduce the Opacity from 100 percent to a number that fits your needs.
8] Use the Flip Tool
It is now required to use the Flip Tool to better create a mirroring look. We are going to flip the below image so that it sits upside down instead of right side up.
- Look to the left panel.
- You will see several available tools.
- Simply click on the Flip Tool icon.
- If you do not see the icon, then hover over Unified Transform.
- After that, please press SHIFT + F to change it to Flip.
- The next step, then, is to click on the image to have it flipped.
9] Export as JPG
In order to complete everything, we must now export the finished product as a JPG photo. Let us look at how to accomplish this task.
- Click on File.
- Select Export As from the dropdown menu.
- Alternatively, press SHIFT + CTRL + E.
- Change the extension to .jpg from the name of the picture.
- Click the Export button to save the image.
You have just managed to mirror an image using GIMP. And as you can tell, it is not difficult at all.
READ: How to Blur Images and Background using GIMP
How do I make an image mirror in GIMP?
GIMP does not have a mirror tool, but there is a Flip Tool that can be used in the process of mirroring an image. You can find the Flip Tool on the left-hand side. However, if the option is not visible, you can use keyboard shortcut – Shift+F. It opens the option panel from where you can make all the changes.
Leave a Reply