In this post, we will show you how to move, reorder or rearrange pages in Word. If at any time you believe a page in Microsoft Word is in the wrong spot, then there is no need to mess around with the text. That’s because Word makes it possible for the user to change the location of pages via a rearrange feature that we live very much.

When it comes down to changing the location in Word, it is not as straightforward as one might prefer. You see, in order for this to work, there needs to be a heading section on each page. Now, we understand that not everyone writes with headings, therefore, the next logical step is to use the cut and paste method, which is the traditional way of doing things.
Either way, you will learn how to change page location in your Microsoft Word document by the end of this article.
How to move, reorder or rearrange pages in Word
So, let us begin, and hopefully, you’ll acquire great knowledge that can help you in the near and distant future with the steps we’ve shared below:
- Rearrange pages by moving headings in a Word document
- Rearrange pages using cut and paste
Rearrange pages by moving headings in a Word document

If your Microsoft Word document contains headings via the Styles section, then this method will work pretty fine. We should point out that your pages won’t be moved, but rather move the headings for easier realignment of content. To do this, launch Microsoft Word.
- From there open the preferred document if you haven’t already.
- Look at the Ribbon.
- Click the View tab.
- After clicking View, look to the Ribbon for Show.
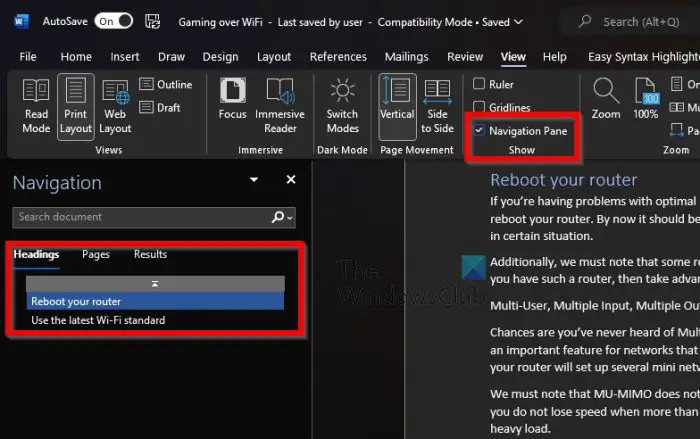
- Via the Show section, please tick the box next to Navigation Pane.
- A panel should now appear on the left.
- This panel is home to three tabs.
- Select the Headings tab to the left.
- Doing this will allow you to view all the headings located in your document.
- Move the preferred heading to the correct location by dragging it with the mouse.
Microsoft Word will then move the contents to the selected heading.
Move or reorder Word pages using cut and paste
The tried and tested cut and paste method that never fails to work. We suspect everyone has used cut and paste before, but not all have used it in a situation like this. So, let us explain.
- Open a Microsoft Word session along with the document in question.
- Go to the page you want to move.
- On the page, select all the content available there.
- We assume you know how to select bodies of text.
- Next, press the right-click key on your mouse.
- After that, select Cut.
- Alternatively, you could press the Ctrl + X to Cut.
- From within the document, find the location you want to paste the text.
- Right-click in the space.
- Select Keep Source Formatting.
- Or simply press Ctrl + V to paste instead.
That’s it, your content has been moved from one area to the next in your Microsoft Word document.
Read: How to add Code Blocks and Commands in Microsoft Word
What is Microsoft Word used for?
OK, so Microsoft Word is a word processing tool designed for users to create high-quality and professional-looking documents. Microsoft Word is not the only tool in its class, but it is the best of the bunch, and will likely keep the crown for many more years to come.
Can I get Microsoft Word for free?
Windows and Mac users are not able to get Word for free unless they’re using the web version. Outside of that, the Android and iOS versions of Microsoft Word are freely attainable.
Does Microsoft Word have pages?
Yes, Microsoft Word has pages, and users can view multiple pages instead of just one at a time. Pages are important when a person writes lengthy documents or those with a lot of visuals.
Can a Word document be too big?
At the moment, the maximum file size for a Microsoft Word document that only contains text is 32MB. We understand this is the case for documents created in Word 2007 and later, but things could always change in the future if Microsoft allows it.
How do you get more pages on Word?
Getting more pages in Microsoft Word is a simple affair. All you have to do is place the mouse cursor where you want the new page to begin, then select Insert > Blank Page. The new blank page should be visible.
Leave a Reply