The Start Menu is one of the most important UI elements in Windows 11/10. In the recent past, Microsoft has added new features and redesigned the Start Menu several times. It is very common for professionals to use multiple monitors on Windows. In this article, we explain how you can move the Start Menu to the second monitor.
Move Start Menu to the second monitor

There are two easy ways you can do this in Windows 11/10-
- Unlock and drag the taskbar
- Change Setting – Use this device as the primary monitor.
Let us see how to do this in detail.
Using more than one display not only offers a better screen real estate but also helps in improving productivity. The taskbar and the Start Menu are usually present only on the original monitor. Most of the time it helps to move Start Menu to the secondary display. This will help us segregate tasks and use separate monitors for different tasks. Check out some of the best ways to move the Start Menu to a second monitor.
Read: How to make a program open on a specific monitor.
1] Unlock and drag the taskbar
This is one of the simpler methods. It is pretty effective too. What this method lacks are advanced features.
Follow the steps below to unlock and transfer the Start Menu to the second screen.
- Unlock the taskbar by clicking on the Taskbar.
- In the Taskbar Settings menu uncheck Lock the taskbar feature
- The taskbar is now free and you can move it around.
- Push the Start Menu to the furthermost corner and transfer the start menu to the other display
- Transfer Start Menu to the second monitor by using the keyboard
- Open the Start Menu by pressing the Windows key
- Close the Start Menu by hitting Esc
- Now the controls will shift back to the taskbar
- Open the taskbar context menu by pressing Alt and Space-bar together
Note: In Windows 11, there is no option to lock the Taskbar using Windows Settings. That is why you need to follow the second method as mentioned below.
2] Change Setting – Use this device as the primary monitor
Windows 11

If you are using Windows 11, follow these steps:
- Press Win+I to open Windows Settings.
- Go to System > Display.
- Select the monitor you want to show the Taskbar on.
- Expand the Multiple displays section.
- Tick the Make this my main display checkbox.
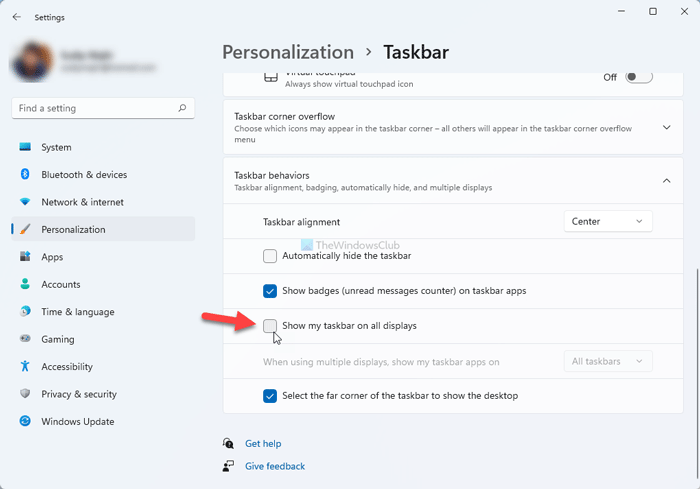
- Go to Personalization > Taskbar.
- Expand the Taskbar behaviors section.
- Remove the tick from the Show my taskbar on all displays checkbox.
However, if you are using Windows 10, follow these steps:
Windows 10
If the Taskbar is automatically moving to the wrong monitor or the program window does not start on the same monitor as the taskbar, then you can use this troubleshooting method.
- Click Start, click Run.
- Type desk.cpl and click OK.
- Alternatively, you can also right-click on the desktop and select Screen Resolution from the dropdown.
- Click on the monitor that you want to use as the primary monitor.
- Now select Make this my main display check box.
- Now you need to select Show desktop only on 1 from the Multiple displays drop-down menu.
- Select Keep Changes.
- Select Extend these displays from the Multiple displays drop-down menu, and then click Apply.
- Click Keep changes when the pop-up dialogue box appears.
TIP: You can use Ultramon Smart Taskbar to add a taskbar to every monitor.
How do I move something to my second monitor without dragging it?
To move a window to your second monitor without dragging it, you need to disable one monitor and choose the Show only on [n] option. To get started, press Win+I to open Windows Settings. Then, go to System > Display and choose the monitor you want to show your window on. Click on the Extend these displays option and choose the Show only on 2 or Show only on 1 option.
How do I move my taskbar to my second monitor in Windows 11?
To move Taskbar to the second monitor in Windows 11/10, you need to disable the Show my taskbar on all displays setting and choose your primary monitor correctly. Both are mentioned above, and you can do it using Windows Settings. You can also read this article to move Taskbar to the second display on Windows 11/10.
Were you able to Move Start following the steps above? Let us know about your experience in the comments below.
Leave a Reply