In this post, we will show you how to open and use Color Management in Windows 11. Color Management is a built-in feature in Windows 11 that helps to set a custom color profile for different devices like a monitor, scanner, printer, etc., connected to your computer. By default, Windows automatically sets a default color profile for the devices that is suitable in most cases. But, for example, if you feel that the color representation looks odd or faded, or inaccurate on your display device, then it could be because of the wrong color profile set to that device. In that case, the Color Management feature can be used to install a custom color profile to get more accurate colors.
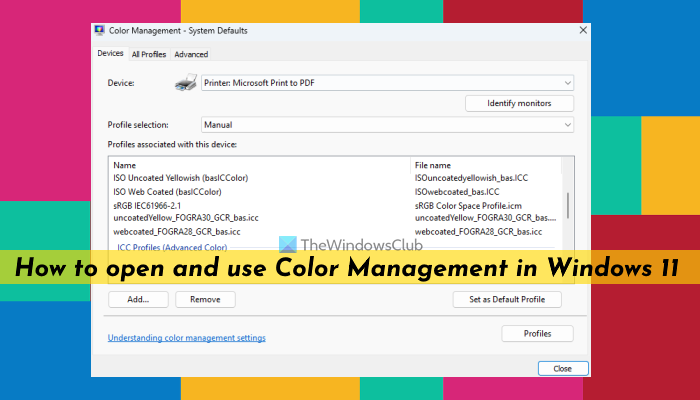
With the correct color profile set by you, the colors on the display will look more natural. Similarly, you can use Color Management for a printer to print with better color representation if the default color profile is not giving the expected output. You can associate multiple color profiles for different devices on your Windows 11 system and then set any installed color profile as default and also reset your settings anytime you want using Color Management in Windows 11. Now let’s first check how to open this feature.
How to open Color Management in Windows 11
There are multiple ways to open Color Management in Windows 11. These are:
- Open the Color Management window using the Search box
- Open Color Management using the Settings app
- Launch the Color Management window via Control Panel
- Use File Explorer to open the Color Management window
- Access the Color Management window using the System32 folder
- Launch the Color Management window using the Run Command box
- Open the Color Management window via Task Manager
- Use Windows Terminal to launch Color Management
- Create a Desktop shortcut to open Color Management.
Let’s check all these ways one by one.
1] Open the Color Management window using the Search box
The quickest way to open Color Management is by using the Windows 11 Search box. Just type color management in the Search box of Windows 11 and click on the available result to open it.
2] Open Color Management using the Settings app
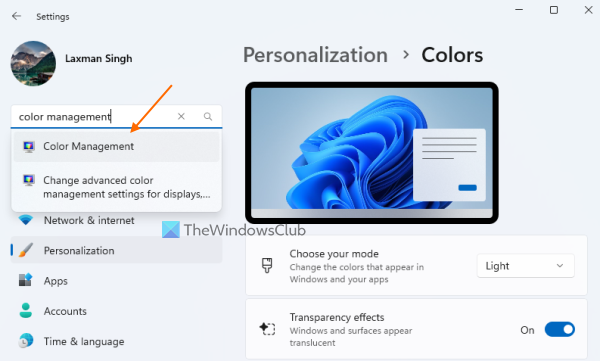
- Use the Win+I shortcut key to open the Settings app
- Type color management in its Search box available on the top left side
- Press the Enter key.
3] Launch the Color Management window via Control Panel
Open the Control Panel window and change the View by mode from Category to Large icons or Small icons. Click on the Color Management option and its window will open.
4] Use File Explorer to open the Color Management window
Press the Win+E hotkey to open the File Explorer window. In the address bar of File Explorer, type colorcpl, and use the Enter key to open the Color Management window.
Related: Color Management not working on Windows PC
5] Access the Color Management window using the System32 folder
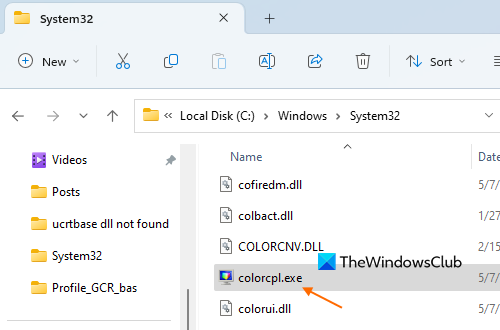
The System32 folder is the location where the EXE application file of the Color Management window is stored. So, you can access the Color Management window directly from its original location. For this, open the File Explorer window, and go to the C:\Windows\System32 folder. There, look for the colorcpl.exe application, and double-click on it.
6] Launch the Color Management window using the Run Command box
Open the Run Command box using the Win+R hotkey. Type colorcpl in the text field, and press the OK button to immediately launch the Color Management window.
7] Open the Color Management window via Task Manager
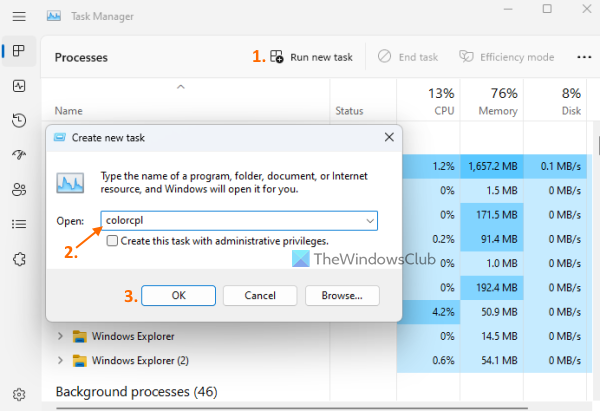
Similar to the Run Command box, you can run a new task in Windows 11 Task Manager and open the Color Management window from there. To do this:
- Use the Ctrl+Shift+Esc hotkey to launch the Task Manager window
- Click on the Run new task option. A separate box will open
- Type colorcpl in the text field of that box
- Hit the OK button.
8] Use Windows Terminal to launch Color Management
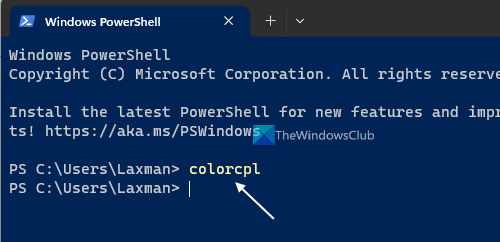
You can use the Windows Terminal app with Command Prompt or PowerShell in Windows 11 to open the Color Management window. The steps are:
- Right-click on the Start button of Windows 11
- Select the Terminal option and the Windows Terminal app will open with the default profile
- Use the drop-down icon available on the title bar
- Open the Command Prompt window or select the Windows PowerShell option
- Type colorcpl and hit Enter key to execute the command.
9] Create a Desktop shortcut to open Color Management

If you prefer a desktop shortcut to open the Color Management window, then use the following steps:
- Right-click on your Windows 11 desktop
- Access the New menu
- Select the Shortcut option
- In the desktop shortcut wizard, enter the following location of the Color Management window in the location field:
C:\Windows\System32\colorcpl.exe
- Select the Next button
- Add a name for this shortcut (like the ColorManagement shortcut or anything else you want) in the text field
- Press the Finish button.
Now let’s proceed further to see how to use this feature.
How to use Color Management in Windows 11?
In the Color Management window, there are three main tabs (Devices, All Profiles, and Advanced) that cover everything for using the Color Management window. Using these tabs, you can do the following important things:
- Add or install custom color profiles for devices
- Remove a custom color profile
- Set a custom color profile as default for a device
- Reset color profile settings to System defaults.
Let’s check all these options.
1] Add or install custom color profiles for devices
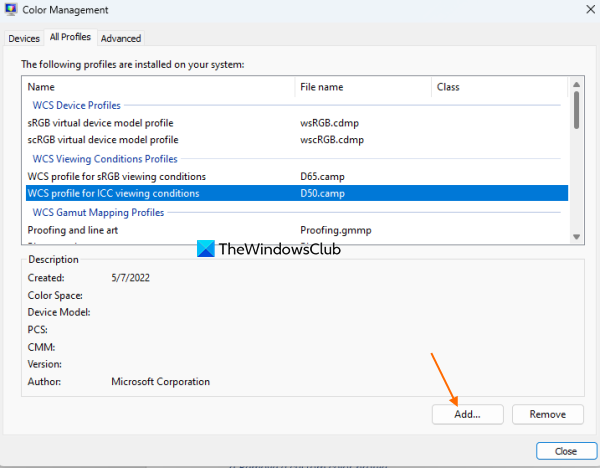
Windows 11 supports ICC Color Profiles (*.icc or *.icm files), Gamut Mapping Model Profiles, Device Model Profiles, etc. If you have already downloaded color profile(s) from the manufacturer’s website or a trusted source, then you can add or install those custom color profiles easily using the Color Management window.
For doing this, go to the All Profiles tab in the Color Management window. There you will see a list of pre-installed profiles (WCS Device Profiles, ICC Profiles, etc.) on your system. All the newly added or installed color profiles are also visible under this category. For each installed profile, you can see the file name, file extension, and Class type (Display, Printer, etc.). Created date, Color Space, Publisher name of the selected color profile, and other information are also visible. Now, to install a custom color profile:
- Press the Add button and an Install Profile window will open
- In that window, you can select the file type (ICC Profiles, Gamut Mapping Model Profiles, etc.), and go to the location/folder where your color profiles are stored
- Select a color profile and press the Add button in that window.
That particular profile will be added to the installed color profiles list in the All Profiles tab. In the same way, you can add more color profiles.
2] Remove a custom color profile
In case you need to remove a custom color profile from your Windows 11 system, simply access the All Profiles tab in the Color Management window, and select a color profile. Press the Remove button and confirm your action using the Continue button.
3] Set a custom color profile as default for a device
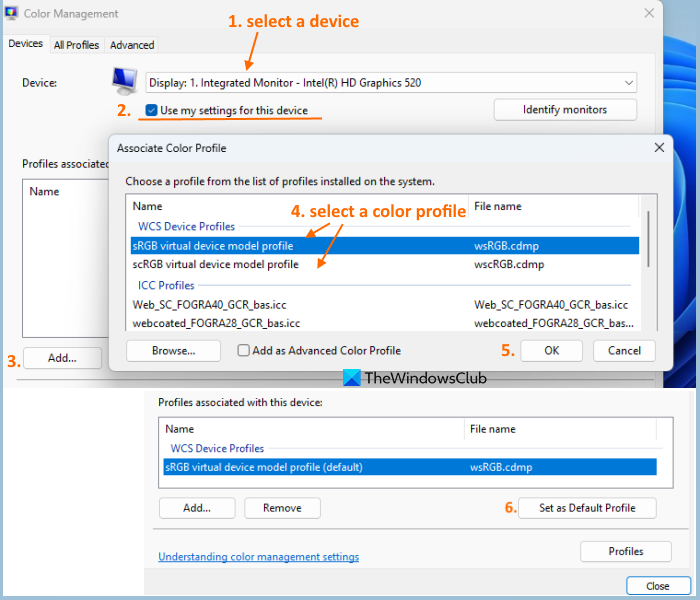
Once you’ve added the custom color profiles, you can set any of those color profiles as default for a device. For this, switch to the Devices tab in the Color Management window. Use the drop-down menu to select your device (Display, Scanner, Printer, etc.). In case you have multiple monitors connected to your Windows 11 system, then first press the Identity monitors button for confirmation. After that, tickmark the Use my setting for this device option. Also, set the Profile selection mode to Manual.
Now the profiles that are already associated with that particular device will be visible in the middle section. You won’t see the newly installed color profiles unless you associate them with the selected device. To do this, click on the Add… button and an Associate Color Profile box will pop up. Select a profile and press the OK button. In this way, you can associate multiple color profiles with a device.
Now among the multiple associated profiles for the selected device, select a color profile and press the Set as Default Profile.
You can also dissociate a color profile for your device anytime you want. All you need to do is select an associated profile from the list and hit the Remove button.
4] Reset color profile settings to System defaults
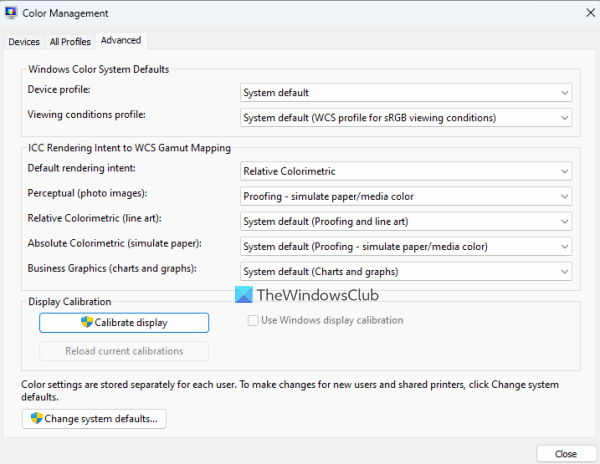
In case you are messed up with too many color profiles for your devices and you need to reset everything, then jump to the Advanced tab of the Color Management window, and set each available option (such as Device profile, Default rendering intent, Business Graphics, etc.) to the System default. This will restore the default display color settings for your Windows 11 system.
Alternatively, you can access the Devices tab, select the device from the list, and check the Use my settings for this device option. Finally, click on the Profiles button, and use Reset my settings to the system defaults option.
Other options present in Color Management of Windows 11
Some other useful options are also present in Windows 11 Color Management. These include:
- Combine your color profile settings for the selected device with system defaults. This option can be accessed using the Profiles button present in the Devices tab
- Save the standard associations for the selected device so that you can load them later when needed. This option can also be used from the same Profiles button
- Open the Display Color Calibration wizard that helps to change Color Calibration, set basic color settings, adjust the gamma, etc.
How do I change the Color Settings on Windows 11?
To change Color Settings on your Windows 11 computer, open the Settings app (Win+I), and access the Personalization category. Go to the Colors page in that category. Now you can select an accent color or use a custom color, show the accent color on the Start and taskbar, title bars of opened windows, etc.
That’s all! Hope this helps.
Read next: Fix Computer Monitor has a Yellow tint on the screen.