In this article, we will see how to open files or folders automatically when Windows starts. There may be some files or folders that you open after starting your system. For example, if you are a student, you might open some of your documents or the folder containing your documents on system startup, if you are a graphics designer, you might open some images or the folder containing your data on system startup, etc. Microsoft has made this simpler for you by creating the Startup folder.
The Startup folder is a folder that is used to open programs, files, and folders automatically on system startup. If you open the same files or folders on system startup, you can make this simple by using the Windows Startup folder.
How to open Files or Folders automatically when Windows starts
You can open files or folders automatically when Windows starts via:
- The Startup folder
- The Task Scheduler
Below, we have covered both of these methods in detail.
1] How to open files or folders automatically when Windows starts via the Startup folder
As explained earlier, you can use the startup folder to open those programs, files, and folders that you usually open after turning on your system. To open files and folders automatically every time you start your system, you have to place them in the Startup folder. We have explained the entire process step by step below.
How to open files automatically when Windows starts via the Startup folder
The steps to do this are as follows:
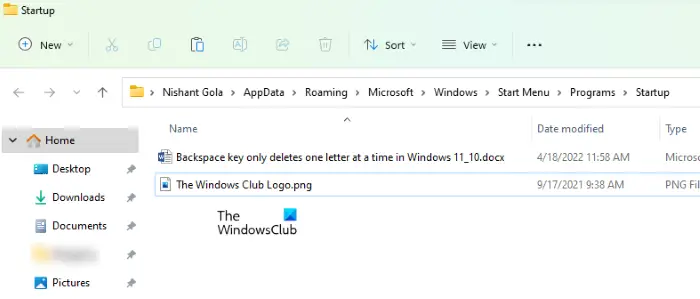
- Press the Win + R keys to launch the Run command box.
- Type shell:startup and click OK. This will open the Startup folder.
- Copy the files that you want to open on the system startup.
- Paste the copied files into the Startup folder.
After performing the above steps, Widows will open the files placed in the Startup folder automatically every time you turn on your system. If this does not work, you have to place the shortcuts of files in the Startup folder. Follow the steps below:
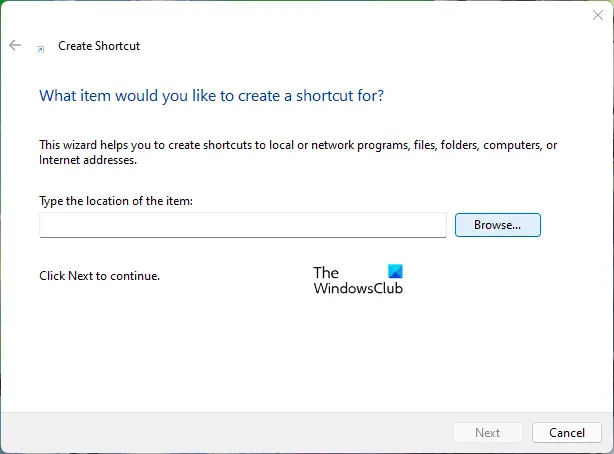
- Right-click in the empty space on your Desktop.
- Go to “New > Shortcut.”
- Click on the Browse button and select the file, the shortcut of which you want to create.
- Click Next.
- Rename your shortcut (if you want to do so).
- Click Finish.
After creating the shortcut of files, copy all of them and paste them into the Startup folder. If you do not want to keep the shortcuts on your Desktop, you can use the cut and paste method instead of the copy and paste method.
How to open folders automatically when Windows starts via the Startup folder
To open folders automatically every time you turn on your system, follow the steps provided below:
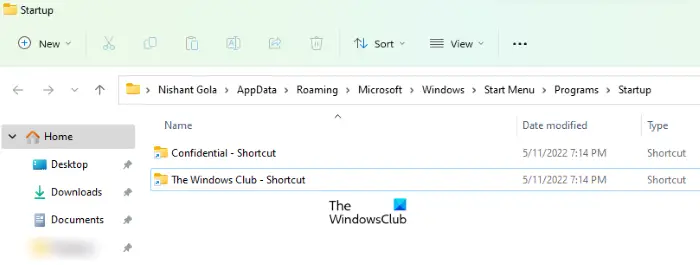
- Right-click on the folder the shortcut of which you want to create and go to “Send to > Desktop (Create Shortcut).” If you are a Windows 11 user, select Show more options after right-clicking on the folder. After that, you will see the “Send to” option in the context menu.
- After creating the shortcut of the folder, copy it from your desktop.
- Open the Startup folder by following the steps described above.
- Paste the copied folder into the Startup folder.
Now, every time you start your system, Windows will automatically open the folders that are placed in the Startup folder.
Read: How to enable and disable the startup sound in Windows 11.
2] How to open files or folders automatically when Windows starts via the Task Scheduler
Task Scheduler is a useful tool in Windows devices that lets users schedule tasks for a particular date and time. You can also use the Task Scheduler app to open files and folders automatically on system startup. Let’s see how to do that. Unlike the above method, the process to open files and folders automatically when Windows starts is different for Task Scheduler. We will explain both of these methods here.
How to open files automatically when Windows starts via Task Scheduler
The steps to create a task to open a file on the system startup are written below:
- Open the Task Scheduler.
- Create a new folder for your custom tasks.
- Right-click on the right side and select Create New Task.
- Enter the name of your task.
- Define Triggers and Actions.
- Click OK.
Let’s see these steps in detail.
1] Click on Windows Search and type Task Scheduler. Select the Task Scheduler app from the search results.
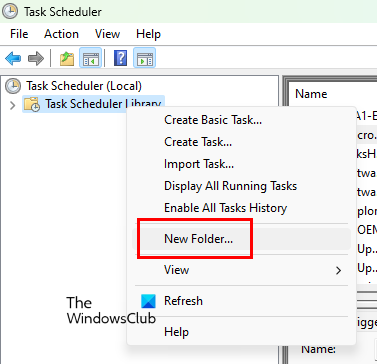
2] When the Task Scheduler opens up, right-click on the Task Scheduler Library folder and select New Folder. The Task Scheduler Library folder is available on the left pane.
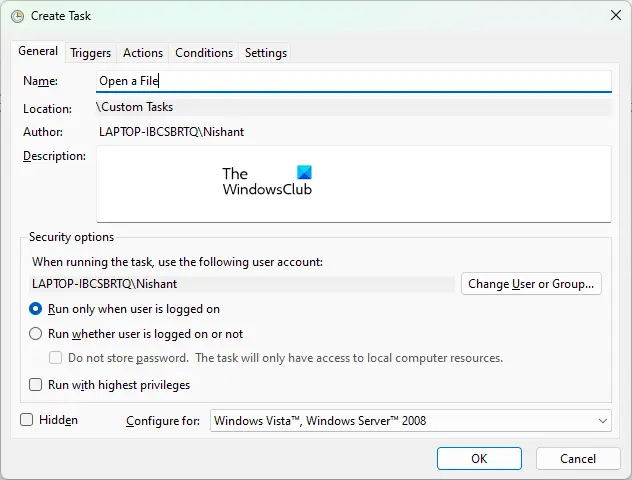
3] After creating the folder, select it. Now, go to “Action > Create Task.” A new window will appear on your screen. Type the name of your task under the General tab.
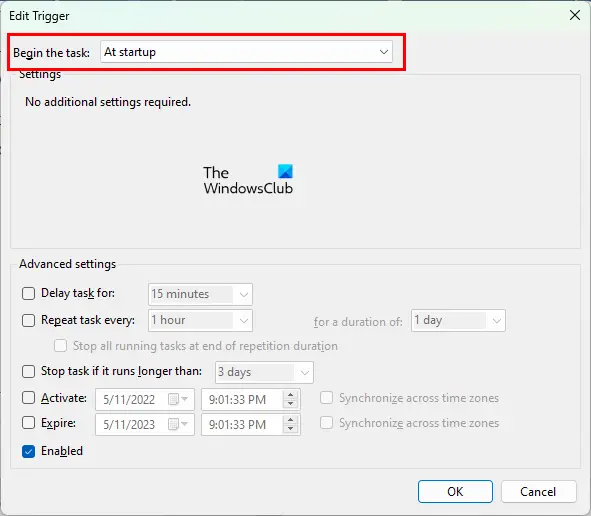
4] Select the Triggers tab and click on the New button. The New button is available on the bottom left side. A new window will appear. Select At Startup in the Begin the task drop-down. Click OK to save.
5] Select the Actions tab and click on the New button available on the bottom left side. In the Action drop-down menu, make sure that the “Start a program” option is selected.
To open a file on a Windows computer, you require a dedicated program. Without a program, you cannot open a file on your computer. Hence, if you want to open a file automatically when Windows starts using the Task Scheduler, you have to add its default program to the Task Scheduler. To do so, click on the Browse button and select the executable file of the program. After selecting the program, you will see its complete path in the Program/script field in the Task Scheduler.
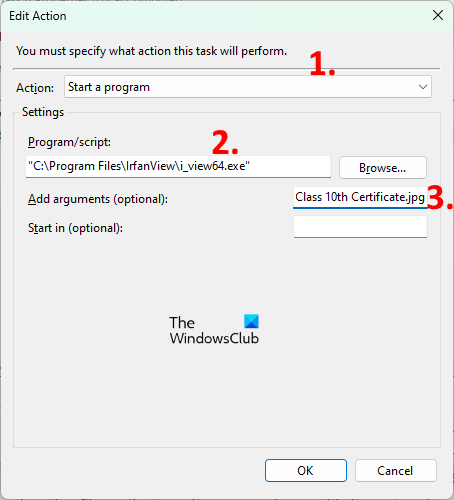
After adding the path of the program, you have to define the complete path of the file so that Windows will open that file in the selected program automatically every time you start your system. For this, copy that path of your file and paste it into the Add arguments (optional) field. After pasting the file path, type its name along with its extension at the end of the path followed by a backslash. For example, if a png image file is placed in your F directory and the name of the file is xyz, the complete path that you have to type is as follows:
F:\xyz.png
In the above path, F is the location where the file is saved, XYZ is the name of the file, and png is the file extension. Click OK to save.
Now, Windows will open the file in the selected program automatically every time you start your computer. Do note that this method may not work for some programs. I have tried it on Paint dot net software. After restarting my computer, Paint dot net was not able to open the file. After that, I scheduled the same file to be opened automatically on system startup on IrfanView and IrfanView opened the file without any error. If you also receive any error, first, check if the Program/Script and Add arguments (optional) fields contain the complete path. If the path is correct but you are getting an error, you can try another software or you can use the Startup folder method.
I also tried another method to open the files using Task Scheduler and this method worked perfectly for all types of files. You have to create a batch file and run this file using the Task Scheduler. The steps to do this are as follows:
- Open Notepad.
- Write a script to open a program.
- Define an argument to open a file in that program.
- Save that batch file.
- Open the Task Scheduler.
- Create a new task.
- Define Triggers and Actions.
- Click OK to save.
Let’s see all these steps in detail.
1] Open Notepad.
2] Write a script to open a program. The script is as follows:
Start C:\"program path\program.exe" "path of file\file name.extension"
Let’s understand the above script. Suppose you want to open a pdf file in Adobe Acrobat Reader from the batch file. For this, first, you have to type the path where the Adobe Acrobat DC is installed on your computer. After that, type the name of its executable file along with the extension .exe followed by the backslash. This will open the Adobe Acrobat DC but does not open the pdf file in Adobe Reader. To open a pdf file in Adobe Reader, you have to define an argument after the program path followed by a space. In this argument, first type the file path, after that, type the name of the file along with its extension followed by a backslash. The below script will help you understand this more clearly.
Start C:\"Program Files\Adobe\Acrobat DC\Acrobat\Acrobat.exe" "F:\bedtime stories.pdf"
The above script shows the complete path of Adobe Acrobat DC. In the argument, F represents the path of the pdf file and bedtime stories is the name of the pdf file, and .pdf is the file extension.
When you are done, save this file as a batch file. To do so, press the Ctrl + S keys and type filename.bat. Here, the filename is the name of your file and .bat is the extension. You can type any name instead of filename but the extension .bat should remain the same.
3] Open the Task Scheduler and select the folder that you have created to define custom tasks. Now, go to “Action > Create Task.” Give a name to your task under the General tab.
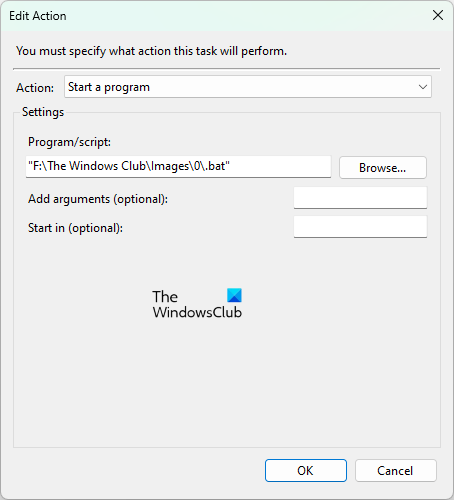
4] Select the Triggers tab and click on the New button. Select At Startup in the Begin the task drop-down. Now, select the Actions tab and click on the New button. Click on the Action drop-down menu and select Start a program. Click on the Browse button and select the .bat file that you have just created. Click OK to save.
Now, Windows will open the selected file on startup.
How to open folders automatically when Windows starts via Task Scheduler
Now, let’s see the method to open folders on system startup by using the Task Scheduler. The steps to do this are written below:
- Open the Task Scheduler.
- Create a new task.
- Enter the name of your task.
- Define Triggers and Actions.
- Click OK.
Let’s see all these steps in detail.
1] Open the Task Scheduler and create a new folder for your custom tasks. If you have already created a new folder, select that folder.
2] Double-click on the Task Scheduler Library folder to expand it and select the folder that you have created. Now, go to “Action > Create Task.” A new window will appear. Give a name to your task.
3] Select the Triggers tab and click on the New button. Click on the Begin the task drop-down menu and select At Startup from the list of options.
4] Select the Actions tab and click on the New button. Click on the Action drop-down menu and select Start a program. While opening a file on Windows startup via the Task Scheduler, we entered the complete path of the default program and the complete location of the file. The same thing we will do here.
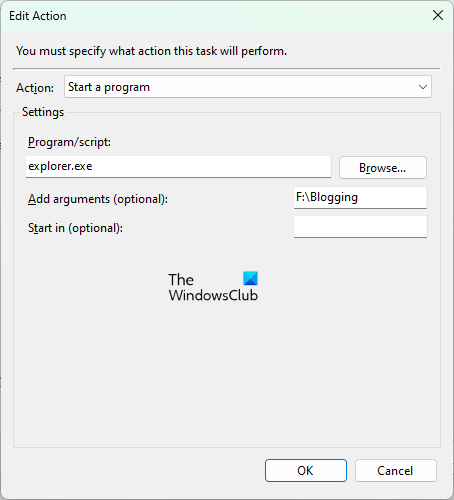
Here, the program to open the folder is the File Explorer. Therefore, type explorer.exe in the Program/script field and the path of the folder in the Add arguments (optional) field. Click OK to save.
Now, Windows will open the selected folder automatically every time you start your system.
Read: Stop apps from opening or running at startup in Windows.
How do I make a folder open on startup?
If you want to open a folder on startup, you can do so by adding the shortcut of that folder to the Startup folder or by scheduling a task for the same in the Task Scheduler. The former method is the easiest method. Simply create a shortcut of the folder that you want to open at startup and paste that shortcut into the Startup folder. To open the startup folder, type shell:startup in the Run command box and click OK.
How do I make a program open when Windows starts?
The Task Scheduler app in Windows gives users a facility to schedule a task. You can use this Task Scheduler app to open a program when Windows starts. To do so, create a new task in the Task Scheduler and select the When the computer starts option if you are creating the Basic task or At startup if you are creating a new task. If you are searching for the easiest method to open a program when Windows starts, place the shortcut of that program in the Startup folder.
Hope this helps.
Read next: How to disable startup programs in Windows.
Leave a Reply