Without a doubt, Raspberry Pi 4 has a capable processor. It has a Broadcom BCM2711 processor with four Cortex-A72 cores, which are capable of clocking much higher than 1.5 GHz, which you get out of the box. In this post, we will see how you can safely overclock Raspberry Pi with ease.
How to overclock Raspberry Pi 4
Raspberry Pi 4 is clocked at 1.5 GHz and we will try to move it up to 2 GHz in this post. Before you go ahead and overclock Raspberry Pi, it’s crucial to keep your device cool. First, you need to add a heatsink and a cooler to your device to stop it from heating. Since overclocking tweaks the physics of your board, at times, it can increase the temperature to 158 Fahrenheit.
A cooler and heatsink are essential for optimal performance of an overclocked Raspberry Pi 4. Without them, the CPU will throttle with rising temperatures and cause freezing issues, ultimately leading to poorer performance. Therefore, it’s recommended to get a cooler and heatsink to avoid such issues and ensure optimal performance.
Note: The method mentioned below for overclocking your Raspberry Pi is safe and effective with a cooler and heatsink. However, we are not responsible for any damage caused.
Overclock Raspberry Pi 4 using the instructions mentioned below
To overclock Raspberry Pi 4 using Raspberry OS, follow the steps mentioned below.
- First of all, on your Raspberry Pi OS, open the Terminal app and run the following command to update all the packages.
sudo apt update && sudo apt upgrade -y
- Now, run sudo apt dist-upgrade to install the latest version of the distro.
- We need to update its firmware to the latest version. Open the Terminal and execute the following command. If you get the message “rpi-update is already the newest version”, you’re set. Otherwise, update the firmware and reboot the Pi.
sudo apt install rpi-update
- After restarting your device, again launch the Terminal and run the following command to access the config file.
sudo geany /boot/config.txt
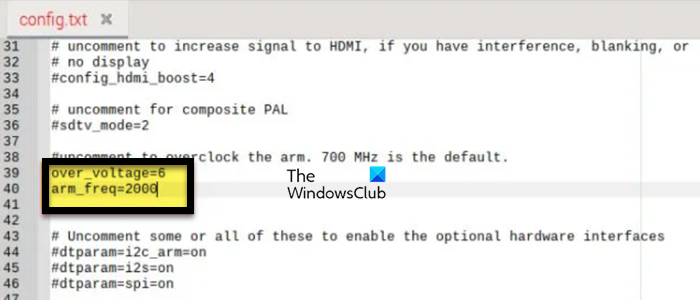
- In the Geany window that will pop after you run the command mentioned earlier, search #arm_freq=800. Remote the Hashtag(#) and change 800 to 2000 as we need to clock the speed to 2GHz.
- To increase the voltage, add the following line before the arm_freq string.
over_voltage=6

- If you want to increase the clock speed of the Graphics Processor Unit, add the following line.
gpu_freq=750
- You can now follow the instructions below to check if the CPU and GPU of your Raspberry Pi are overclocked successfully:
- Restart your Raspberry Pi.
- Open two instances of Terminal.
- In each of the Terminal windows, run the following commands:
watch -n 1 vcgencmd measure_clock arm //To monitor the CPU clock speed in real-time
watch -n 1 vcgencmd measure_temp //To display the current temperature

- To check if Raspberry Pi 4 reaches the required clock speed, 2 GHz, we will use Sysbench. Run the command mentioned below to install the utility.
sudo apt install sysbench
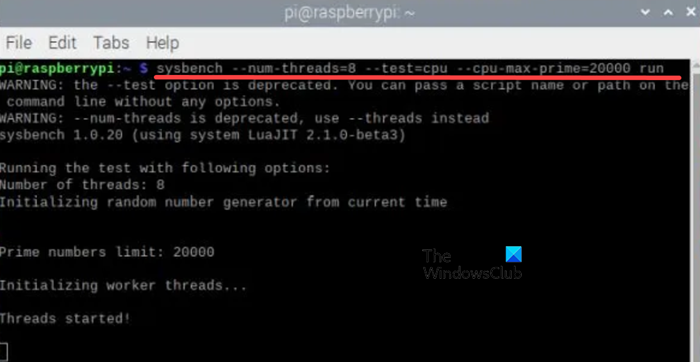
- Now, execute the command mentioned below to check if Raspberry Pi’s clock speed reaches 2000. This will take a little time somewhere around 10 seconds.
sysbench --num-threads=8 --test=cpu --cpu-max-prime=20000 run
That’s how you can overclock Raspberry Pi. If you want to disable the overclocking, open the Config file, and add # before the commands you have written. This way, the lines will be commented out and will not be rendered when the config file is being executed.
Reverse the changes in the config file if Raspberry Pi is not booting after overclocking
If Raspberry Pi is not booting after overclocking, you will need a computer to revert the changes that you have made.
For that, we need to re-configure the Raspberry Pi 4 config file using a computer. To get started, take out the SD card from the board and insert it into your PC. On your PC, locate the SD card (it will be labeled as “boot” in File Explorer) and open it. Once you’ve opened the SD card, locate the config.txt file.
Finally, open the config file using Notepad, and add a Hashtag to all the instances we changed earlier. Once that’s done, plug your card into a Raspberry Pi and allow it to open with the default clock speed.
Read: How to create Raspberry Pi Virtual Machine
Can Raspberry Pi be overclocked?
Yes, Raspberry Pi can be overclocked using the steps mentioned earlier. However, overclocking your Raspberry Pi may void its warranty, shorten its lifespan, or lead to instability. That is why we urge you to be extremely cautious when changing the clock speed of the device and add an ample amount of cooling before subjecting the device to extreme pressure.
Read: How to stress test Raspberry Pi 4 in Windows PC?
Does Raspberry Pi work with Windows 11?
Yes, you can use Windows 11 on your Raspberry Pi device. We recommend you read our guide to install Windows 11 on your Raspberry Pi. If you don’t like Raspberry Pi OS, Windows 11 can be a great alternative.
Also Read: How to set up a Raspberry Pi module with default settings.
Leave a Reply