When you encounter problems with drivers that destabilize the system or software that malfunctions, System Restore is a very useful feature in Windows 11/10 that allows PC users to revert to an earlier point in time when the operating system was functioning properly without issues. Nonetheless, in some cases, the changes made may affect the PC badly, that Windows won’t boot. In this post, we will walk you through the steps to perform System Restore when Windows 11/10 won’t boot to the desktop.

Perform System Restore when Windows 11/10 won’t boot
To perform a system restore when Windows 11/10 won’t boot to the desktop, do the following:
- Boot interrupt Windows by starting your PC and as soon as you see the Windows logo; press and hold the Power button to force a shutdown.
- Repeat this 2-4 times and Windows will open up the Advanced Startup Options menu for you.
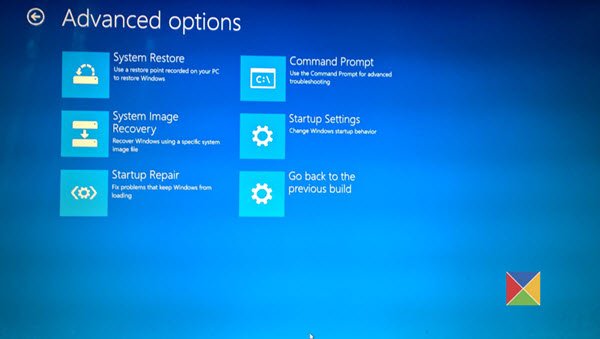
- At the Advanced Startup Options screen, select Advanced Options.
- Select Troubleshoot.
- Under Advanced options screen, select System Restore.
Alternatively, if available, you can use the Windows installation media to boot your PC into the Advanced Startup Options menu. Contact the PC manufacturer (or refer to the manual that came with the PC) to know how to change the boot order of the computer. You will have to change the boot device to a USB drive.
On any working PC, create a Windows installation USB drive.
You can also create the Windows installation media on a Linux machine or Mac computer if those are what you have access to.
Having done that, proceed as follows:

- Boot the faulty PC using the Windows installation media.
- The Windows Setup dialog box will appear.
- Set the Time and currency format, Keyboard or input method, and the language to install.
- Click Next.
- Click on Repair your computer from the lower-left corner.
- From the Choose an option screen, click on Troubleshoot.
- Click Advanced Options in the Troubleshoot screen.
- In the Advanced Options screen, click System Restore.
- Windows will take some time to prepare System Restore. It may even restart your computer or device.
- When System Restore is ready, you will be prompted to choose a user account to continue.
- Select an account that is set as administrator on your Windows 10 computer or device.
- At the next screen, change the keyboard layout if you want and then input the password for that account.
- Click the Continue button.
System Restore will now start.
From here onwards, the steps involved in restoring your system to a working state are the same as usual.
That’s it!
How do I force a System Restore from startup?
To force a system restore from startup, restart your computer and immediately press F11 to access “Advanced Startup” options. Choose “Troubleshoot,” then select “System Restore.”
How do I force Windows to boot into recovery?
To force Windows to boot into recovery, click Start, then Power while holding the Shift key, click Restart. Alternatively, go to Start > Settings > Update & Security > Recovery, and under Advanced startup, click Restart now. You can also open a command prompt and type shutdown /r /o to access recovery mode. Powering down your PC when it is booting 3-4 times will also make it boot into Recovery mode the next time it starts.
How do I factory reset my computer that won’t boot?
To factory reset, a computer that won’t boot create a bootable USB drive with recovery tools using another device. Insert the USB into the non-booting computer, access the BIOS to boot from the USB, and use system recovery options to perform a factory reset.

Leave a Reply