Photoshop is a raster graphic software from Adobe. Photoshop offers a lot of options to enhance images and add or remove unwanted attributes. Knowing how to polarize an image in Photoshop is great. Polarizing an image is making the image look like it was taken with a polaroid camera. The image would be made to have less reflection. The polarize effect reduces the intensity of the image.

How to Polarize an Image in Photoshop
Polarizing the image in Photoshop will not make it look fully like it would if it was taken by a camera with a polarizing filter. However, the polarizing effect can make the image less intense, and reflections can be reduced. Effects in Photoshop will not look identical on every image. the colors and other things in images will make the effect look different in each image.
- Place the image in Photoshop
- Duplicate the image
- Desaturate the image
- Convert the image to a Smart object
- Apply Gaussian blur filter
- Change the blend mode
- Add Levels adjustment layers
- Create clipping mask
- Use brush tool
- Save
1] Place the image in Photoshop
You can use a few methods to place the image in Photoshop. You can open Photoshop then find the image and drag the image into Photoshop. You can also find the image and right-click on it then click Open with then Adobe Photoshop (version number). Another way to add the image in Photoshop is to open Photoshop then go to File then Open or press Ctrl + O. You will then see the Open dialogue box, you then search for the image, click on it, and click Open.
This is the original image.
2] Duplicate the image
When the image is placed in Photoshop, it is time to duplicate it. duplicating the image helps in cases where you do not want to accidentally edit the original. Duplicating the image also helps when you use certain blend modes to mix the edited copy and the original image.
There are a few ways to duplicate the image. You can click on the in the layers panel and drag it down on the Create a new layer icon. This will duplicate the image and place the duplicate above the original image in the layers panel. Another way to duplicate the image is to right-click on the image in the layers panel. A menu will appear, click Duplicate layer. The duplicate will be placed above the original in the layers panel. Another way to duplicate the image is to select the image then go to the top menu bar and click Layer then click Duplicate layer. The Duplicate layer option will appear, give the layer a name then click Ok to create the duplicate.
3] Desaturate the image
The next step is to desaturate the image. Desaturate is to remove the color from the image.
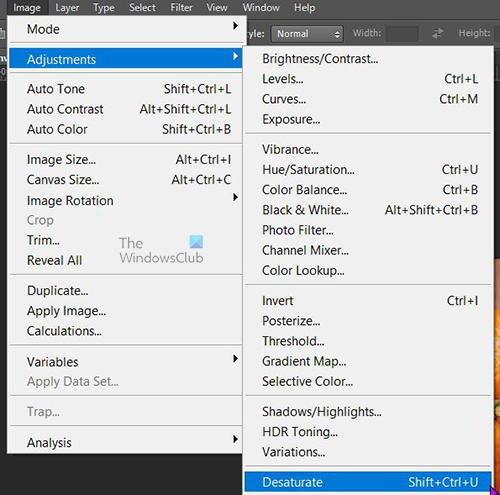
To desaturate the image, select it in the layers panel and go to the top menu bar and click Image then Adjustment then Desaturate, or press Shift + Ctrl + U. Those methods of Desaturation will directly edit the image, this is called destructive editing as it directly edits the pixels of the image.
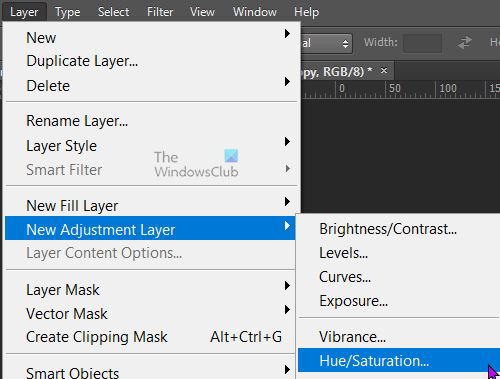
You can desaturate the image non-destructively by placing an Adjustment layer above the image layer. To create the Adjustment layer select the image in the layers panel then go to the top menu bar then select Layer then New adjustment layer then Hue/Saturation.
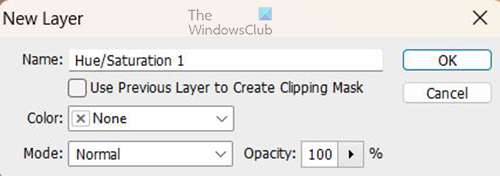
The New layer option will appear, you can give the adjustment layer a name then press Ok to create the Adjustment layer. The adjustment layer will appear above the image layer.
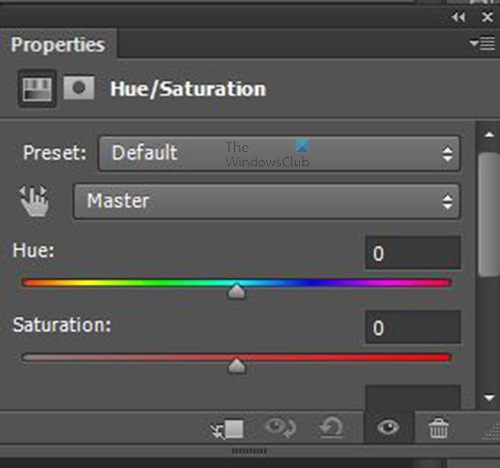
The Hue/Saturation properties window will appear near the layers panel. You will see some sliders, slide the Saturation slider to the left. You will see the image change as you move the saturation slider. This method of desaturating the image allows you to choose the level of desaturation that you want.
You can also desaturate the image by selecting the image in the layers panel and then going to the bottom of the layers panel and clicking on the Create new fill or adjustment layer icon. The Hue/saturation properties window will appear with the sliders. Adjust the saturation slider to remove the color from the image. The further you take the Saturation slider to the left, the more color is removed.

This is the image when it is desaturated.
4] Convert the image to a Smart object
This step is optional, however, converting the image to a Smart object at this step will make sure that when you apply the Gaussian blur in the following step, it will not be applied directly to the image. When an image is a smart object, any filter applied ( including the Gaussian blur), will be a smart filter. The smart filter will be applied to a filter layer and the filter will be editable if you need to make any adjustments. To convert the image to a Smart object, right-click the image in the layers panel then choose Convert to smart object. The image will be converted to a Smart Object, and the thumbnail of the image in the layers panel will have a square on the lower left.
5] Apply Gaussian blur filter
This step required you to add a Gaussian blur filter to the desaturated image. To apply the Gaussian blur select the image then go to the top menu bar and select Filter then Blur then Gaussian blur. 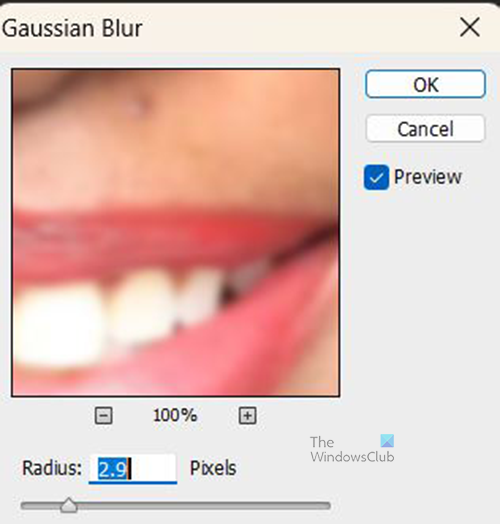
The Gaussian blur options window will open where you can make adjustments to the Gaussian blur. Click Preview so that you will see the changes you make reflect on the image. You then move the Radius slider to a value of between 40 and 70 pixels.
6] Change the blend mode
In this step, the blend mode of the blurred image will be changed to Overlay. To change the Blend mode go to the top of the layers panel where there is the word Normal. That is where the Blend mode can be changed, just click on Normal and the drop-down menu will appear, from the drop-down menu click Overlay. The Overlay blend mode will allow the original image below to show through the blurred image above.
7] Add Levels adjustment layer
In this step, you will want to adjust the brightness levels of the image. The way to do this is by using a Levels adjustment layer.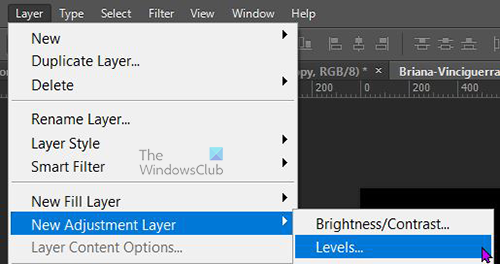
To create the Levels adjustment layer go to the layers panel and select the blurred layer. Go to the top menu bar and click Layer then New Adjustment layers then Levels. You can also create the Levels adjustment layer by going to the bottom of the layers panel and clicking Create new fill or adjustment layer. A menu will pop up, and from this menu click Levels.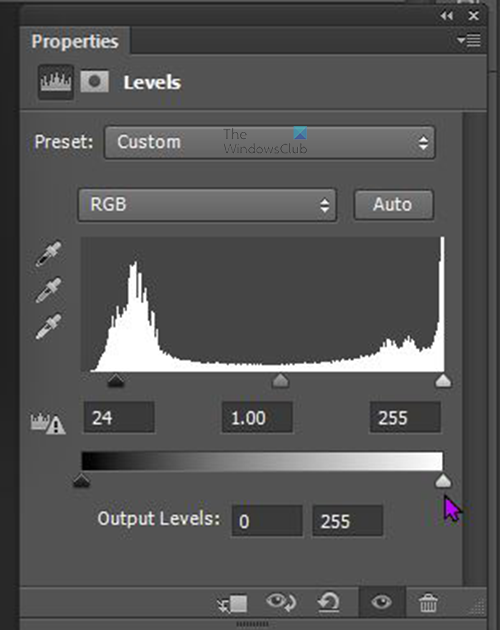
The Levels adjustment layer properties will show up. You can click and adjust the sliders until you are satisfied with how the image looks.
8] Create a clipping mask
This step is where you will create a clipping mask. This step is optional and will just be used if you want areas of the image to be left out of the polarized effect. To create the clipping mask right-click on the top image in the layers panel, when the menu appears click Create clipping mask. You will see the layer has an arrow that points down.
9] Use the brush tool
After the clipping mash is created, it is time to use the Brush tool to brush over the sections that you want to remove the polarize effect. Select the Brush tool, then look for the brush options on the top Toolbar and change the opacity to 40 % or less. The lower the opacity of the brush, the less it will affect the polarize effect. You will also need to change the foreground color to white. you will now paint over the parts that you want to remove the polarize effect. When you are finished, right-click on the image in the layers panel and click Release clipping mask.
This is the final polarized image.
10] Save
After all this hard work you will want to save the completed work. First, save the image as a Photoshop PSD file so that you can make changes later if you need to. To save the document go to File then Save as. The Save dialogue box will appear, give the file a name and leave the file format as Photoshop PSD then click Save. To save the file as a format that you can share or print, you can go to File then Save as then go to the Format section and choose JPEG or PNG, or another file format of your choice. When you are done click Save.
If you know that you will not be making any more changes to the document, you can flatten the images to make them one. Note that when the images are flattened you will not be able to edit them again. to flatten the images select both then right-click and choose Flatten image.
Read: How to create a Picture-in-Picture effect in Photoshop
What is the Polarize effect used for in Photoshop?
The polarize effect is one of the few effects that are equally effective with color imaging and with black-and-white. The polarize can be used to minimize or eliminate reflections in glass, and other surfaces except for metal. The polarize effect can darken skies in color photos as well as in black-and-white. it can make the skies look bluer in images. If you look at the final image above, you will notice that it has a more matted less shiny finish compared to the original.
Why are the Layers flattened in Photoshop?
Layers are flattened to combine them into one artwork. A Photoshop document is made up of multiple layers. Layers are like transparent pages that are used to hold different elements and effects that make up an artwork. when you are finished working on the artwork you can choose to flatten them. Flattening them will give a smaller file. You can flatten when the whole project is finished or when certain steps are finished. This means that an editable Photoshop document can contain flattened and un-flattened layers. When you save the Document in certain file formats such as JPEG the layers are flattened. Layers that are flattened can no longer be edited.