Quick Settings in Windows 11 is a built-in feature that lets you quick access to common features like Battery saver, Airplane mode, Wi-Fi, turn on or off Night light, Mobile hotspot, etc. It is very much similar to the Action Center feature of Windows 10. You can also easily add or remove Quick Settings anytime you want. But, if you want, you can also prevent editing Quick Settings on your Windows 11 computer. Once you have done it, you will see all the items that can be added to Quick Settings. But the pencil or edit icon that is used to edit Quick Settings won’t work.
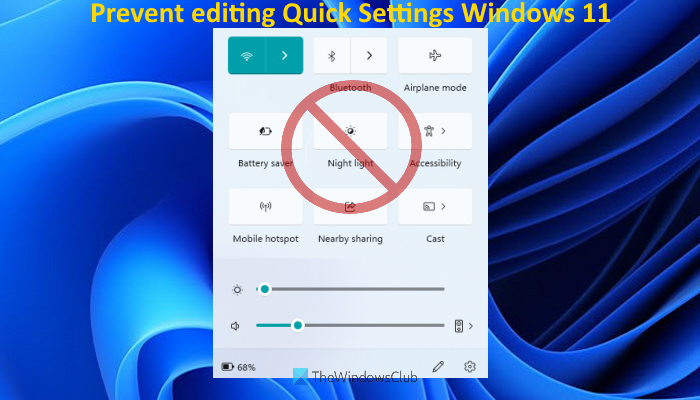
You can continue to access all the items present in Quick Settings. However, you will not be able to add new items or remove existing ones. Don’t worry, as you can also enable editing Quick Settings whenever needed.
Prevent editing Quick Settings in Windows 11 computer
If you want to prevent or disable editing Quick Settings on your Windows 11 computer, then you can do this using two native features. These are:
- Using Local Group Policy Editor
- Using Registry Editor.
Let’s check both the features with a step-by-step guide.
Stop others from changing Quick Settings
Prevent editing Quick Settings in Windows 11 using Local Group Policy Editor
Here are the steps:
- Open Local Group Policy Editor window
- Access the Start Menu and Taskbar folder
- Access Disable Editing Quick Settings
- Select the Enabled option
- Press the Apply button
- Press the OK button
- Restart File Explorer or sign out and sign in.
In the very first step, you need to open Local Group Policy Editor window. For this, first, press the Win+R hotkey to open the Run Command box. Type gpedit.msc in the Run Command text field and hit the Enter key to open the Local Group Policy Editor window. You can also use the Search box, Settings app, or any other preferred way to open it.
In the Local Group Policy Editor window, access the Start Menu and Taskbar folder. Its path is:
Computer Configuration > Administrative Templates > Start Menu and Taskbar
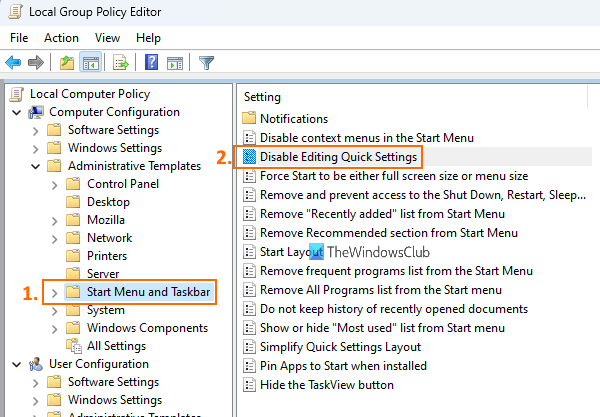
After accessing this folder, look for the Disable Editing Quick Settings on the right section. When you have found that setting, double-click on it, and its separate window will open.
In that window, select the Enabled option available in the top left section. When you have done it, press the Apply button and OK button to close that window.
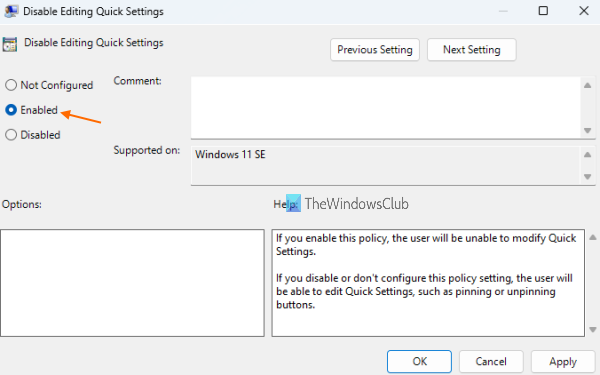
After that, you can close the Group Policy Editor window.
Now, in the final step, you need to restart File Explorer to apply the changes. If that doesn’t work, then you must sign out from your Windows 11 computer and sign in again to successfully apply the changes.
After that, when you open Quick Settings and click on the pencil icon to edit them, you will notice that the pencil or edit icon does not work, which means editing the Quick Settings is disabled.
To enable editing Quick Settings again on your Windows 11 computer, you need to follow the above steps, and in Disable Editing Quick Settings window, select the Not Configured option. After that, press the Apply button and OK button. Finally, just sign out and sign in again to your computer, and you will be able to edit Quick Settings again.
Disable editing Quick Settings in Windows 11 using Registry Editor
It is advised to be careful before trying or applying any Registry tweak. Therefore, keeping a Registry backup is recommended so that you can undo any unwelcomed changes. So, once the Registry is backed up, follow these steps to disable editing Windows 11 Quick Settings:
- Open Registry Editor
- Go to the Windows Registry key
- Create Explorer Registry key
- Create DisableEditingQuickSettings value
- Add 1 in the Value data of DisableEditingQuickSettings
- Press the OK button
- Sign out and sign in to your computer.
Let’s check these steps in detail.
Use the Search box of your Windows 11 computer, type regedit, and use the Enter key to open the Registry Editor.
In the Registry Editor, go to the Windows Registry key. For doing so, use this path:
HKEY_LOCAL_MACHINE\SOFTWARE\Policies\Microsoft\Windows
Under this Windows key, create a Registry key, and set its name to Explorer.
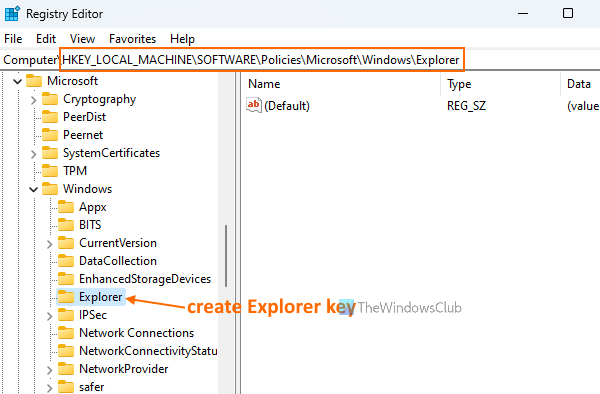
On the right-hand section of the Explorer key, create a DisableEditingQuickSettings DWORD value. For creating it, right-click on an empty area, access the New menu, and use the DWORD (32-bit) Value option. When the new value is created, set its name to DisableEditingQuickSettings.
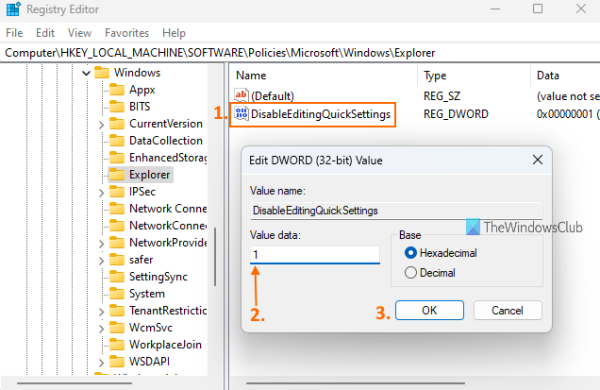
Now it’s time to set the value data of this DWORD value. To do so, double-click the DisableEditingQuickSettings value. This will open a small box. Add 1 in the Value data field present in that box, and press the OK button.
Finally, sign out and sign in to your Windows 11 computer to add the changes. This will disable editing the Quick Settings of Windows 11.
To turn on or enable editing the Quick Settings, just follow the above steps, and delete the DisableEditingQuickSettings DWORD value. Now log out or sign out from your computer and log in again and you can start editing Quick Settings once again.
Where is the Quick Settings panel in Windows 11?
The Quick Settings panel can be accessed from the bottom right corner (just before the system clock) of your Windows 11 system tray present in the taskbar. You can click on Wi-Fi, Volume, or Battery icon to open the Quick Settings panel. Once you have accessed the Quick Settings panel, you can access commonly used features like turning on Wi-Fi, Night light, Accessibility, Bluetooth, etc. You can also add or remove items from the Quick Settings panel easily.
How do I enable Quick Settings in Windows 11?
By default, the Quick Settings feature remains enabled in Windows 11. However, if for some reason, your Windows 11 Quick Settings is not working, then you can try some fixes to solve your problem. You can try fixes like:
- Update Windows
- Troubleshoot in Clean Boot State
- Set Access Center settings to Not Configured using the Local Group Policy Editor
- Run SFC scan, etc.
Read next: Bluetooth icon missing on Quick Settings panel in Windows 11.