If you do not want to use smart cards on BitLocker removable data drives in Windows 11/10 PC, you can follow this guide minutely. Here is how you can prevent users from using smart cards on BitLocker removable drives in Windows 11 or Windows 10 PC using Local Group Policy Editor and Registry Editor.
Prevent users from using Smart Cards on BitLocker Removable Drives
To prevent users from using smart cards on BitLocker removable drives, follow these steps:
- Press Win+R to display the Run dialog.
- Type gpedit.msc and click the OK button.
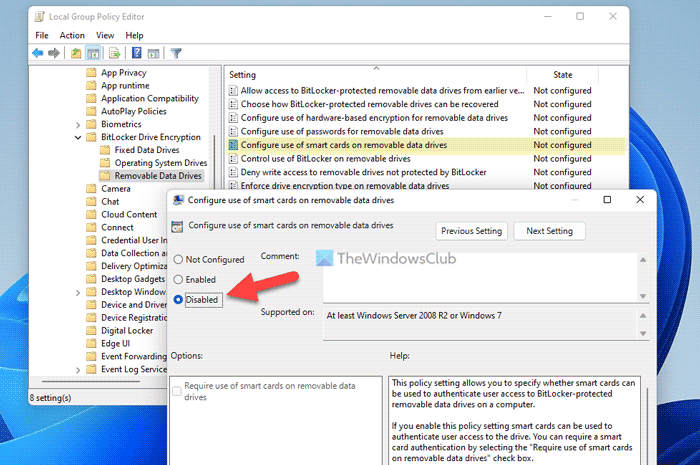
- Go to Removable Data Drives in Computer Configuration.
- Open the Configure use of smart cards on removable data drives setting.
- Select the Disabled option.
- Click the OK button.
Let’s check out these steps in detail.
To get started, you need to open the Local Group Policy Editor. For that, press Win+R to display the Run dialog, type gpedit.msc, and click the OK button.
Once it is visible on your screen, navigate to this path:
Computer Configuration > Administrative Templates > Windows Components > BitLocker Drive Encryption > Removable Data Drives
Here you can find a setting called Configure use of smart cards on removable data drives. You need to double-click on this setting and choose the Disabled option.

Finally, click the OK button to save the change.
Note: If you want to allow users to use smart cards on BitLocker removable data drives, you need to choose the Not Configured or Enabled option. If you select the Enabled option, you need to tick the Require use of smart cards on removable data drives checkbox.
Block users from using smart cards on BitLocker removable drives using Registry
To block users from using smart cards on BitLocker removable drives using Registry, follow these steps:
- Search for regedit and click the search result.
- Click the Yes button.
- Go to Microsoft in HKLM.
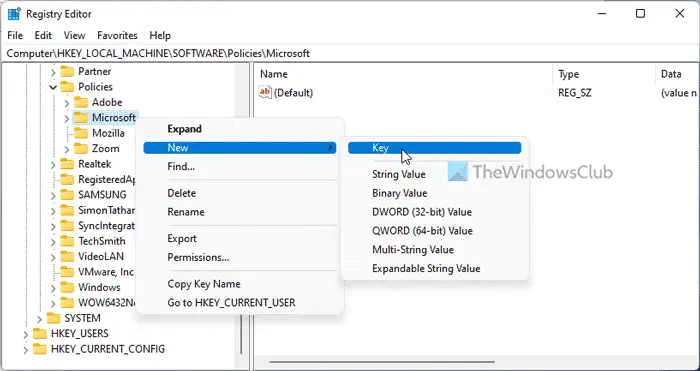
- Right-click on Microsoft > New > Key and name it as FVE.
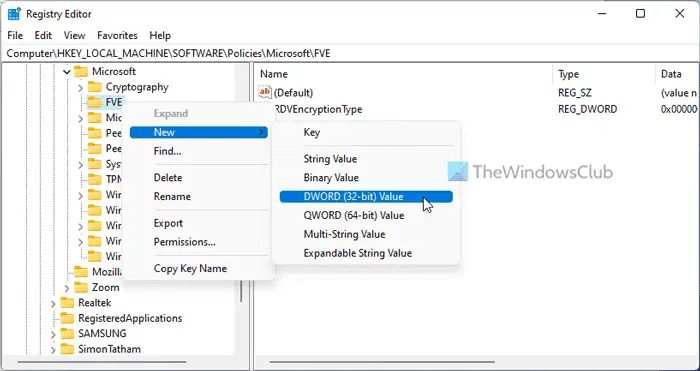
- Right-click on FVE > New > DWORD (32-bit) Value.
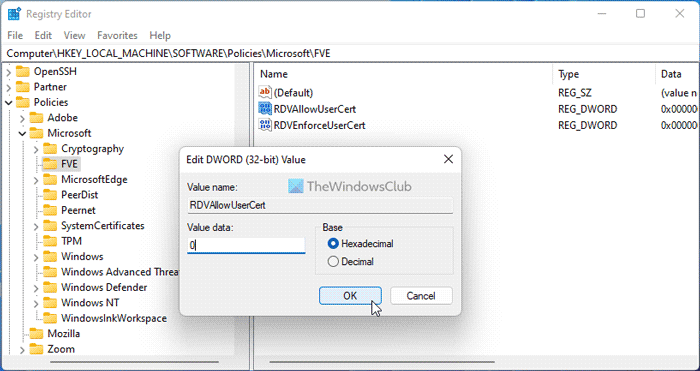
- Set the name as RDVAllowUserCert.
- Repeat the same steps to create another REG_DWORD value named RDVEnforceUserCert.
- Restart your PC.
Let’s find out more about these steps.
First, search for regedit in the Taskbar search box, click on the search result, and click the Yes button in the UAC prompt.
Then, navigate to this path:
HKEY_LOCAL_MACHINE\SOFTWARE\Policies\Microsoft
Right-click on the Microsoft key, select New > Key, and name it as FVE.

Following that, you need to create two REG_DWORD values. For that, right-click on FVE > New > DWORD (32-bit) Value and set the name as RDVAllowUserCert.

By default, it comes with a Value data of 0 and you need to keep that. Once done, repeat the same steps and create another REG_DWORD value called RDVEnforceUserCert.

As usual, you do not need to change the Value data for this REG_DWORD value as well. Finally, close all the windows and restart your computer.
If you want to revert the change, you need to right-click on each REG_DWORD value, select the Delete option, and click the Yes button.
Read: How to enable or disable Enhanced PINs for BitLocker Startup in Windows 11/10
How do I disable BitLocker on removable disk?
There are mainly two ways to disable BitLocker on a removable disk or drive on Windows 11/10 PC. For that, open the Local Group Policy Editor and go to BitLocker Drive Encryption > Removable Data Drives, and double-click on the Control use of BitLocker on removable drives setting. Then, choose the Disabled option and click the OK button to save the change.
Is BitLocker capable of protecting removable drives?
Yes, you can protect removable drives using BitLocker. Whether you use Windows 11 or Windows 10, you can password-protect removable data drives with the help of BitLocker. For that, you can use Control Panel or the Local Group Policy Editor to get the job done.
That’s all! Hope these guides helped you.
Read: Unlock BitLocker Encrypted Fixed or Removable Data Drive in Windows 11/10.
Leave a Reply