By default, Microsoft Word doesn’t print on the front or back automatically for duplex printing, and users need to select the side manually. However, you can print on single or both sides for duplex printing by enabling this setting in Microsoft Word. It is possible to turn on this feature using Word Options, Local Group Policy Editor, and Registry Editor.

How to print on both sides for Duplex printing in Word
To print on both sides for Duplex printing in Word, follow these steps:
- Open Microsoft Word on your computer.
- Click on the File menu.
- Select Options.
- Switch to the Advanced tab.
- Head to the Print section.
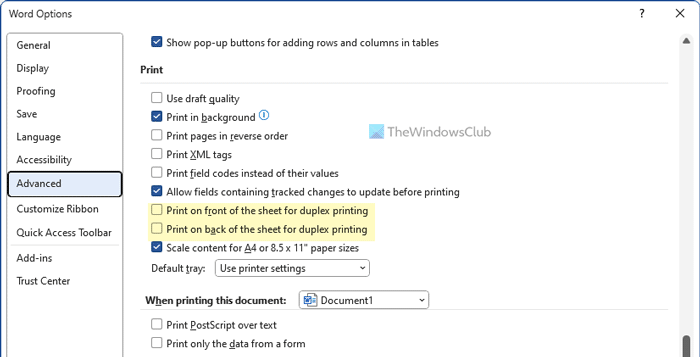
- Tick the Print on front of the sheet for duplex printing setting.
- Tick the Print on back of the sheet for duplex printing setting.
- Click the OK button.
To learn more about these steps, continue reading.
To get started, open Microsoft Word, click on the File, and select the Options menu visible in the bottom left corner. It opens the Word Options panel.
Following that, switch to the Advanced tab on the left side and head to the Print section. Next, you can find two checkboxes:
- Print on front of the sheet for duplex printing
- Print on back of the sheet for duplex printing

You need to tick these two checkboxes and click the OK button to save the changes. In this case, you do not need to restart the Word application since you have used the in-built option to enable this setting.
If you want to follow the Local Group Policy Editor method, you need to install the Office template for Group Policy first. Otherwise, you cannot find the path mentioned below. For your information, this template is available for free on the official Microsoft website.
How to print on both sides for Duplex printing in Word using Group Policy
To print on both sides for Duplex printing in Word using Group Policy, follow these steps:
- Press Win+R to open the Run prompt.
- Type gpedit.msc and hit the Enter button.
- Navigate to Advanced in User Configuration.
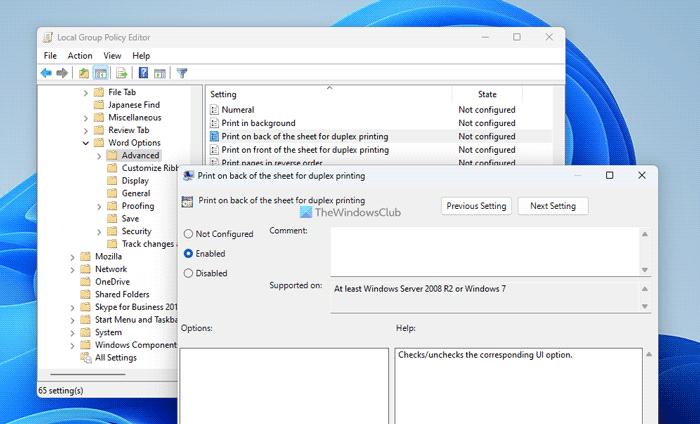
- Double-click on the Print on back of the sheet for duplex printing setting.
- Select the Enabled option and OK button.
- Double-click on the Print on front of the sheet for duplex printing setting.
- Choose the Enabled option and click the OK button.
Let’s find out more about these steps.
First, you need to open the Local Group Policy Editor. For that, press Win+R, type gpedit.msc, and hit the Enter button.
Next, navigate to this path:
User Configuration > Administrative Templates > Microsoft Word 2016 > Word Options > Advanced
Here you can see two settings:
- Print on front of the sheet for duplex printing
- Print on back of the sheet for duplex printing
Double-click on each setting, choose the Enabled option and click on the OK button.

Finally, you need to restart the Word to get the change.
Note: The following method is all about creating and changing Registry values. That is why it is highly recommended to backup Registry files and create a System Restore point.
How to enable printing on both sides for duplex printing in Word using Registry
To enable printing on both sides for duplex printing in Word using Registry, follow these steps:
- Search for regedit in the Taskbar search box.
- Click on the individual search result.
- Click the Yes button in the UAC prompt.
- Navigate to office\16.0\word in HKCU.
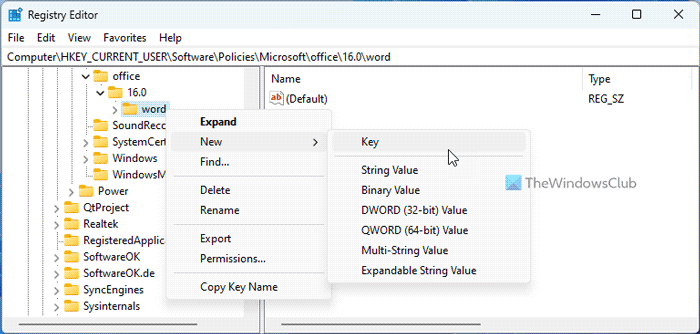
- Right-click on word > New > Keyand name it as options.
- Right-click on options > New > Keyand set the name as vprsu.
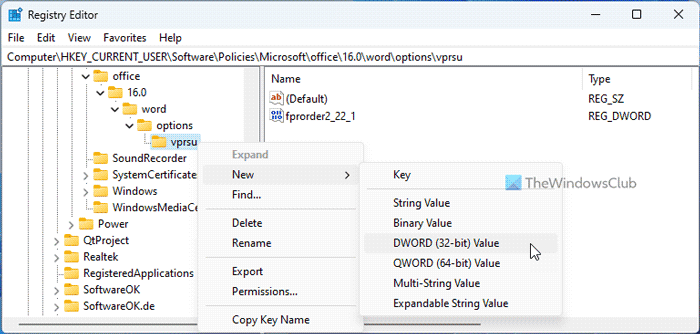
- Right-click on vprsu > New > DWORD (32-bit) Value.
- Name it as fprorder1_21_1.
- Double-click on it and set the Value data as 1.
- Click the OK button.
- Create another REG_DWORD value named fprorder2_22_1.
- Repeat the same steps to set the Value data as 1.
- Close all windows and restart your computer.
Let’s delve into these steps in detail.
To get started, search for regedit in the Taskbar search box, click on the individual search result and click the Yes button in the UAC prompt.
Next, you need to navigate to this path:
HKEY_CURRENT_USER\Software\Policies\Microsoft\office\16.0\word
However, if you cannot find it, you need to create the sub-keys manually. For that, right-click on Microsoft > New > Key and name it as office. Then, repeat the same steps to create 16.0 and word sub-keys respectively.
Next, right-click on word > New > Key and name it as options.

Then, right-click on options > New > Key and set the name as vprsu. Once done, right-click on vprsu > New > DWORD (32-bit) Value and set the name as fprorder1_21_1.

Double-click on it and set the Value data as 1. Then, repeat the same steps to create another REG_DWORD value named fprorder2_21_1 and set the Value data as 1.

Finally, close all windows and restart your computer to get the change.
Read: How to Print Double-Sided on Windows
Why is Microsoft Word not letting me print double sided?
By default, Microsoft Word doesn’t let you print on both sides. However, you can enable this setting by turning on the duplex printing. It is possible to activate this option using any of the three guides mentioned here in the article. For your information, you need to enable both options at the same time so that Word can print on both sides at the same time.
How do I set Word to print double sided by default?
To print on both sides of the paper in Word, you need to enable the aforementioned settings. They are called Print on front of the sheet for duplex printing and Print on back of the sheet for duplex printing. As said earlier, you can find these settings in the Word Options panel. Alternatively, you can enable them using Local Group Policy Editor as well as Registry Editor. A detailed guide is mentioned above, and it is recommended to follow that in order to turn them on.