Snipping Tool is not a new feature of the Windows operating system and most users have been using this tool to take screenshots of their screen for a while now. However, most users are unaware that you can now record videos using this tool. They tend to install a third-party application to record their screen. Microsoft’s solution to this is pretty simple: they added video recording capability to the good old Snipping tool. In this post, we will see how you can record videos using the Snipping Tool on a Windows 11 computer.

You can now use the Snipping Tool not only for screenshots but for screen recording as well. All you need to do is update the Snipping Tool to the latest version and you will start seeing the Record button.
In Windows 11, the SnippingTool is integrated with an in-built video recorder, which comes in handy in many ways, and you can find the update on the Microsoft Store’s Library. Before this update, we used to capture a snippet by clicking the Win+Shift+S button. This way, a rectangle shape snippet will be created as the rectangular mode is set as default. However, you can also select Window mode, Full-screen mode, and Free-form mode from the toolbar.
As we know, the tool is known for taking screenshots on Windows PCs. However, the newest addition to it, the screen recording feature, allows users to get rid of third-party apps when it comes to recording the screens. If you have a Windows 11 computer and want to record videos, then you don’t need to use any third-party software. This is because the upgraded version 11.2211.35.0 of built-in Snipping Tools makes it possible for you to record videos. Microsoft has started rolling out this update for Dev Channel devices, and it will then be deployed on all Windows 11 devices.
Record videos using Snipping Tool in Windows 11

Follow these steps to record the video with the Snipping tool on your Windows PC.
- Press the Windows key and search Snipping Tool.
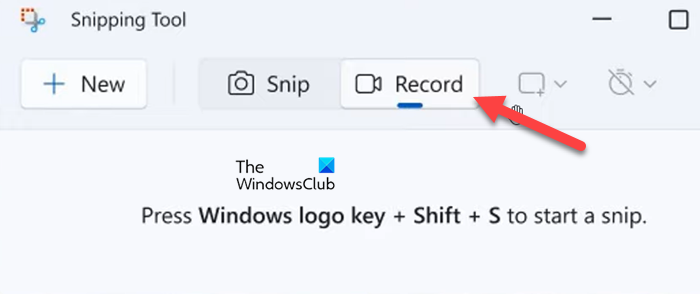
- Open the app and click on the Record button.
- Select the New button and select the area to record.
- Now, click the Start button and record the screen session as required.
- Select the Stop button when you want to stop recording.
- At last, click on the Save button and select the required location to store the recording file.
You can access the file whenever you want to.
Although the feature is much appreciated, it has its own limitations – not being able to crop or edit the footage is one of them. It is a basic screen recorder! Another thing to keep in mind while using the feature is that it does not support audio recording. If you can overlook these two drawbacks, this feature can be helpful; therefore, let us see in detail how to Record videos using the Snipping tool in Windows 11.
Read: How to Record Video in Windows Mixed Reality
Hopefully, we have resolved any inquiries that you may have about the Snipping tool and its recent update, such as does it allow you to record the screen.
Leave a Reply