This post will show you how to recover BIOS settings in HP, ASUS, Dell, and other laptops. This can be useful if your Windows computer does not start.

BIOS stands for Basic Input Output System. It is firmware and is stored on a chip on a computer’s motherboard. It contains a set of instructions that help load your operating system. When you turn on your computer, it performs some basic checks, like testing your computer’s hardware, then it loads the operating system. When BIOS fails or gets corrupted, you won’t be able to boot your computer. In such a case, you have to recover your BIOS.
How to recover BIOS on Windows computers
Computers of different brands have different procedures to recover BIOS. In this article, we will discuss how to recover BIOS on computers of some popular brands, like HP, ASUS, and Dell.
How to recover BIOS on HP laptop
We will show you the following two processes to recover HP BIOS:
- By using a key combination
- By using a USB recovery drive
Recover BIOS on HP computers by using a key combination
Many HP computers have an emergency BIOS recovery mode. This allows users to recover or restore the working version of BIOS from the hard drive. For this, you have to use the dedicated key combination. The process to recover BIOS from the hard drive is explained below:
- First, completely turn off your computer by pressing and holding the power button. If you have an HP laptop, connect the power adapter to the laptop and one side to the wall outlet. Turn on the switch of the power adapter to give a continuous power supply to your laptop.
- When your computer is powered off, press and hold the Win + B keys. Keep these keys pressed and then press and hold the Power button for up to 3 seconds.
- Release the Power button after 3 seconds but keep the Win + B keys pressed until you hear a beep sound. Now, release the Win + B keys.
- After the beep sound, your HP computer screen may remain blank for up to 60 seconds. After that, the HP BIOS Recovery screen should appear.
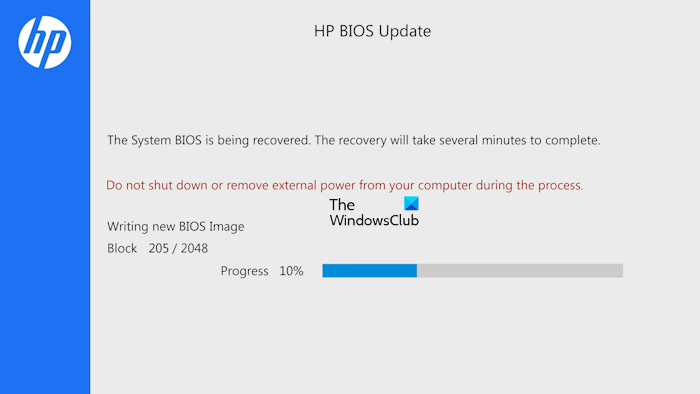
If after following the above steps, your screen remains black, repeat these steps again. If after repeated attempts, the screen remains black, your computer might not support this functionality or there might be a hardware issue.
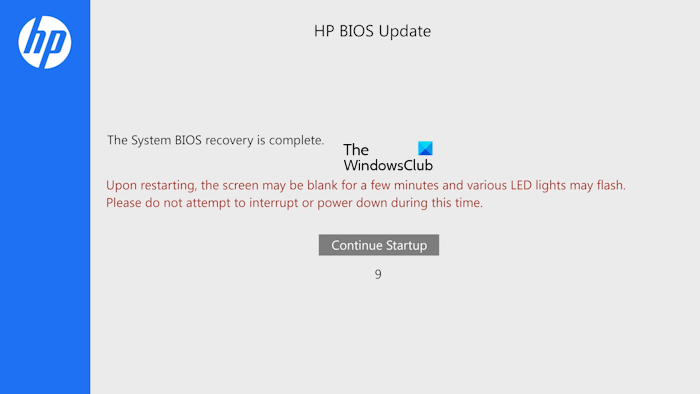
The BIOS update will begin automatically. Let the process be completed. After the completion of the BIOS Update, you will see the following message:
The System BIOS recovery is complete.
Click on Continue Startup to restart your computer.
Recover BIOS on HP computers by using a USB recovery drive
If the above process did not help you, you have to prepare a USB recovery drive and then use that USB flash drive to recover your HP BIOS. For this process, you need another working computer.
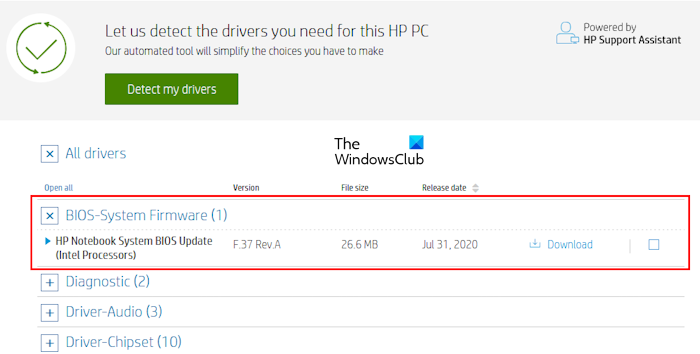
Visit the official website of HP to download the BIOS firmware file. Enter your HP computer details, like model number or serial number (whichever is required). Now, on the Drivers page, expand the All Drivers category. After that, expand the BIOS category and click on the Download link to save the BIOS file on your computer. You may be prompted to install HP Support Assistant; avoid this message, and proceed to download.
Do note that to create an HP BIOS recovery drive, the file system of your USB flash drive should be FAT32. If not, change it to FAT32 by formatting it. To check the file system of your USB Flash drive, follow the process below:
- Connect the USB flash drive to your computer.
- Open File Explorer and go to This PC.
- Right-click on your USB flash drive and select Properties.
- Under the General tab, check its File system. It should show FAT32, If it shows NTFS or other, you have to change it to FAT32.
To format your USB flash drive, right-click on it and select Format. Select FAT32 (Default) in the File system drop-down and then click Start to format the USB flash drive.
Now, insert the USB flash drive into any of the USB ports. Go to the location where you have saved the BIOS file. Double-click on the BIOS file to launch the installation wizard. Follow the on-screen instructions to complete the installation.
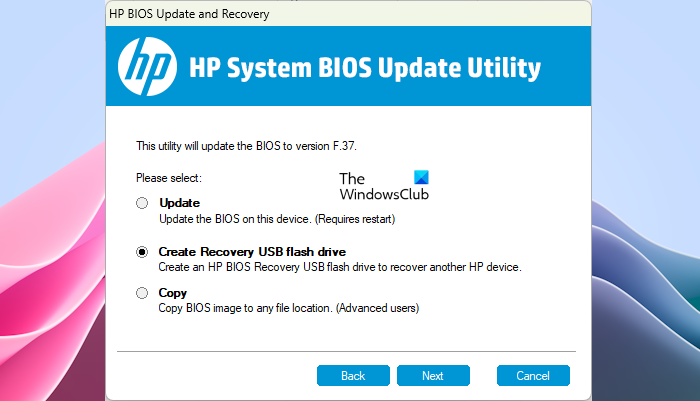
After the installation process gets completed, the HP System BIOS Update Utility will open automatically. Click Next. On the next screen, select Create Recovery USB flash drive and click Next.
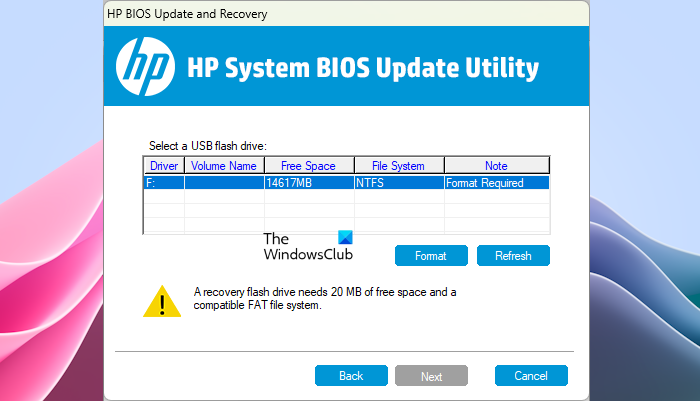
On the next screen, select the USB flash drive and click Next. If it is in NTFS, the software will ask you to format it. Click Format. After that, the computer will copy the BIOS files to the USB flash drive and rename the USB flash drive to HP_TOOLS. Eject the USB flash drive.
You have created the BIOS Recovery USB flash drive. Now, you can use it to recover BIOS. First, turn off the computer by pressing and holding the power button. If you have an HP laptop, connect the power adapter to it and turn the power adapter on to provide a continuous power supply to the laptop.
Insert the BIOS Recovery USB flash drive into any USB port. After that, press and hold the Win + B keys. Now, press and hold the power button for up to 3 seconds, then release the power button. Keep the Win + B keys pressed until the HP BIOS Update screen appears. Let the BIOS update process be completed successfully. After the completion of the update, you will see the message that says HP BIOS Recovery is complete. Click Continue Startup to restart your computer.
Related: How to enable or disable Fast Boot in UEFI/BIOS in Windows.
How to recover BIOS on ASUS laptop
There are two methods to recover BIOS on ASUS computers, one is by using the motherboard support CD or DVD and the other is by using the USB flash drive. If you have a motherboard support CD or DVD, you can use it but the BIOS version in that CD or DVD might have been outdated. Hence, it is better to go with the second method which involves creating a BIOS Recovery USB flash drive by downloading the latest version of BIOS from the official website of ASUS. Keep in mind that the USB flash drive should have a FAT32 file system.
Visit the official website of ASUS and download the latest version of your BIOS. You should know your product model name to download the correct BIOS firmware. The BIOS should be downloaded as a Zip file. Do not download the exe file. After downloading the zip file, extract it and open the extracted folder. The folder will show you the following two files:
- BIOSRenamer (an exe file).
- A CAP file.
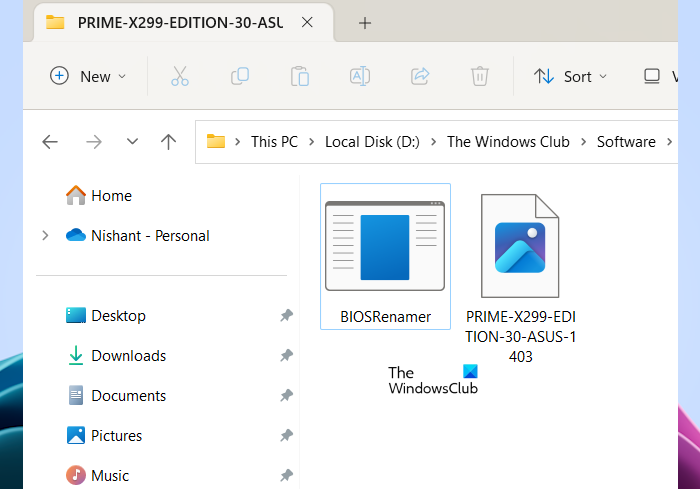
Launch the BIOSRenamer application file as an administrator. This will rename the CAP BIOS file. Now, copy this file to your USB flash drive. Insert this USB flash drive into the computer on which you want to perform BIOS recovery. Make sure that the computer is turned off and is receiving a continuous power supply.
Turn on the computer. It will automatically detect the BIOS file on the USB drive and the BIOS update will start automatically. Do not interrupt the process. After the update is complete, your system will restart automatically. On the restart, run the setup by pressing the key displayed on your screen. Restore your BIOS settings to default. Save and exit the BIOS settings and restart your computer.

If the zip file does not contain the CAP file, your motherboard might not support the ASUS CrashFree BIOS 3 utility. In this case, download the BIOS for ASUS EZ Flash Utility from the official website. Extract the file and copy the file to the USB flash storage device. Now, follow the same process explained above. If this does not work, you need to contact ASUS support for help.
Related: Legacy Boot is greyed out in BIOS.
How to recover BIOS on Dell laptop
The BIOS Recovery Tool for Dell computers is designed to recover corrupted BIOS. BIOS Recovery 2 and BIOS Recovery 3 are the tools that help you recover corrupted BIOS on your Dell computer. BIOS Recovery 3 is an advanced version of BIOS Recovery 2 software. The Dell computer models released after December 2015 support this tool. If your Dell computer model is older than this date, you will not be able to use the BIOS recovery process described here. In this case, you need to contact Dell support.
Follow the steps provided below:
For desktop computers, press the power button to turn on the computer. Now, press and hold the Ctrl + Esc keys until the BIOS recovery screen appears.
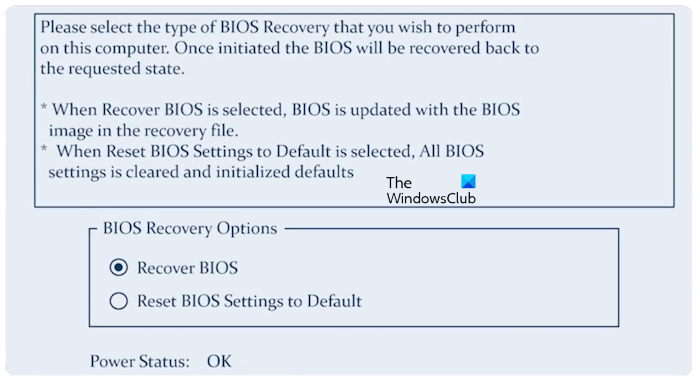
If you have a laptop, while your laptop is turned off, disconnect the power adapter. After that, press and hold the Ctrl + Esc keys. Keep the keys pressed, connect the power adapter, and turn on your laptop. Make sure that your laptop is receiving a continuous power supply. Release the Ctrl + Esc keys when the BIOS recovery screen appears.
Select the Recover BIOS option and hit Enter. After this, the BIOS recovery process will start automatically. Do not interrupt the update process. After completing the BIOS update, press any key to restart your computer. Now, your computer should work normally again.
If the recovery screen does not appear and your screen remains black, your system does not have the BIOS Recovery Tool. In this case, you must use your USB flash drive to recover your BIOS.
Read: BIOS not showing on external monitor
Recover Dell BIOS by using a USB flash drive
Do note that the USB flash drive should have a FAT32 file system. This method will work only on the following Dell computers:
- OptiPlex
- Latitude
- Precision
- XPS
If you have a Dell computer other than those mentioned above, you need to contact the Dell support team to download the BIOS Recovery Tool. Open a working computer and visit the official website of Dell. Enter the correct model name or model number to download the right BIOS firmware. The downloaded file will have an exe extension. Now, rename the file extension. For this, follow the steps provided below:
- First, enable the filename extensions on your Windows computer.
- Right-click on the downloaded file and select Rename. Or press the F2 function key.
- Delete the entire file name along with the file name extension. Now type BIOS_IMG.rcv and hit Enter. Rename the file correctly; otherwise, the recovery process will not work.
- Click Yes in the confirmation box.
- Copy the BIOS_IMG.rcv file to the FAT32 USB flash drive.
Insert the USB flash drive into the USB port of the non-functioning computer. Follow the BIOS recovery process for Dell computers explained above in this article.
That’s it. I hope this helps.
Read: Windows computer unable to boot to BIOS.
What is the key for BIOS recovery?
Computers of different brands have different key combinations for BIOS recovery. Hence, you need to visit the official website of your computer manufacturer to know the correct key combination for BIOS recovery.
Read: How to reset BIOS settings to default values on Windows computer
Can BIOS be recovered?
Yes, BIOS can be recovered. Computers have a BIOS recovery tool installed on the hard drive. You need to press the dedicated keys to launch the BIOS Recovery Tool. If this does not work, you have to use an external USB storage device to recover BIOS. If nothing helps, contact your computer manufacturer for support.
Read next: PC won’t boot after BIOS Update.
Leave a Reply