This post will show you how to redact in Word document on a Windows 11/10 system. The redaction process for a Word file helps protect privacy, prevent data leaks, and more. You can make your sensitive or private information inaccessible to others or remove it from your Word document. Thus, others will have only the information that you want them to access or use.
Is there a redaction tool in Word?
Microsoft doesn’t offer a built-in or dedicated tool to redact in Word. However, there are native options or features in MS Word that help redact a Word file (DOC or DOCX). Those native features let you black out or white out text, replace sensitive data (including text and images), hide text content directly, and more. You don’t need any third-party tool to redact a Word document.
How to Redact in Word document
You can redact text in a Word document on Windows 11/10 using the options listed below. Before using any of these options, make a copy of your Word document, just in case. The options are:
- Blacking out text in a Word document
- Add a shape to Word content
- Redact text in Word using the Hidden Font Effect
- Save the Word document as an image
- Redact Text in Word using the Find and Replace tool.
Let’s check all these options.
1] Blacking out text in a Word document
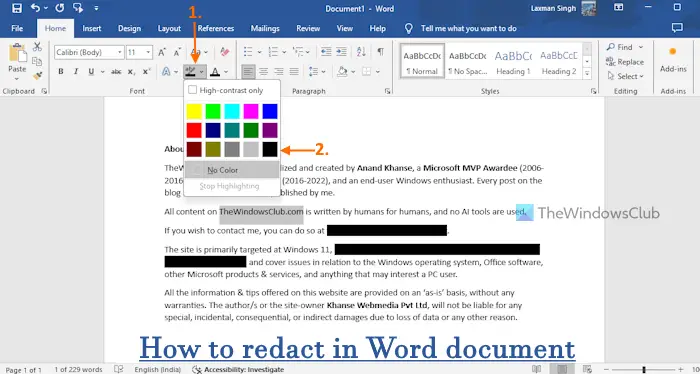
When you have to take a print of a Word file or discuss something with others without sharing the digital copy, blacking out text in a Word document is a pretty good option. You can select the text of your choice to prevent it from being read or seen and protect confidential information. The process of redacting text in a Word file can be done with the help of the Highlight feature. Here are the steps:
- Open the Word file
- Select the text (a line, words, or paragraph) that you want to redact
- Access the Home menu
- Open the drop-down menu available for the Text Highlight Color option. This option is present in the Font group in the Ribbon menu
- Select the Black color in the drop-down menu. The text will be covered with a black strip
- The most important thing is to ensure the text color is also set to black. If not, then text content will be visible easily. You can use the Font Color drop-down menu to change the text color to black (if not already)
- Follow the same steps to black out other text content
- Save your Word file.
Now you can print the document and share it with anyone you want.
To undo the redacting process, open the Word file, and select the text highlighted in black color. Open the Text Highlight Color drop-down menu and select the No Color option.
Related: Redact PDF using free PDF redaction software and services
2] Add a shape to Word content
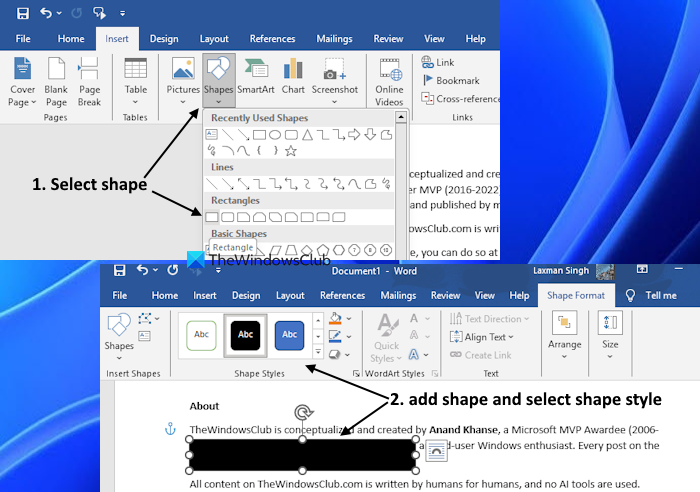
It’s another option to redact in Word and is useful for printing purposes. The added benefit of using this option is it helps to hide text content as well as image content. All you have to do is add a shape to Word content and select black, blue, or any other color for that shape for redacting the content. Here are the steps:
- Open the Word file
- Go to the Insert menu
- In the Illustrations group, click on the Shape option to open a drop-down menu
- Now you will see basic shapes, rectangles, and other shapes. For ease, select a rectangle or rectangle with rounded corners shape. Though you can choose any shape you want
- Press and hold the left mouse button and drag it to the required area over a text content or image. The selected shape (or rectangle in this case) will be added. You can also move the rectangle anytime
- Select a style (color for rectangle) from the Shape Styles group in the Shape Format menu. This will cover the selected area
- Repeat this process to redact more text or images
- Press the Save button.
3] Redact text in Word using the Hidden Font Effect
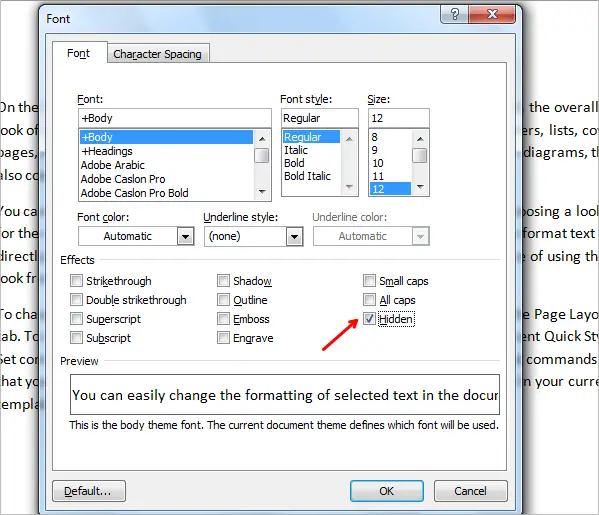
This is an interesting way to redact text in Word. You can use the built-in feature of Microsoft Word to show or hide text. Select the text you want to hide > right-click > Font. In the Font box, check the Hidden option in the Effects section, and press OK. Repeat this process to hide more text content.
To show the hidden text, use the Show/Hide option in the Paragraph group in Ribbon. Alternatively, navigate to File > More… > Options. In the Word Options box, select Display > and check the Hidden text option in the Always show these formatting marks on the screen section.
While the options covered above are surely beneficial, note that if you share the digital copy of the document, anyone who knows how to undo the redacting can access the sensitive information. Still, if you have to share its digital copy, you can use the option given below.
4] Save the Word document as an image
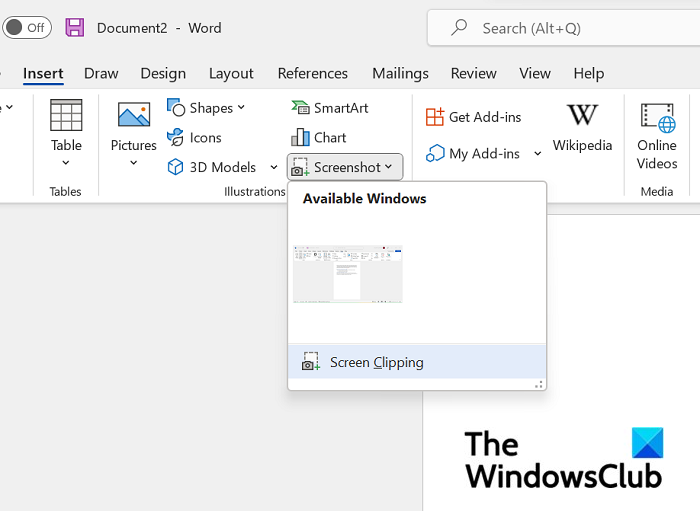
This method is handy when you have to share the digital copy of your Word file along with redacted text. Once you are done redacting in Word (as explained in the two options above), all you need to do is save the Word document as an image. This way, it would be almost impossible to fetch private information from the redacted text and/or image.
There are multiple ways to do it. For example, you can use the Snipping Tool to take a screenshot of a page and save your Word file as a JPEG image. However, in this case, you have to take screenshots of each page separately which would be time-consuming.
Another way to save a Word file as an image is to convert Word to a multipage TIFF image using a free online tool or desktop application. By doing so, you don’t have to save each page separately. You can also convert a Word file to a scanned PDF and share it.
5] Redact Text in Word using the Find and Replace tool
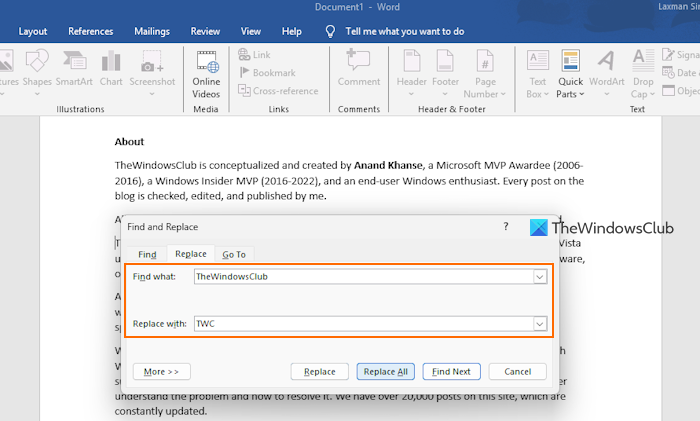
The Find and Replace tool is more suitable to redact text in Word because the content you want to hide or protect is removed permanently. The steps are:
- Open a Word file
- Press the Ctrl+H hotkey. The Find and Replace tool will open
- In the Find what: field, enter the text you want to redact. It could be a single word, multiple words, line, etc.
- In the Replace with: field, enter the text (say abc) that you want to show in replacement. To make it easier to find redacted text after the process, add the same number of characters as a replacement
- Press the Replace All button. All the matched text will be replaced
- Repeat all the steps to redact more text
- Save your Word file.
To make it more secure, you should remove document properties and personal information, comments and revisions, hidden text, and other items from your document. For this, use the built-in Document Inspector tool of Word and remove all such information. Finally, save the Word file.
Bonus: You can also use the Find and Replace tool to replace all images in Word at once
How do you black out words in Docs?
To black out words in Google Docs, open a Google Docs document. Select the words or text in the document, and click on the Highlight color icon. It is present in the top-middle section of the toolbar. Select the black color in the color palette. The text color must also be black so the text content won’t be visible. Use the Text color menu to change the selected text color if it is not set to black already.
Read next: Word document is opening black on Windows PC.
Leave a Reply