Windows Terminal is Microsoft’s built-in application that allows its users to run command lines on their PCs for a myriad of purposes. The package offers several kinds of command shells like Command Prompt, PowerShell, Azure Cloud Shell, etc. A common and misfortunate occurrence with the Windows Terminal is that you can mistakenly uninstall it while trying to do something else. In this article, we will be discussing how you can reinstall the Windows Terminal application back on your Windows 11 PC.

How to reinstall Windows Terminal on Windows 11/10
If, in case, you end up uninstalling Terminal from your PC, then you won’t be able to access it from any menu options (the Start Menu or the Win + ‘X’ menu prompt). Thus, it is important to know how this application can be brought back. There are two methods to do so, both very straightforward:
- Using PowerShell
- Via the Microsoft Store
1] Reinstall Windows Terminal using PowerShell
- Open the Search prompt on the Start Menu and search for PowerShell
- Click to run it as an administrator profile
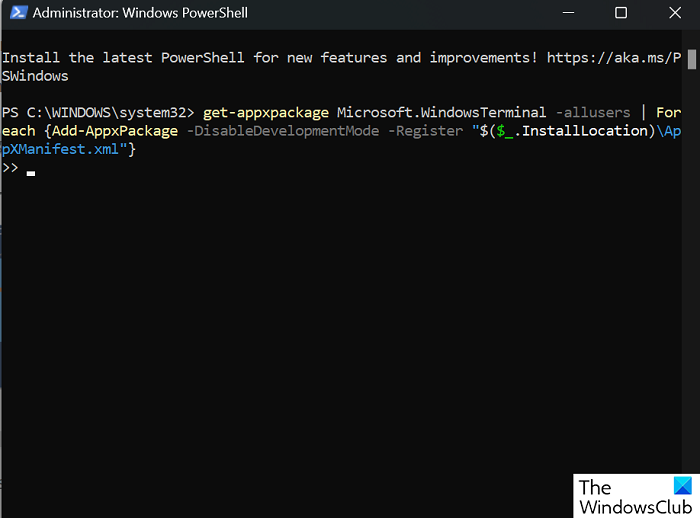
- Paste the following command in the shell and press enter
get-appxpackage Microsoft.WindowsTerminal -allusers | Foreach {Add-AppxPackage -DisableDevelopmentMode -Register "$($_.InstallLocation)\AppXManifest.xml"}
- Once the command has run, close the PowerShell

You’ll find out that, upon successful execution, the Windows Terminal application was installed once again on your PC.
Related: Windows Terminal is not opening
2] Reinstall Windows Terminal from the Microsoft Store
Another, and a much easier, way to reinstall Windows Terminal is using the Microsoft Store. Here are the steps you need to follow for the same:
- Launch the Microsoft Store app on your PC
- Search the words “Microsoft Terminal” or click on this link to directly jump to the app page
- Click on the Get button and very soon, the Windows Terminal app will start downloading
Read: Terminal vs PowerShell vs Command Prompt difference explained
How to set your default Terminal application in Windows 11?

On a similar note, once you have Windows Terminal on your PC, you must be wondering how you can set an application to open by default on your terminal. The process to set a default terminal application is discussed below:
- Open Windows Terminal on your PC
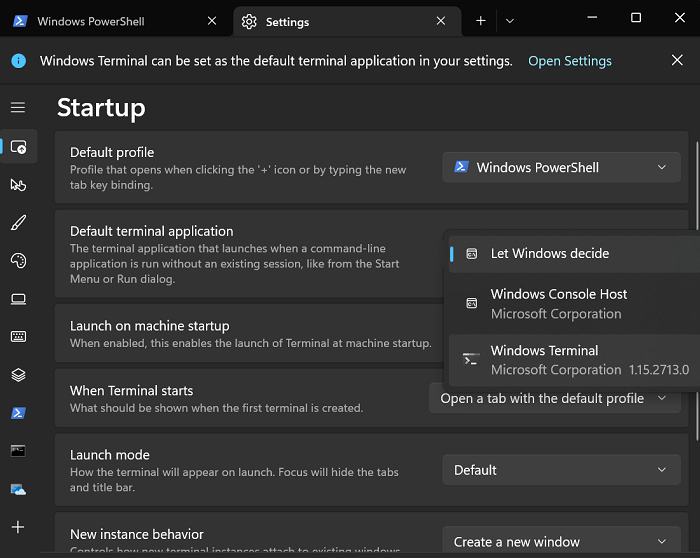
- Click on the drop-down next to the Terminal tab at the top and further select Settings
- On the Startup page, you’ll find an option to set a default terminal application via a drop-down.
Above it is the setting to set a default terminal profile as well. You can select Command Prompt, PowerShell, or Azure Cloud Shell.
Can I uninstall Windows Terminal Windows 11?
With Windows 11, Microsoft has given its users the option to delete several pre-installed apps on their computer, among which is the Windows Terminal as well. Using a simple PowerShell script, you can now uninstall Windows Terminal on your Windows PC.
Where is Windows Terminal Installed in Windows 11?
Windows 11 installs Windows Terminal in %LOCALAPPDATA%\Packages\Microsoft.WindowsTerminal_8wekyb3d8bbwe folder. Even if you have multiple user accounts attached to your PC, you can find the Windows Terminal installation here only. No matter which method you use to install the Terminal app, the installation folder location remains the same.
We hope that you find this helpful.
Leave a Reply