Windows users who frequently access network resources need to map network drives. Once you map a network location to a network drive, you can access it from File Explorer as a local drive. In case this feature is not useful, you may remove the Map network drive Context Menu item on your Windows computer.
Remove Map network drive Context Menu item on Windows 11/10
There are two methods you can use to remove the Map network drive context menu item on your Windows 11 PC. They are as follows:
- Using Group Policy Editor
- Through Registry Editor
Let’s take a closer look at each method:
1] Remove Map network drive context menu item using the Group Policy Editor
If you would like to remove the Map network drive Context Menu item using the local group policy, here are the steps you should follow. But one thing you should remember is that this method can only be applicable to the Windows 10 Pro, Enterprise, or Education edition. Or, you could say that Microsoft Windows Home Edition does not offer the group policy editor by default. Therefore, if you’re using Windows basic variant, you can skip this method and move on to the next one.
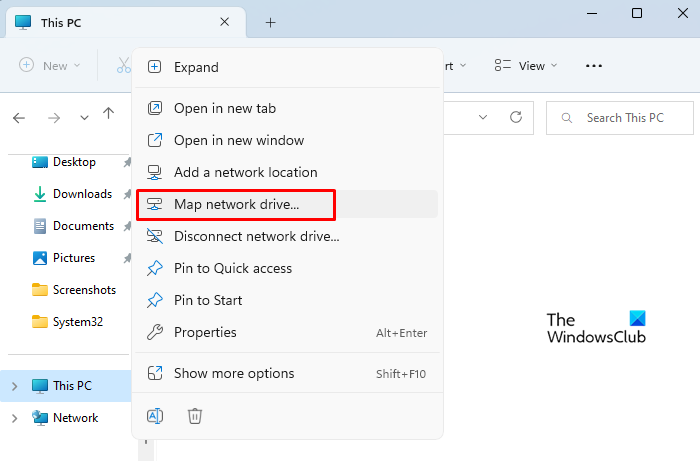
- Open the Local Group Policy Editor.
- Navigate to the path – User Configuration > Administrative Templates > Windows Components > File Explorer.
- Double-click on Remove “Map Network Drive” and “Disconnect Network Drive”.
- Check the Enabled radio button.
- Then click on Apply > OK.
- Once you do so, the change will take effect instantly.
If you need more explanations, you can check out the following section:
To get it started, you first need to open the Local Group Policy Editor. For this, press the Windows key + R to launch the Run dialog box. In the text box, type gpedit.msc and press Enter to open the Local Group Policy Editor.
On the next page, go to the following location:
User Configuration > Administrative Templates > Windows Components > File Explorer

Once you’re on the respective location, select File Explorer from the left panel. Now move to the right pane, scroll down the Setting column, and double-click on Remove “Map Network Drive” and “Disconnect Network Drive”.
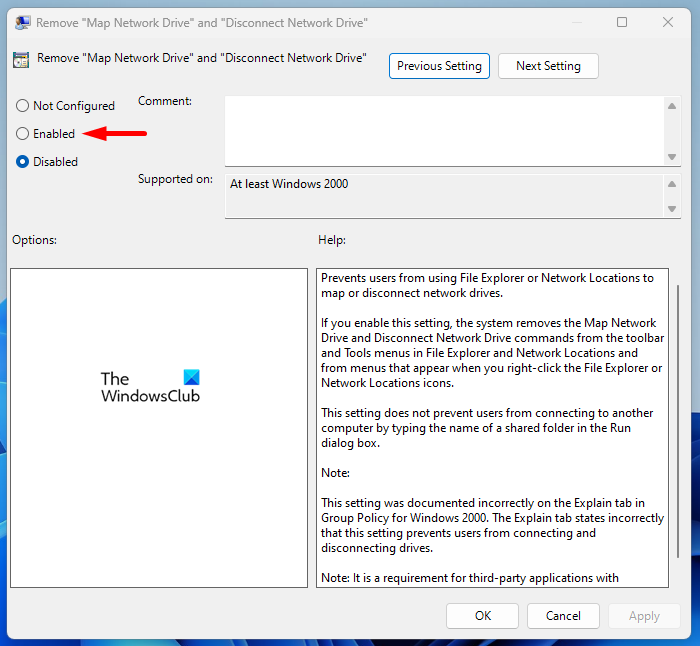
In the Remove “Map Network Drive” and “Disconnect Network Drive” window, select the Enabled option.
After that, click on Apply > OK button to save the changes.
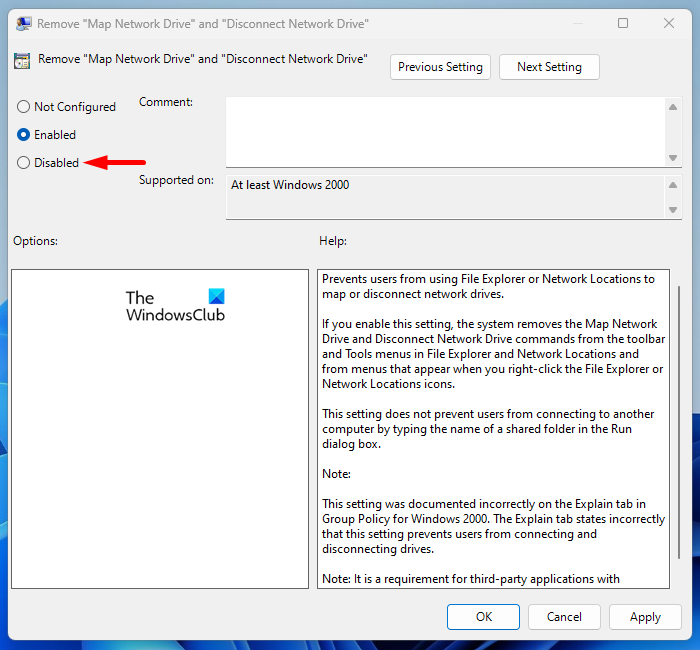
Whenever you need to add the Map network drive Context Menu item, you simply need to follow the above steps and check Disabled in the Remove the “Map Network Drive” and “Disconnect Network Drive” window.
2] Remove Map network drive context menu item through the Registry Editor
This solution requires you to remove the Map network drive through the Registry Editor. Therefore, if you haven’t been able to resolve this problem, there is one more option you can try. Simply follow the below steps:
- Open the Registry Editor.
- If you see a UAC prompts on the screen, click Yes to give your consent.
- When the Registry Editor window opens, navigate to the following Registry location: \Policies\Explorer.
- If the Explorer key does not exist, create one.
- Then right-click the Explorer key, and then select New > DWORD (32-bit) Value.
- Assign the key name NoNetConnectDisconnect, then hit Enter.
- Double-click on NoNetConnectDisconnect and set its Value data 1.
- Click OK, and then exit Registry Editor.
- Restart your computer.
If you need a more detailed explanation of the above step, please see the following section:
To get it started, open the Registry Editor first. For this, you can search for regedit in the Taskbar search box and click on Registry Editor from the search result. Alternatively, you can use the Run command to perform the same task.
Just press the Windows key and the R key at the same time to open the Run dialog box. When the dialog box appears, type regedit and click OK. You will see a UAC prompt at this point. Please click Yes to proceed.
Once you’re in the Registry Editor window, go to the following path:
HKEY_CURRENT_USER\Software\Microsoft\Windows\CurrentVersion\Policies\Explorer
If you prefer, copy and paste the given path line in the address bar of your Registry Editor and press Enter. This will take you directly to the required location. Click on the Explorer directory on the left side of the page.
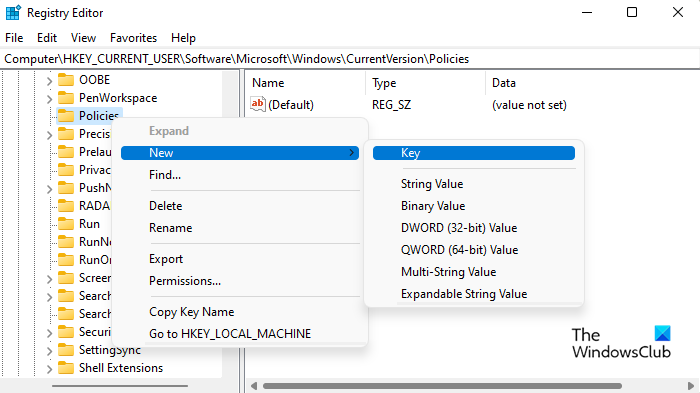
If you don’t find the Explorer key at the specified location, you will need to create it. For this, right-click on the Policies directory, and select New > Key. Type Explorer in the Name box and then press Enter to save it.
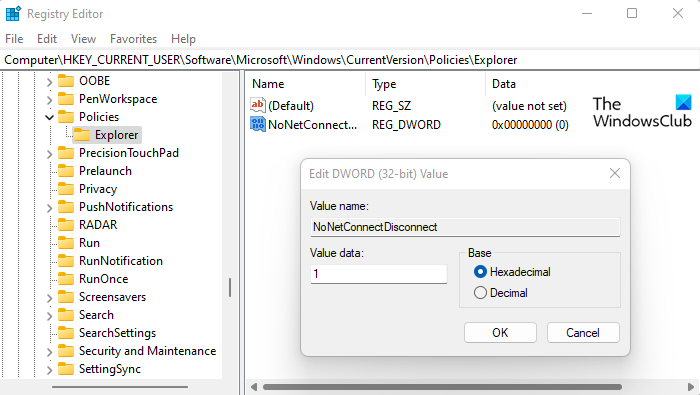
Next, go to the right pane and right-click on a blank space then select New > DWORD (32-bit) Value. Assign the key name NoNetConnectDisconnect, then hit Enter. After that, click twice on the newly created NoNetConnectDisconnect key and when the popup menu appears, enter 1 in the Value data field.
After making your changes, click OK to save them. This will remove the Map network drive from your Windows 11 PC.
The Map network drive context menu items can be re-enabled at any time by changing the policy option back to its default value. Alternatively, you can open the Registry Editor, follow the above steps, and then delete the NoNetConnectDisconnect key.
How do I add Map a network drive to Explorer?
If you would like to add Map a network drive to Windows File Explorer so that you don’t have to manually type its network address each time, then follow the steps below:
- Press the Windows key + E keyboard shortcut to open the File Explorer. You can also open it either through the taskbar or the Start menu.
- In the File Explorer window, select This PC from the left pane.
- Then, go to the top-right corner and click on the three dots (See more).
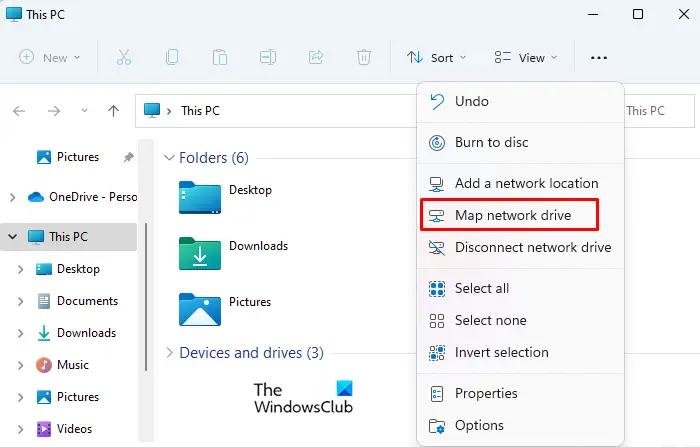
- From the menu list, click on the Map network drive.
- Choose from one of the available drive letters in the Drive list.
- Input the path to the folder in the Folder box. Alternatively, you can click the Browse button to locate the folder or computer you want to choose from the Folder box.
- Next, select the Reconnect at sign-in checkbox. This will connect every time you sign in to your PC.
- Once you’re done, click on the Finish button.
This way, you can easily add a map to your network drive on a Windows 11 PC. Please note that sometimes you may not be able to connect to a network drive or folder if the computer you’re connecting to has been turned off. In some cases, you might not have the right permissions, which results in you being unable to access a network folder or driver. In such a case, you should try to contact the network administrator.
Related Post: How to map or add a Network Location or Map FTP Drive in Windows.
How does map network drive work?
A mapped drive allows users to access resources on a local network or files on a website or FTP server by creating a shortcut to the drive on another device. The idea behind mapping a drive is to allow other users who share a network to access a specific drive. When you map a drive, all of its contents will be accessible from the File Explorer section on other computers just as they would be on an internal drive.
Read next:
Leave a Reply