An image with a background in Microsoft Excel can cause distractions, and as such, it would make perfect sense to remove it once and for all. Now, since Excel is all about numbers and calculations in the eyes of many, a lot of users believe basic image manipulation is not possible.
How to remove picture background in Excel
But that is not the case at all, and we will prove it. You see, it is entirely possible to remove a background in any photo using Microsoft Excel, which is quite impressive.
Removing the background is super easy, more so than when a standalone image editor is used. At least, that is how we view it.
1] Insert a picture in Microsoft Excel

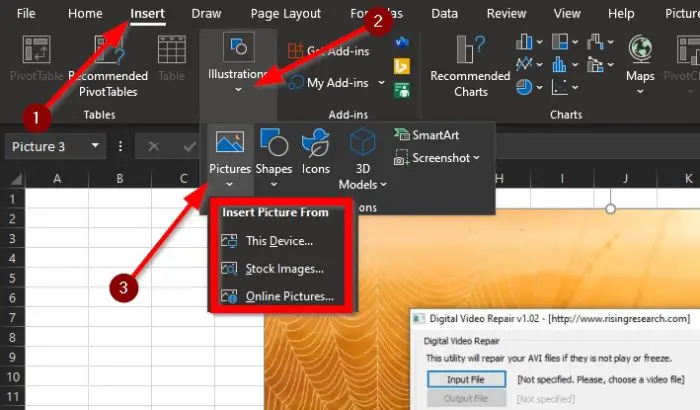
Okay, so the first thing you will need to do is fire up Excel and then open a current or new document. From there, click on Insert > Illustrations, then select Picture and choose how to add your image to the document.
2] Picture is not available on the Ribbon?

Because this is Microsoft Excel we’re talking about, the ability to add an image is not essential. Therefore, you may find that the Picture option is not available on the Ribbon but worry not.
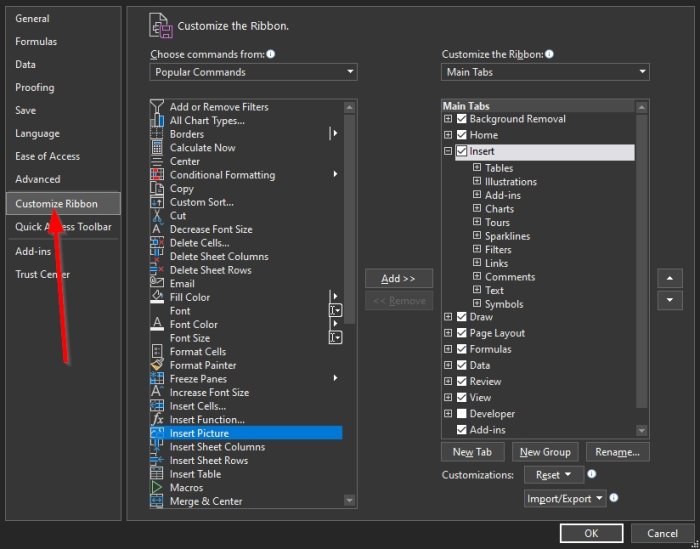
If this is the case, click on File > Options, and from there, a new window will appear within Excel.
Click on Customize Ribbon. From far-right, click on the dropdown menu and select Main Tabs if it hasn’t been chosen already.
Below the Main Tab section, select Insert from the list of options, then go over to the left-side and click on the dropdown menu under Choose commands from. From there, choose Popular Commands, then select Insert Picture.
Finally, click on Add, and right away, the Insert Picture function will fall under the Insert Tab. Complete the task by clicking on the OK button.
You can now add your picture to Excel by following the first step above.
3] Remove Background from image

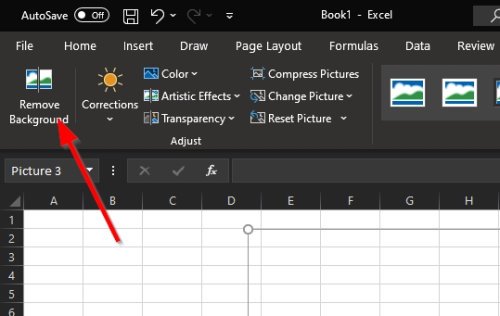
Once the image has been added to Microsoft Excel, you should see an option to the top left that reads, Remove Background. Click on that button, and right away, the background on the image should now have a purple tint.
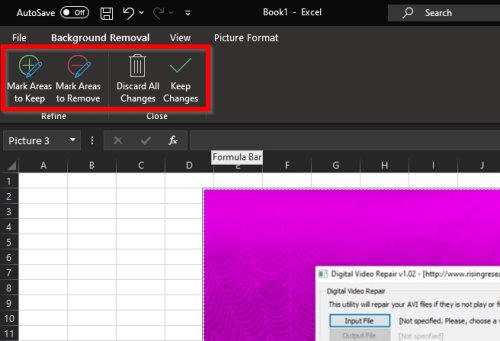
Finally, click on Keep Changes to remove the background and keep the foreground.
4] Mark areas to keep or remove

From our experience, Excel is very good at detecting the background in many photos, so removing the background is mostly automatic. However, if the tool does not fully detect the background, we suggest using the Mark Areas tool to get the job done.
If there is a section on the photo, you want to keep, select Mark Areas to Keep. If there is a section that needs to go, then click on Mark Areas to Remove.
Manually highlight the areas, then hit the Keep Changes button to complete the action.
TIP: You can also remove the Background of a Picture with Word.
Leave a Reply