If you want to rename hardware in Device Manager of Windows 11/10, here is how you can do that. Whether you want to rename GPU, CPU, USB camera, or any other USB device, it is possible to change the name with the help of this step-by-step guide.

Device Manager shows all the devices and drivers attached to your computer – whether it is your internal or external hard disk, camera, graphics card, speakers, or anything else; you can find that in the Device Manager.
The Device Manager usually shows the device with the original name under each section. However, there could be times when you might not recognize the device due to having a generic name. For instance, if you open the USB controllers section, you can find some devices that you might not recognize or even comprehend. In such situations, you can rename the device to identify it further.
How to rename Hardware in Device Manager of Windows
To rename hardware in Device Manager of Windows 11/10, follow these steps:
- Open Device Manager on your computer.
- Right-click on the hardware and select Properties.
- Go to the Details tab.
- Expand the Property menu and choose the Driver key.
- Right-click on the Driver key and select Copy.
- Open the Registry Editor on your PC.
- Navigate to Enum in HKLM.
- Select Edit > Find.
- Paste the copied Device key and click on Find Next.
- Double-click on the FriendlyName String Value.
- Enter a name you want to set and click on OK.
- Restart your computer.
To learn more about these steps, continue reading.
To get started, you need to obtain the Driver key of the hardware that you want to rename. For that, press Win+X and select the Device Manager option to open Device Manager on your computer. Next, find the hardware you want to rename, right-click on it, and select the Properties option.
Then, go to the Details tab, expand the Property drop-down list, and select the Driver key. Following that, right-click on the Driver key and select the Copy option.
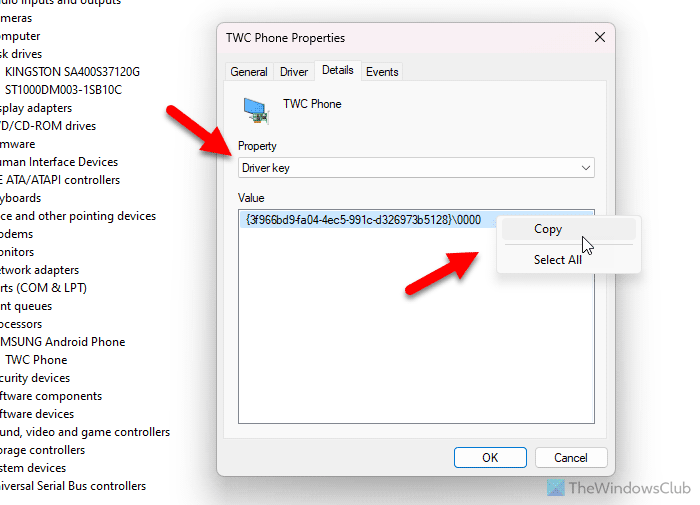
Once done, you need to open the Registry Editor on your computer and navigate to the following path:
HKEY_LOCAL_MACHINE\SYSTEM\ControlSet001\Enum
After selecting Enum, go to Edit > Find or press Ctrl+F. Then, paste the copied Driver key and click on the Find Next button.
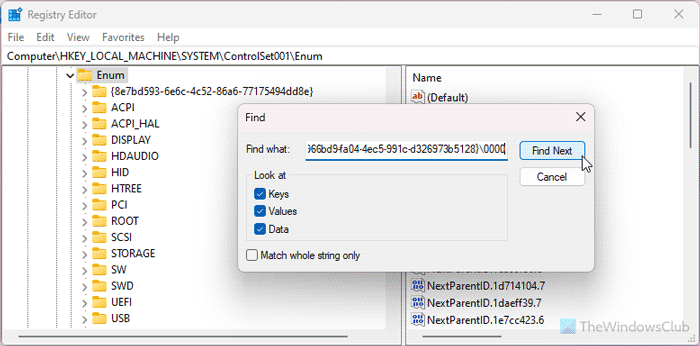
You can find a sub-key. On the other side, you can see a String Value named FriendlyName. You need to double-click on this String Value and enter a name you like to set.
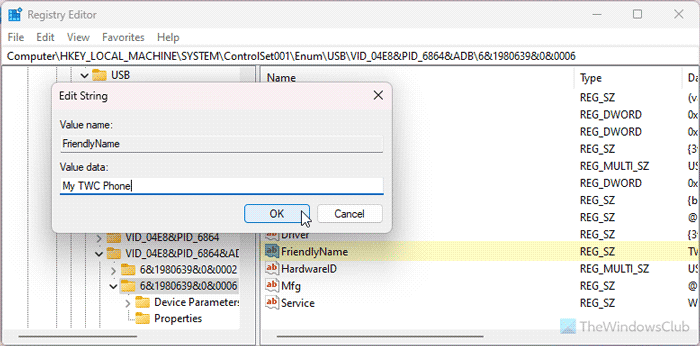
Finally, click the OK button, close all windows, and restart your computer.
However, if you cannot see the FriendlyName String Value, you need to create it manually. For that, right-click on the search result sub-key > New > String Value and name it FriendlyName.
After restarting your PC, you can find the new name of the hardware in Device Manager.
How to change GPU name in Device Manager
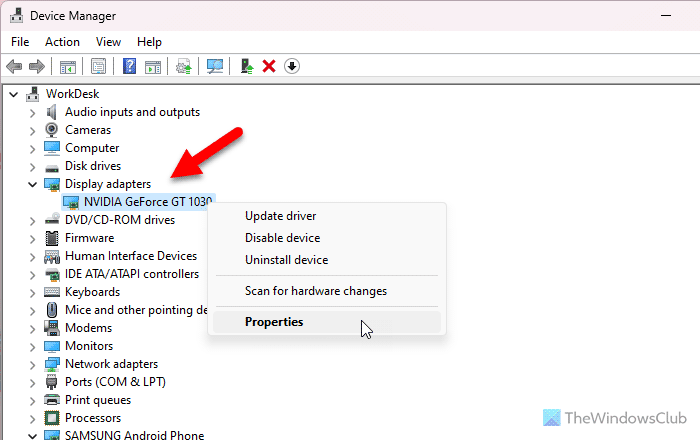
To change the GPU name in Device Manager, follow these instructions:
- Open the Device Manager and expand the Display adapters section.
- Right-click on the GPU driver > Properties > go to the Details tab.
- Select the Driver key from the Property list > right-click on the Driver key > select Copy.
- Open the Registry Editor and navigate to this path:
HKEY_LOCAL_MACHINE\SYSTEM\ControlSet001\Enum - Search for the Driver key in the Enum folder by clicking Ctrl+F.
- Double-click on the FriendlyName String Value and enter a new name.
- Click the OK button and close all windows.
- Restart your computer or sign out of your account and re-sign into it.
Note: As mentioned earlier, if you cannot find the FriendlyName String Value, you must create it independently.
How to change Device type in Device Manager
Currently, there is no way to change the device type in Device Manager of Windows 11/10. Although some printers allow you to do that, they do not apply to all kinds of devices.
When you install new hardware, the Device Manager chooses the type automatically. For example, if you install a graphics card, it gets assigned to the Display adapters section. Similarly, if you install a new monitor, you can find that in the Monitors section.
Read: How to rename External Hard Drive in Windows
How to rename USB camera in Windows
Sometimes, you might have installed multiple cameras on your computer, and you want to identify a specific one to make some changes. In such situations, you can go through these steps to rename the USB camera – whether it is an internal one or an external webcam.
To rename the USB camera in Windows 11/10, you need to open the Device Manager first. Then, expand the Cameras section, right-click on the existing camera hardware, select the Properties option, and switch to the Details tab.
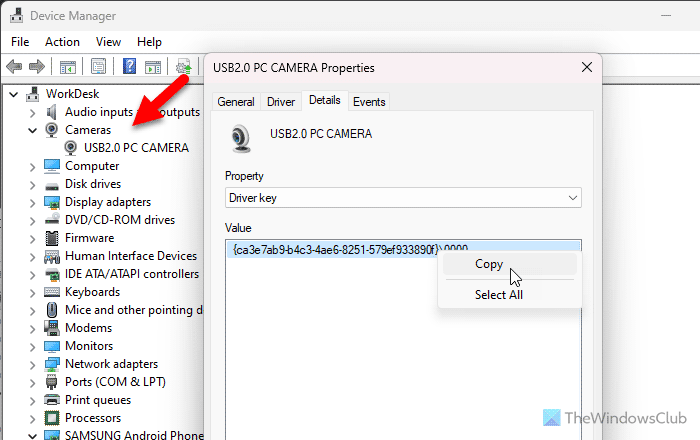
Next, you need to copy the Driver key. Following that, open the Registry Editor and go to this path:
HKEY_LOCAL_MACHINE\SYSTEM\ControlSet001\Enum
Search for the copied Driver key and double-click on the FriendlyName String Value.
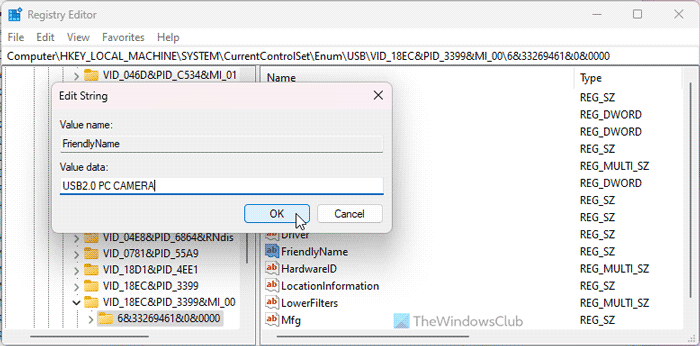
Enter a new name you like and click the OK button.
Finally, restart your computer to apply the change. Alternatively, you can sign out of your computer and re-sign into your account to get it done.
That’s all!
Read: How to rename a Bluetooth device in Windows
How do I change my CPU name in Device Manager
To change your CPU name in Device Manager, you need to copy the Driver key of the CPU. You must expand the Processors section, select the Properties option, and go to the Details tab. Next, you need to open the Registry Editor and go to Enum in HKLM. Search for the Driver key and double-click on the FriendlyName String Value. Then, restart your computer after entering the new name and clicking the OK button.
How to rename USB device in Windows 11
There is no difference between changing the name of any other device and a USB device. However, you must first find the USB device in the Device Manager. You can open Universal Serial Bus controllers to find all the USB devices connected to your computer. Then, go through the same steps as above to rename the USB device in Windows 11/10.