Network issues are common with Windows systems but are mostly resolvable once you understand the cause. Imagine a situation when your system is connected to the internet and the Wireless icon shows connected but websites aren’t opening. Changing the browsers do not help. There is a possibility that the issue is with the DNS server. If yes, please read this article for the resolution.

What is DNS?
The Internet doesn’t understand our language. So, if we enter the URL of a webpage on the address bar of a browser, the DNS server converts it into a numerical value (IP address of the website) which can be read by the internet. If the DNS (Domain Name System) stops converting the URL to the numerical value, you will encounter the error DNS Server not responding. In general, for any issue related to the DNS, you will not be able to access websites.
How to tell if the issue is with the DNS server?
If the DNS server is problematic, you might not be able to open the website by entering its URL but would still be able to open it by entering the IP address of the website. Eg. Enter Google’s IP address 172.217.4.46 in your browser’s address bar and hit Enter. If it opens Google.com, then you have isolated the cause.
Further, you can try the Ping test.
- Press Win+R to open the Run window and type the command cmd.
- Hit Enter to open the Command Prompt window.
- In the Command Prompt window, type the command ping google.com and hit Enter.
- If it doesn’t return all 4 packets, type ping 172.217.4.46 and hit Enter.
- Should you receive all 4 packets with the second command, the issue is definitely with the DNS server.
How to resolve DNS issue on Windows 11/10
To resolve DNS related issues on your Windows computer, try the following solutions sequentially:
- Check for issues with the ISP
- Power-cycle modem, router, and computer
- Renew IP, Flush DNS, Reset Winsock
- Perform a Clean Boot on the system
- Activate the Microsoft LLDP Protocol Driver
- Install latest Network Drivers
- Change Power Plan
1] Check for issues with the ISP
If the issue is with the ISP, any level of local troubleshooting would be useless. So, before anything else, please check other devices connected to the router for the internet connection. If other devices work fine, then the ISP is doing its job right. If you have no other device, then try connecting the computer directly to the modem.
Read: Windows can’t communicate with the device or resource (Primary DNS Server)
2] Power-cycle modem, router, and computer
In case the system isn’t picking up the IP address properly, try the following solution:
- Switch OFF the modem, router, and computer.
- First start the modem only and wait for 2-3 minutes till all the lights are stable.
- Next, start the router and wait for 2-3 minutes till the light on the router are stable.
- Finally, start the computer.
This should solve the problem for many users, but if not, please proceed to the next solution.
Read: Fix DNS server not authoritative for zone error
3] Renew IP, Flush DNS, Reset Winsock
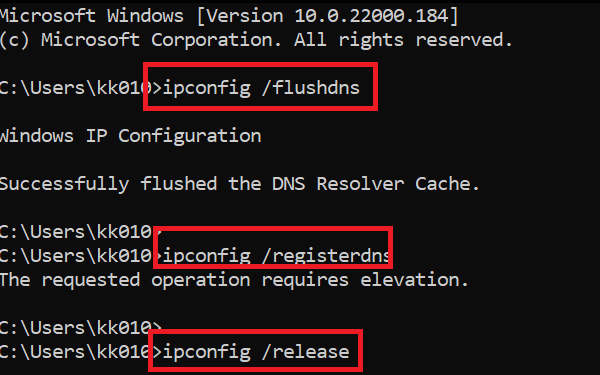
This solution is through the elevated Command Prompt mode.
Search for Command Prompt in the Windows search bar and select Run as administrator in the right-pane corresponding to the application. This will open the elevated Command Prompt window.
In the elevated Command Prompt window, type the following commands sequentially. Hit Enter after each command to execute it.
ipconfig /flushdns

ipconfig /registerdns

ipconfig /release

ipconfig /renew

NETSH winsock reset catalog

NETSH int ipv4 reset reset.log

NETSH int ipv6 reset reset.log

Exit
This will Renew IP, Flush the DNS cache and Reset Winsock.
Alternatively, you could use the Network Reset feature in Windows 11/10.
Read: How to enable the DNS Client Service if greyed out in Windows
4] Perform a Clean Boot on the system
A Clean Boot helps isolate if the cause if the condition is caused by third-party software products on your system.
If yes, try removing such software products or at least disable them at startup.
Read: How to view the DNS cache contents in Windows
5] Activate the Microsoft LLDP Protocol Driver
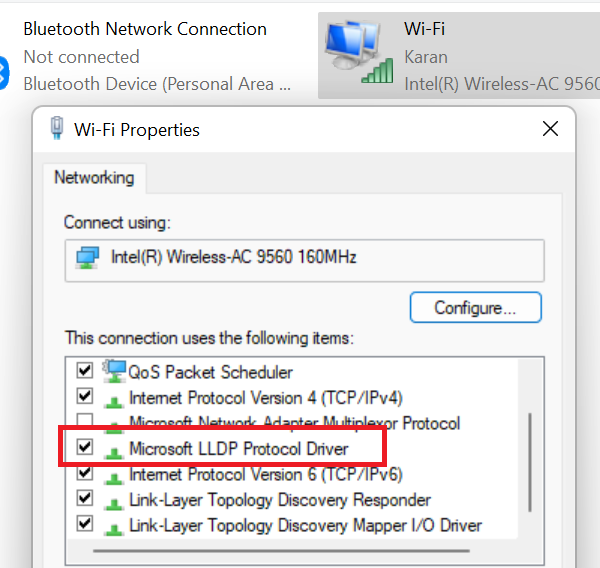
To activate the Microsoft LLDP Protocol Driver, do as follows:
Press the Windows key and the R button together to open the Run window.
In the Run field, type the command ncpa.cpl and hit Enter to open the Network Connections window.
Right-click on your active Network Connection and select Properties.
In the list under “This connection uses the following items” find Microsoft LLDP Protocol Driver. Make sure that the checkbox associated with it is checked.
Read: How to check if your Router is hacked or its DNS hijacked?
6] Install latest Network Drivers
Obsolete or corrupt drivers could also be the cause behind the issue in discussion. So, install the latest Network Drivers on your system. These can be downloaded from Intel.com.
Read: What is a DNS leak and how to Stop DNS leak
7] Change Power Plan
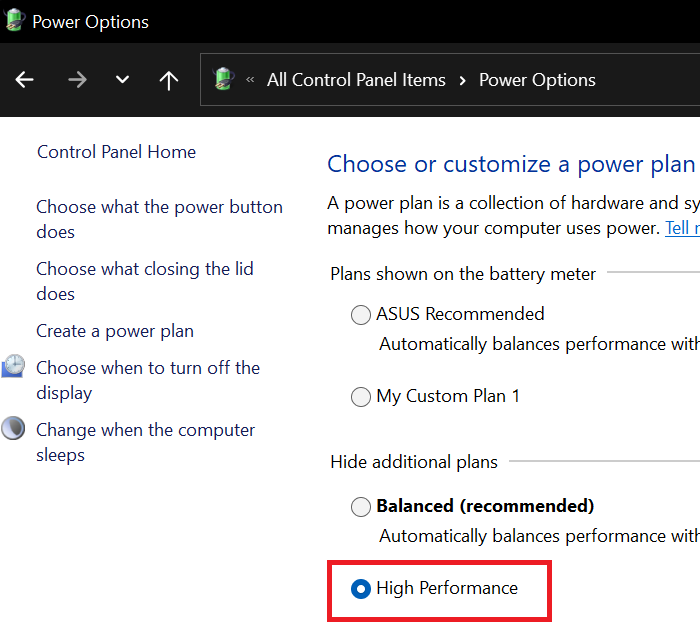
While the Balanced Power Plan is the most common, if you encounter DNS related issues, then you can change it to High Performance as follows:
Press Win+R to open the Run window and type the command powercfg.cpl and hit Enter to open the Power Options window.
From all the available power plan options, please select the High Performance power option.
Read: DNS Cache Poisoning and Spoofing – What is it?
Read: Fix DNS-related activation issues on Windows Server
8] Change to public Google DNS servers
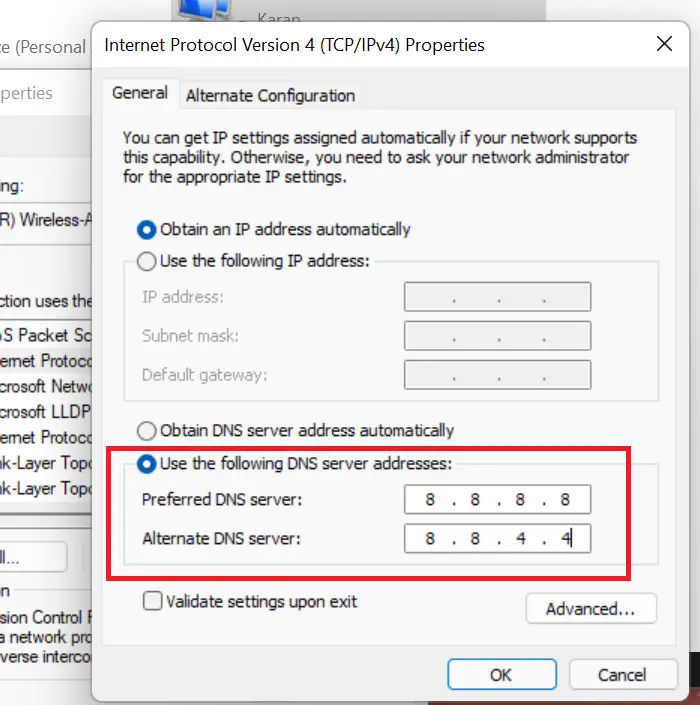
If everything else fails, you can change the DNS server and replace it with public Google DNS servers – or any other for that matter.
Press Win+R to open the Run window and type the command ncpa.cpl. Hit Enter to open the Network Connections window.
Right-click on the active network and select Properties.
Double-click on Internet Protocol Version 4 to open its properties.
Shift the radio button to Use the following DNS server addresses. Change the parameters as follows:
- Preferred DNS Server: 8.8.8.8
- Alternate DNS Server: 8.8.4.4
Click on OK to save the settings.
Now read: What is DNS Aging & Scavenging & How to configure the feature on Windows Server?
Leave a Reply