Making changes to Windows Registry can have catastrophic effects on your system’s performance, if not done accurately. The Windows Registry houses the settings for system processes and apps so that they can operate correctly and modifying them can cause irrevocable damage to your Windows 11/10 system, going to the extent where your computer may not even boot again.
In such scenarios, you may be required to restore your Registry backup to reinstate your Windows to what it was. A situation like this may also arise out of a buggy update. Windows creates an automated secret backup of your Registry, but you have to manually enable it. Today, we will show you how to restore a Registry backup using Command Prompt.
Now the folder is still there, but things have changed, and you will see no files inside it. In case you face issues with your system, Microsoft now recommends you to use System Restore to restore your system rather than using Registry Backups – but you can make it automatically backup Registry to RegBack still.
How to restore Registry using Command Prompt in Windows 11/10
The main steps involved in restoring your Registry backup using the command prompt in Windows 11/10 are:
- Reboot your computer in the Advanced Startup Options Screen
- Click Troubleshoot > Advanced Options > Command Prompt
- Make sure that you’re in the Windows directory by using the dir command
- Next, change the directory using the CD command to System32
- Copy Registry files from the RegBack folder using CMD
- Paste them into the System32\config folder using CMD
- Restart your computer.
Let us go into the detailed version now.
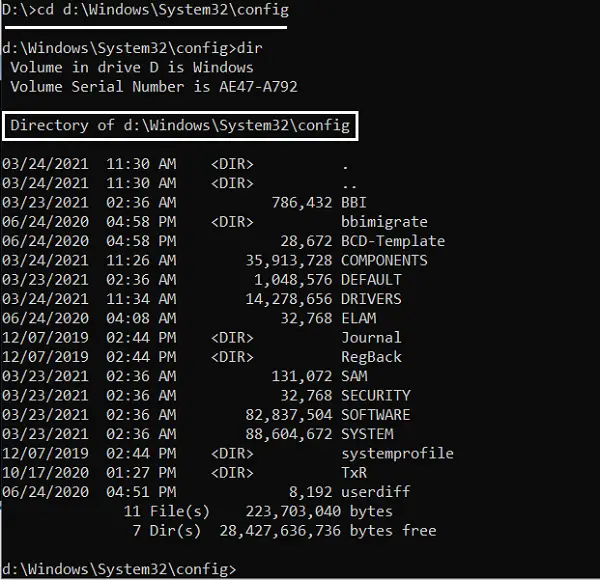
There is a backup copy of your Registry stored in the folder %windir%\System32\config\RegBack but we have to make use of the command prompt to make this folder accessible and store the database here. What we will do here is copy files from the RegBack folder (where all updated Registry files are stored) and paste them into the System32\config folder.
In versions before Windows 10 v1803, Windows would automatically back up the Registry. These backups were available in the RegBack folder. If you try to locate and open the RegBack folder in your Windows 11/10 computer now, you’ll find it empty. Microsoft disabled the functionality for systems running on Windows now.
Microsoft now recommends you to use System Restore to restore your system rather than using Registry Backups – but you can still make Windows automatically backup the Registry.
If your Registry backup is located in another location, you will have to use that path below.
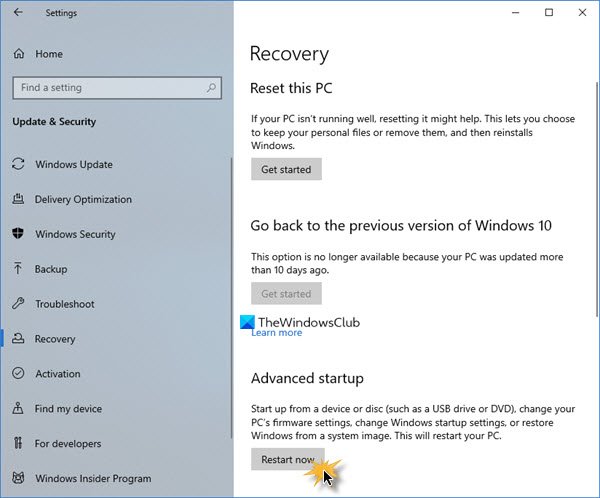
First things first, you will have to restart your PC under the Advanced Startup options. It’s pretty easy to do so. Close all the programs that you have running on your PC and open your Windows settings. Click on Update & Security > Recovery and you’ll find a Restart Now button under Advanced Startup.

Once that is underway and the Advanced Startup blue screen shows up, click on Troubleshoot. Then, select Advanced Options and click on Command Prompt. This is going to run Command prompt on your PC as an administrator with the first command-line being C:\Windows\System32.
Now, you need to access the drive where Windows is installed. Typically it’s the C:\ folder, which is the default folder under action every time the command prompt is opened, but since you’ve booted your PC in a recovery mode, it may change to D:\. Thus, type the following and press Enter.
D:\
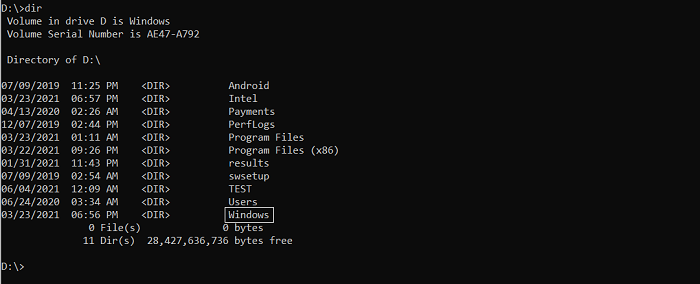
You can make sure that you’re in the right directory by using the dir command. If the directory shows the Windows folder, as shown below, you’re going in the right direction. If not, you will have to try browsing through other drives.

Next up, type the following command to enter the System32 folder and press Enter.
cd d:\windows\system32

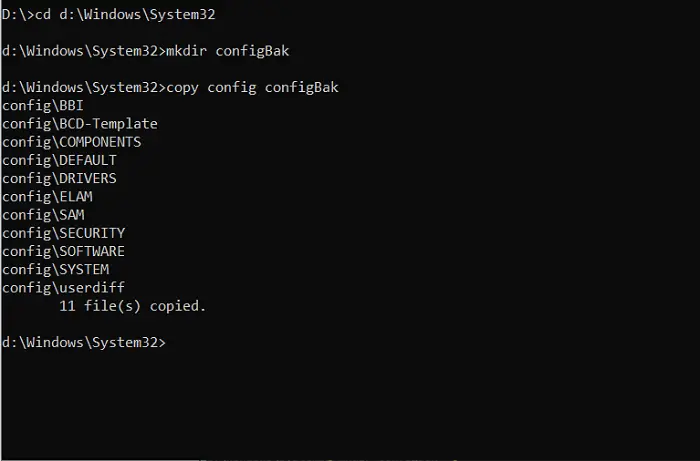
Now, you have to create a folder as a temporary backup of files on your config folder. We’re doing this because there is a copy of Registry files in the config folder too. To do so, type the following command line and press Enter.
mkdir configBak
This will not be followed by any action since all you’re doing is creating a backup folder. Copy files into this folder with the command below. Once entered, you will see 11-12 files being copied. Wait until that’s over before you proceed.
copy config configBak

To move back to working with the RegBack folder, which houses a backup of Registry files, you have to use the ‘cd’ command as prescribed below and use ‘dir’ to verify its contents:
cd config\RegBack
While going through the directory, check the files’ bit sizes. If any of the files show 0 as their size, you are supposed to stop the process right there. Continuing any further can damage your PC.
All that’s left for you to do is copy the files from the config folder to the RegBack folder. The following copy command will help you do so. In the process of moving these files, you’ll be posed with questions as to whether or not you want to overwrite the files. Press Enter and the Y key on every question to confirm.
copy * ..\*
Once done, close the window by pressing on the ‘X’ icon. After that, your computer will start up, and if you are facing any problems booting your system, they must be solved now. We hope our guide made it convenient for you to navigate through the advanced Startup’s command prompt setup and that you could restore your computer’s Registry successfully.
TIP: Windows Registry Recovery lets you recover Registry Configuration from crashed computers.
Leave a Reply