You can rotate a picture using Context Menu, Picture Tools, Photos app, Paint, or Paint 3D in Windows 11/10. Here’s how to do it. There are many free image and photo viewer apps as well as photo editing software for Windows 11/10 that come with an option to rotate an image anticlockwise or clockwise – but in this post covers all built-in options.
Whether you have JPG, HEIC, BMP, PNG, or some other common format images, you can rotate them to 90 degrees, 270 degrees, or 180 degrees. You can also save the rotated image.
How to rotate an Image on a Windows computer
These are the options that can help you rotate a picture or photo in Windows 11/10 without using any 3rd party tools:
- Using right-click context menu
- Using Picture Tools
- Photos app
- Microsoft Paint
- Paint 3D.
Let’s check all these options.
1] Using right-click context menu
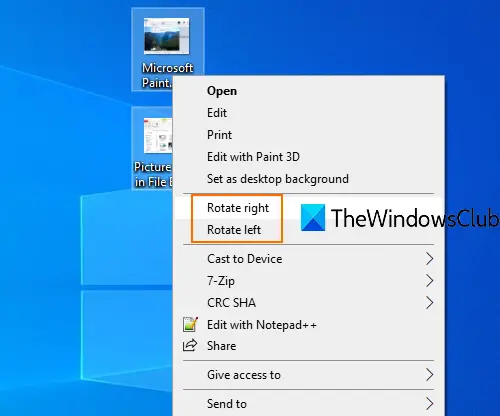
This is one of the simple options that doesn’t require much effort. You can rotate a single image or multiple images in one shot. Also, you don’t have to open the image(s) to use this option.
To rotate images, all you need to do is access a directory or folder where your photos are stored. Now select the images of your choice and right-click. You will see two options- Rotate left and Rotate right. Select an option and it will rotate selected images instantly and save them in the rotated option.
2] Using Picture Tools
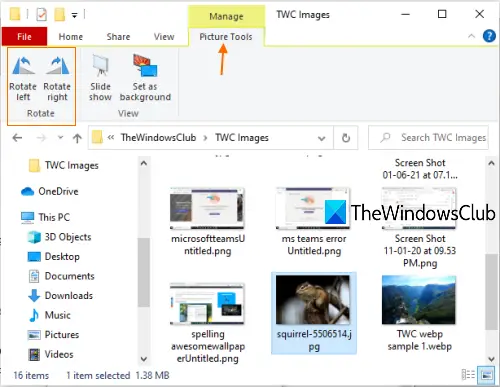
Picture Tools is another built-in option of Windows that is available in File Explorer. This option is visible only when you have selected some image thumbnails or accessed a folder that contains the images. If the Ribbon menu is disabled for some reason, then you first need to enable it to use this option.
Like the first option, this option also doesn’t require you to open an image for rotation. Apart from that, you can rotate multiple images together or a single image.
To use this option, go to some drive or folder where your images are located. After that, select images. You will see the Picture Tools option in the ribbon menu. Under Picture tools, you will see Rotate right and Rotate left buttons. Use those buttons and image(s) will be rotated immediately.
Picture Tools option also supports the hotkeys to rotate the images. For this, first, select some images, and press Alt+J hotkey. Now, hotkey mode is enabled. After that, again press Alt+RR hotkey to rotate images to the right or press Alt+RL to rotate images to the left.
3] Photos app
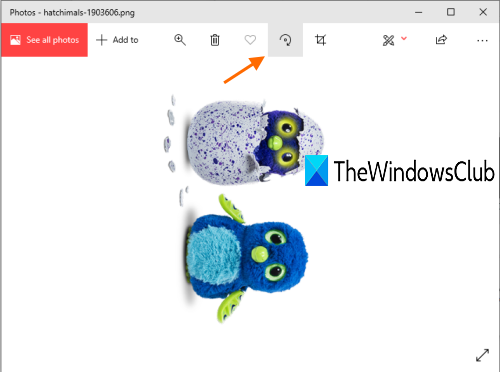
The Photos app comes pre-installed with Windows and has many good features. It has a dark mode, lets you add images to favorites, share images and videos, resize images, and more. It is also a good and native option to rotate an image in Windows.
To rotate an image using the Photos app, launch the app using the Start menu or Search box. Open an image and then click on the Rotate icon available on the top middle part (just next to favorites icon) on its interface. This will rotate the image.
Alternatively, you can also use Ctrl+R hotkey to rotate an image in the Photos app. After rotation, use See more icon (three dots) available on the top right corner of the Photos app, and select Save as option. This will open the Save as window using which you can store the rotated image to any folder of your choice.
4] Microsoft Paint
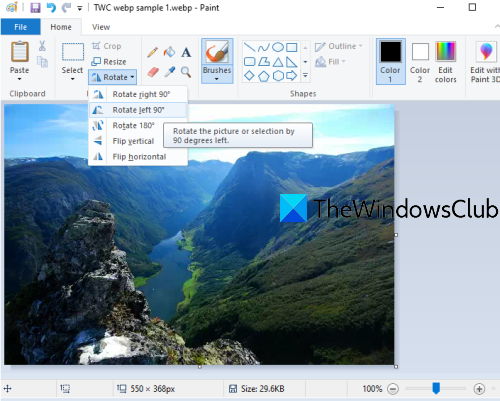
Microsoft Paint is a very old and popular program. Earlier, there was news that Microsoft was retiring the Paint program, but later, they changed the plan, and Paint continues to be used in Windows. This painting program is also helpful in rotating an image to 90 degrees clockwise, anticlockwise, or 180 degrees. You can also save the rotated image in the original format (if supported) or to some other available format (such as BMP, GIF, PNG, etc.). The steps are as follows:
- Launch MS Paint
- Use the File menu to add an image
- Access Home menu
- Use Rotate drop-down menu
- Use the File menu to save the rotated image.
Launch Microsoft Paint and then add an image by clicking on the Open option available under the File menu.
Once the image is added, go to the Home menu, which is just next to the File menu. There, you will see a Rotate drop-down menu. Use that menu to rotate the image. It also lets you flip an image vertically or horizontally.
Once the image is rotated to the desired angle, click on the File menu, and use Save or Save as option to store the rotated image.
5] Paint 3D
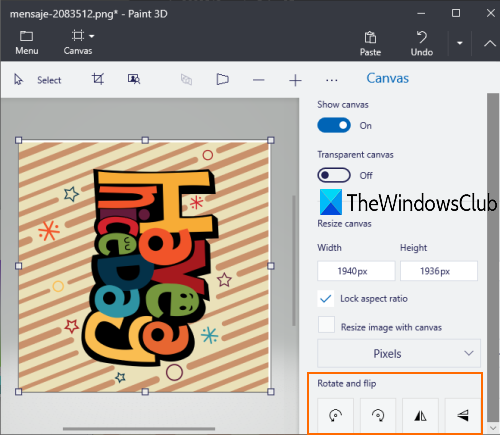
Paint 3D is also a native app of Windows. It has some very interesting features, such as, you can create 3D images, add effects to objects or input images, stickers, convert 2D shapes to 3D, etc. The option to rotate and flip an image is also there. Here are the steps:
- Open Paint 3D
- Use the Menu icon to add an image
- Access Canvas menu
- Use rotate buttons
- Save the image.
Open Paint 3D using the Search box or Start menu. After that, click on the Menu icon in the top left corner. Now use the Browse files button to add an image.
When the image is added, click on the Canvas menu in the top middle section (just next to the Effects menu). On the bottom right side, you will see a Rotate and Flip section. Use that section to rotate the input image.
Now use the Menu icon and then select Save or Save as button to store the rotated image.
These are some native ways to rotate an image in Windows 11/10.
Leave a Reply