In Windows 11/10 you can perform both actions – Run as an Administrator and Run as different user, easily. In this post, we will show you how you can Run a program as a different user.
How to Run as different user in Windows 11/10
You can use the following options to Run as different user on your Windows 11/10 system:
- Use the Shift key to Run as different user
- Run as different user from the Start menu
- Run as different user from Windows 11/10 Taskbar
- Use the Command Prompt window to Run as different user
- Add Run as different user to the Context Menu using Registry.
Let’s check all these options one by one.
1] Use the Shift key to Run as different user
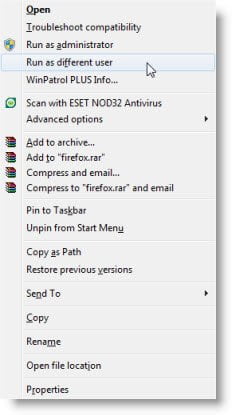
To Run a program as a different user, simply press the Shift key and right-click on the shortcut or executable you wish to Run as different user.
From the right-click context menu, select Run as different user.
This is useful when you want to use the “Run as” feature to start a program as an administrator, when you are logged on as a member of another group, such as the Users or Power Users Group and so on.
On Windows Server, however, Shift+Right-click does not offer the option Run as a different user!
It is offered in Windows 11, Windows 10, Windows 8, and Windows 7. It was also offered in Windows XP, but not in Windows Vista.
If you wish you can add this Run as different user command permanently to your regular right-click context menu by downloading and running ShellRunAs from Microsoft.
This RunAs utility is handy for launching programs under different accounts, but it’s not convenient if you’re a heavy Explorer user.
2] Run as different user from the Start menu
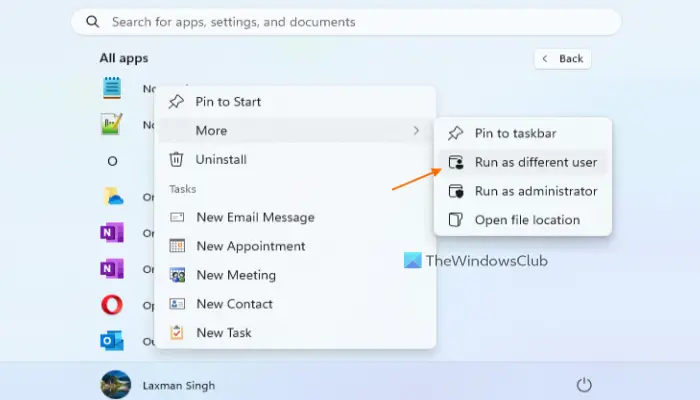
To use this option in Windows 11/10, you first have to enable the related setting using Group Policy. Here are the steps:
- Type gpedit.msc in the Search box and press Enter
- In the Group Policy Editor, window use the following path:
User Configuration > Administrative Templates > Start Menu and Taskbar
- Open the Show “Run as different user” command to Start setting from the right section by double-clicking on it
- Select the Enabled option for this setting
- Press Apply button and OK button.
- Restart the File Explorer if needed
- Open the Start menu
- Right-click on a pinned application or access the All apps section and then right-click on a supported app
- You will see Run as different user option there (as visible in the screenshot above). Click on that option
- In the Windows Security box, provide the login credentials of the other user account, and press the OK button.
TIP: Windows 11 comes with a dedicated setting to add Run as different user option to right-click menu of the Start menu. For this, open the Settings app > Privacy & security > For developers > expand File Explorer section > and turn on the Show option to run as different user in Start option.
3] Run as different user from Windows 11/10 Taskbar
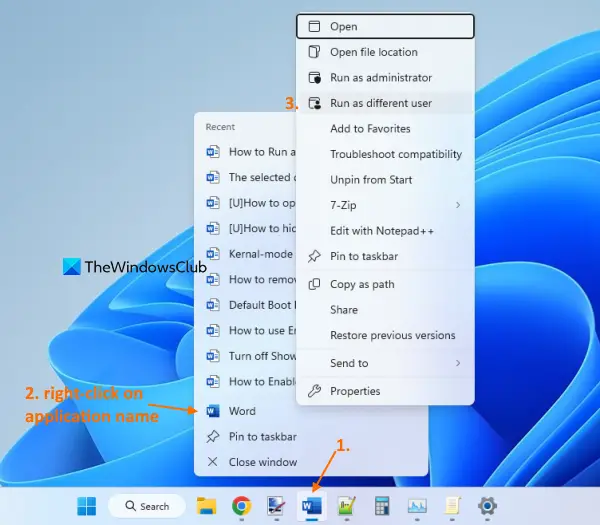
If you want to run an application (say Word, Registry Editor, Notepad, etc.) from the taskbar as a different user, then use these steps:
- Open a particular application and its taskbar icon will appear
- Right-click on its taskbar icon
- Press and hold the Shift key
- Right-click on the name of that application visible just above the Pin to taskbar option
- Release the Shift key
- Click on the Run as different user option.
Read: Run as different user not showing in Windows 11
4] Use the Command Prompt window to Run as different user
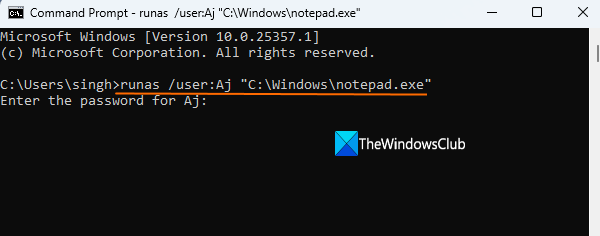
Open the Command Prompt window or PowerShell window. Enter the command that will include a runas parameter, a user parameter to enter the username, and the file path that will include the entire path of the file or application (along with the file extension) that you want to run as a different user. The command would be:
runas /user:USERNAME “Application Path and File Extension”
So, for example, if you want to run Notepad as a different user, then the command is:
runas /user:TWC “C:\Windows\notepad.exe”
Replace TWC in the above command with the actual username and execute the command. In the next step, provide the password for that user account, and press Enter. Finally, Notepad will run as the specific user provided by you.
5] Add Run as different user to the Context Menu using Registry
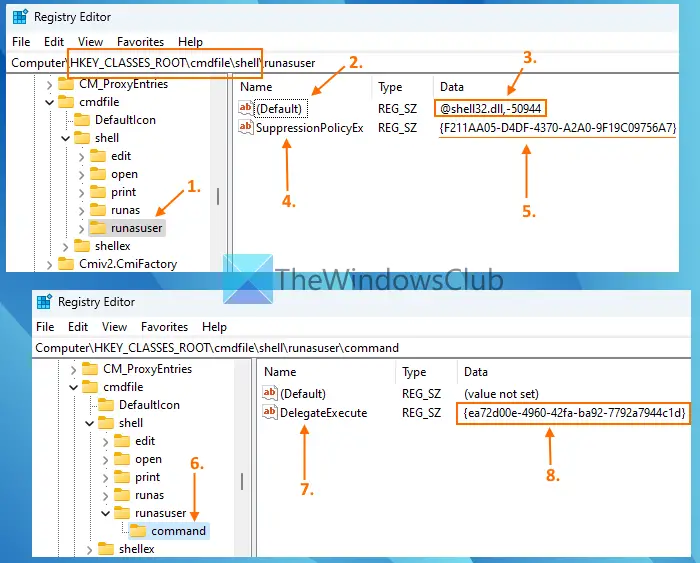
You can also permanently add Run as different user option to the File Explorer context menu for the supported files such as EXE, CMD, BAT, MSI, etc. For that, you have to make changes to the Windows Registry. You need to access the Registry entries related to all such file types and then create sub-keys and required values to always show the Run as different user option in the right-click menu of File Explorer. Before you do that, take a backup of the Registry. After that, follow these steps:
- In the Search box of Windows 11/10, type regedit, and press the Enter key
- The Registry Editor window will open. Now access the shell Registry key for the CMD file. The path is:
HKEY_CLASSES_ROOT\cmdfile\shell
- Right-click on the shell key, access the New menu, and select the Key Rename the new Registry key to runasuser
- The runasuser key will have a (Default) name String value. Double-click on that value, add
@shell32.dll,-50944in the Value data box for that value, and press the OK button - Now create a new String value (right-click on empty area > New > String Value) under runasuser key and name it SuppressionPolicyEx
- Double-click on that value, add
{F211AA05-D4DF-4370-A2A0-9F19C09756A7}in the Value data box, and press the OK button to save the changes - Under the runasuser key, create a command name Registry key
- On the right section, create a DelegateExecute String value
- Double-click on that value, add
{ea72d00e-4960-42fa-ba92-7792a7944c1d}in the Value data field of the Edit String box, and press the OK button to save the changes - By using these steps, you have successfully added the Run as different user option for the CMD file in the right-click menu of File Explorer
- Now repeat all the above steps as it is for the BAT, MSC, MSI, and EXE files. For this, access the following locations one by one:
HKEY_CLASSES_ROOT\batfile\shell
HKEY_CLASSES_ROOT\mscfile\shell
HKEY_CLASSES_ROOT\Msi.Package\shell
HKEY_CLASSES_ROOT\exefile\shell
Under each location, create the exact runasuser key, command key, String values, etc., and put the same Value data as mentioned in the above steps.
Restart File Explorer if needed. Now when you will open the right-click context menu for any of these files, the Run as different user option will be there to use.
Later, when you have to remove the Run as different user option from the File Explorer context menu, access all the above-mentioned paths one by one, and remove or delete the runasuser Registry key from each location.
I hope this helps.
Can Windows 11/10 have multiple users?
Yes, of course. You can have multiple user accounts on your Windows 11/10 system. You will have the option to add multiple Microsoft accounts and local user accounts. Apart from that, you can also change a Microsoft account to a Local account in Windows 11/10. Moreover, you can also set up Family accounts on a Windows 11/10 computer. For this, you need to access the Accounts category in the Settings app of Windows 11/10 and use the available options.
How do I login as a different user in Windows 11/10?
If you want to switch from one user account to another in Windows 11, then click on the Start button. Press and hold the left mouse button (or use right-click) on the account name icon or picture visible on the bottom left part of the Start menu. Select the other user account name. In Windows 10, press the Start button, select the account name icon or picture on the left side in the Start menu, and then select a different user to switch to that particular account.
Alternatively, you can also press the Win+L hotkey to go to the lock screen, then select a user account from the left section, and enter the user password to log in to that account.
Related: This post will help you if Run as administrator option is not working or missing.