If you want to test or run Google Play Store Android apps on Windows 11, here is how you can do that on your computer. Although some apps may not run as they do on mobile, you can install almost any app and game available on the Google Play Store.
Let’s assume that you are using an iPhone, but you want to try some Android apps. Instead of buying an Android mobile, you can follow this tutorial to install and run Android apps on Windows 11 computer. Whether you want to play Candy Crush or use Facebook Lite, you can do everything on your computer.
For your information, you can use Android apps on Windows 11 using Windows Subsystem for Android. However, if you do not have the WSA, you do not need to install it now. Nonetheless, if you have installed Windows Subsystem for Android on your computer, you need to uninstall it before getting started.
How to run Google Play Store Android apps on Windows 11
To run Google Play Store Android apps on Windows 11, follow these steps:
- Enable Developer Mode in Windows Settings
- Download kernel and WsaPackage
- Copy kernel file in WsaPackage_xxxx_x64_Release-Nightly folder
- Use commands in elevated Windows PowerShell window
- Enable Developer mode in Windows Subsystem for Android
- Open the Files app
- Open Google Play Store from Start Menu
To learn more about these steps, continue reading.
To get started, you need to enable Developer Mode in Windows Settings. It is probably the most crucial step. Without allowing the Developer Mode, you cannot install apps from other sources.
To enable Developer Mode in Windows 11, do the following:
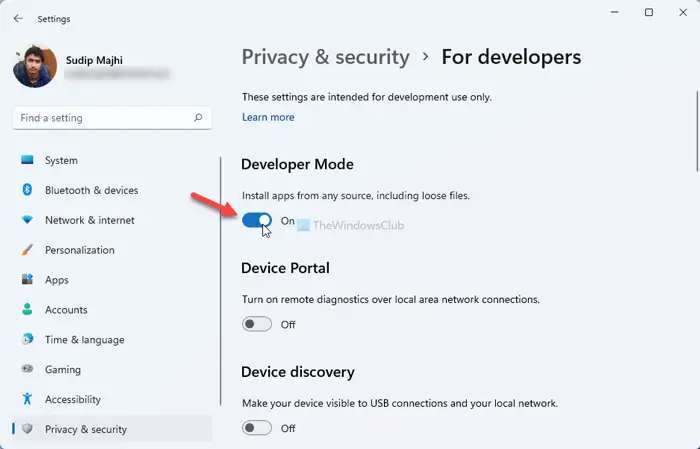
- Press Win+I to open Windows Settings.
- Go to Privacy & security > For developers.
- Toggle the Developer Mode button.
- Restart your computer.
After that, you need to download the kernel and WsaPackage files from mediafire.com. You can visit this page on mediafire.com to download the kernel file and this page on mediafire.com to download the WsaPackage file.
Once the download is done, extract the content of the WsaPackage_1.7.32815.0_x64_Release-Nightly.zip file. For that, you can use any app such as 7-Zip, WinRAR, etc. After extracting, copy the kernel file, open the WsaPackage_1.7.32815.0_x64_Release-Nightly folder, double-click on the Tools folder, and paste it there.
If it asks you to replace the new kernel file with the existing one, you need to do that.
Now, you have to open the elevated Windows PowerShell window in the WsaPackage_1.7.32815.0_x64_Release-Nightly folder. For that, search for windows powershell in the Taskbar search box, and click on the Run as administrator option.
Following that, click the Yes option, and enter the following command:
cd [WsaPackage-folder-path]
To obtain the WSAPackage folder path, you can right-click on the extracted folder and select the Copy as path option.
Then, enter this command:
Add-AppxPackage -Register .\AppxManifest.xml
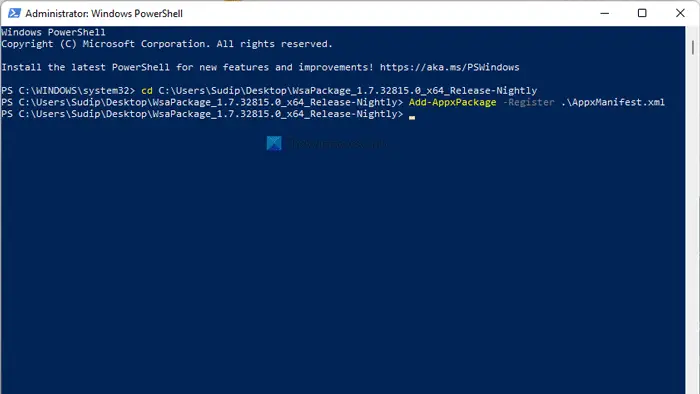
Now, you can find some notifications regarding Google Play Store and Google Play Protect on your screen. If so, you have successfully installed Google Play Store on Windows 11.
After that, you need to open Windows Subsystem for Android on your computer and toggle the Developer mode button to turn it on.
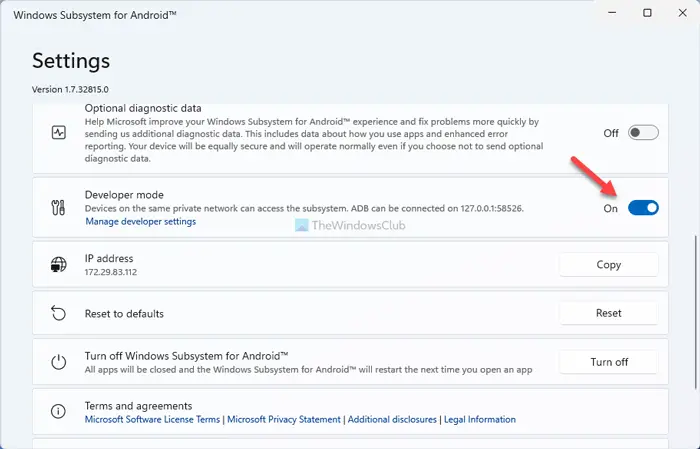
Then, click on the Files option to open the window or app. Once done, you can close the window.
Next, you can search for Google Play Store in the Taskbar search box or Start Menu and open it from there.
How to fix sign in problem in Google Play Store on Windows 11
After opening the Google Play Store app on Windows 11, you need to sign in to your Google account in order to install the apps. However, you might find some issues signing into your account.
To fix sign in problem in Google Play Store on Windows 11, follow these steps:
- Download SDK Platform Tools from the official website.
- Open Windows Subsystem for Android and copy the IP address.
- Extract the downloaded ZIP file.
- Click on the address bar, type cmd, and hit the Enter button.
- Enter this command:
adb connect [IP-address] - Enter this command:
adb shell - Type the following commands:
suandsetenforce 0 - Restart Windows Subsystem for Android if it is running and sign in to your account.
To get started, you need to download the SDK Platform Tools from the official website, android.com. After that, open, Windows Subsystem for Android and copy the IP address to your clipboard.
Then, extract the Platform Tools file you downloaded earlier. Next, open the platform-tools folder on your computer, click on the address bar, type cmd, and hit the Enter button.
It will open Command Prompt in that folder. However, if you want to use Windows Terminal, you can right-click on an empty space and select the Open in Windows Terminal option.
After that, enter the following commands one after one:
adb connect [IP-address]
Don’t forget to replace the [IP-address] with the original IP address you copied from the Windows Subsystem for Android window.
adb shell
su
setenforce 0
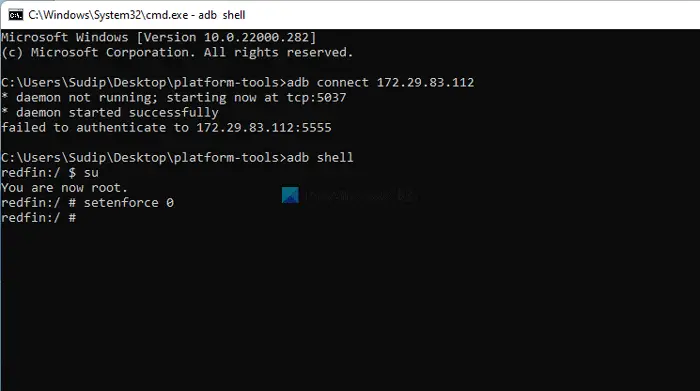
Once done, you can re-open the Google Play Store app and click the Sign in button.
Now, you should not get any problem logging in to your account.
Can Windows 11 run Google Play apps?
Yes, Windows 11 can run Google Play Store apps or Android apps. There is no need to connect any phone or use third-party emulator to run them on your computer. You can download the WSA Package from the official website and install it using PowerShell. Following that, you need to use the Windows System for Linux to run them on your PC.
How do I install Google Play apps on Windows 11?
For that, you need to enable the Developer Mode in Windows Settings and download the Kernel and WsaPackage. Then, copy the Kernel file in the WsaPackage folder and open an elevated window of PowerShell. Following that, enable the Developer Mode in Windows Subsystem for Android and open the Files app. Next, you can open the Google Play Store from the Start and install the desired app accordingly.
That’s all! Hope this tutorial helped you install Google Play Store and run Android apps on Windows 11.
Read next: How to sideload Android apps using WSA on Windows 11.