With the help of the Sudo command, one will be able to run commands in elevated mode without having to run the console in elevated mode. In this post, we will see how to run Sudo Command on your Windows computer.
What is Sudo Command?
Sudo (short for “Superuser Do“) is a command-line utility that allows users of Unix-based operating systems, such as Linux and macOS, to run commands with elevated privileges, usually reserved for administrators.
Run Sudo Command in Windows 11/10
However, with the release of the recent Windows 11 Insider Preview Build, Windows users can now also use this feature. This new feature allows users to run elevated commands directly from an unelevated console session without opening a separate elevated terminal. If you do not see this feature on your stable build, please wait for it to be rolled out to your PC.
How to enable Sudo in Windows?

Enabling Sudo for Windows provides essential administrative control and security. It limits access to sensitive activities and resources, improving system security, by only providing elevated privileges when appropriate. This helps prevent unauthorized installations or alterations that can threaten the system’s integrity. Before running the Sudo Command, you should first enable Sudo in Windows.
Follow the prescribed steps:
- Press the Windows + I key to open the Settings app.
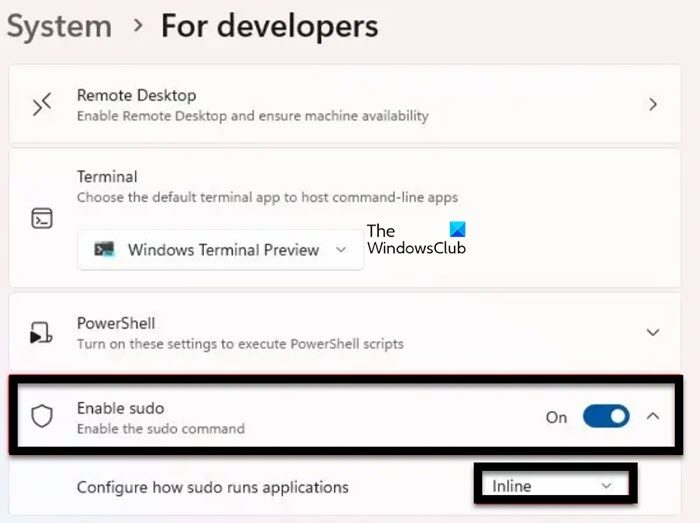
- Go to the left side of the windows, click on System, and then For Developers.
- Find out the Enable Sudo feature and turn on the toggle switch.
- Finally, click Yes to confirm.
How to configure Sudo for Windows?

There are generally three configuration options available for Sudo for Windows:
- In a new window (forceNewWindow)
- Input closed (disableInput)
- Inline (normal)
To change the default configuration option for Sudo for Windows is In a new window:
- Press the Windows + I Key to open the Settings app.
- Go to the left side of the screen, and click on System.
- Scroll down the screen and then click on For Developers.
- Find out the Enable Sudo option, then locate Configure how Sudo runs applications.
- From the drop-down menu, choose In a new window (forceNewWindow), Input closed (disableInput) or Inline (normal).
In addition, you can also open an elevated command line.
- Type the following command after replacing <configuration_option> with forceNewWindow, disable input, or normal, then press Enter button:
sudo config --enable <configuration_option>
This will do the job for you.
How to use Sudo on Windows?

Make sure before using Sudo in Windows, Sudo must be enabled and configured on your computer.
- Press the Windows Key, type Command Prompt, and select Run as administrator.
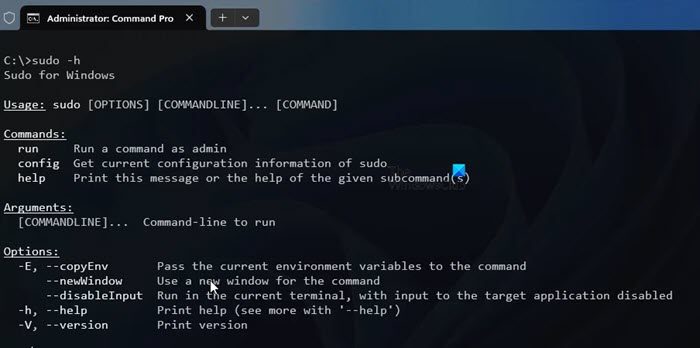
- Now use Sudo before any of the commands you want to use, type the following command to know the options that come with Sudo.
sudo -h
That’s it!
Read: Fatal, Failed to Fork error with Ubuntu on Windows
How do I run Sudo command in Windows 11?
To run a command as an administrator in Sudo for Windows, prepend sudo before the command. For instance, to run netstat -ab as an administrator, you should run sudo netstat -ab in the console window. However, before that, you need to enable Sudo from Settings, which you can learn by following the earlier instructions.
Read: How to kill a Process using Command Line in Windows
How do I enable Sudo in Windows 10?
One of the easiest ways to enable Sudo in Windows is by using the command sudo config –enable <configuration_option>. Just make sure to replace <configuration_option> with how you want Sudo to run. Follow the guide above and you will be good to go.
Also Read: How to enable Systemd in Windows Subsystem for Linux).