In this article, we will show you how to scan for hardware changes in Windows 11/10. All the peripheral devices that we connect to our system require a dedicated driver. These drivers are required for the proper functioning of the devices. Windows installs the device driver automatically when we connect a device to our system.

Scan for hardware changes is a feature of Windows 11/10 in which Windows scans for the hardware changes on a system and installs the driver whenever a device is connected to the computer. Windows scans for hardware changes every time you connect a device to your system and remove a device from your system.
How to scan for hardware changes in Windows 11/10
Though Windows 11/10 automatically scans for hardware changes whenever you connect a new device to your system and remove the connected device from your system, you can manually scan for hardware changes. We will show you the following methods to scan for hardware changes in Windows 11/10.
- Using the Device Manager
- Via the Command Prompt
Below, we have explained both of these methods in detail.
Scan for hardware changes using the Device Manager
You can scan for hardware changes using the Device Manager by following the instructions written below:
- Press the Win + R keys to open the Run command box.
- Type devmgmt.msc and click OK. This command will open the Device Manager.
- Select any category in the Device Manager.
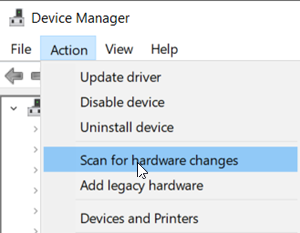
- Click on the Action menu and select Scan for hardware changes.
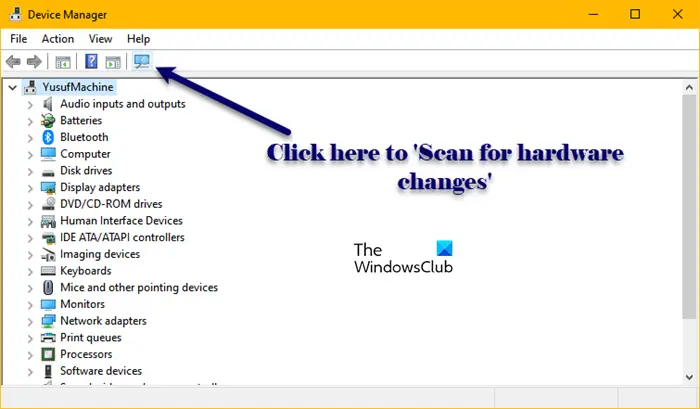
Alternatively, you can also click on the respective icon on the Toolbar of the Device Manager. In the Device Manager, different icons are available on the Toolbar. Hover your mouse cursor on each icon to view its name. In this way, you can identify which one of them is the icon of the Scan for hardware changes.

One more way to scan for hardware changes in the Device Manager is to right-click on any device category or on your computer name in the Device Manager. Right-click on any device category or your computer name and select Scan for hardware changes in the right-click context menu.
Scan for hardware changes using Command Line
The next method to scan for hardware changes in Windows 11/10 is by using the Command Prompt. Open an elevated Command Prompt, copy the following command, and paste it into the administrator Command Prompt window. After that, hit Enter.
pnputil.exe /scan-devices
You will see the following message in the Command Prompt window.
Scanning for hardware changes.
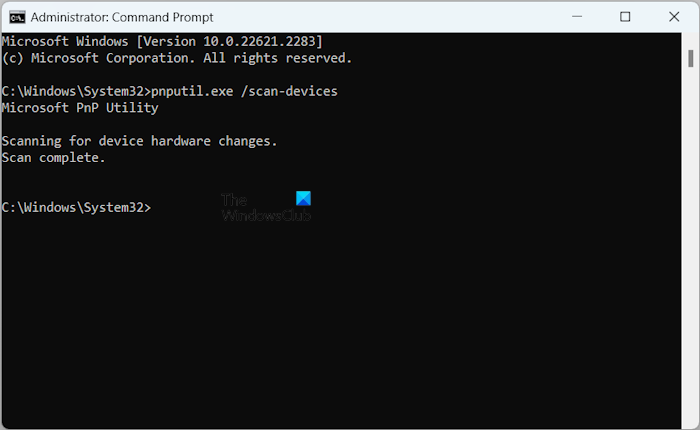
After scanning is complete, the Comand Prompt should show the following message:
Scan complete.
Now, you can close the Command Prompt.
Scan for hardware changes or pnputil /scan-devices not working
Above, we have seen two ways to Scan for hardware changes on Windows 11/10, one via the Device Manager and the other via the Command Prompt. But if the Scan for hardware changes or pnputil /scan-devices does not work on your Windows computer, you can use the following fixes to resolve the issue.
Usually, when a device stops working or does not work properly, uninstalling and reinstalling its driver fixes the problem. In this process, users are instructed to uninstall the driver of the problematic device via the Device Manager and then restart their computer. Alternatively, they can scan for hardware changes after uninstalling the device driver. Windows automatically installs the missing driver on restarting the computer or performing the hardware changes scan.
For some users, Windows failed to install the missing driver. They also tried scanning for hardware changes via the Device Manager and Command Prompt manually but to no avail.
If the Scan for hardware changes or pnputil /scan-devices is not working on your Windows 11/10 computer, use the following suggestions to fix the issue.
- Restart your computer
- Make sure that you are using an elevated Command Prompt
- Create a new user account
- Manually install the missing driver
1] Restart your computer
I experienced this problem on my laptop. The Scan for Hardware Changes command was not working for me. I restarted my laptop and the problem was fixed. Sometimes issues occur due to a minor glitch which can be fixed simply by restarting the computer. Hence, we suggest you restart your computer and see if it helps.
2] Make sure that you are using the elevated Command Prompt
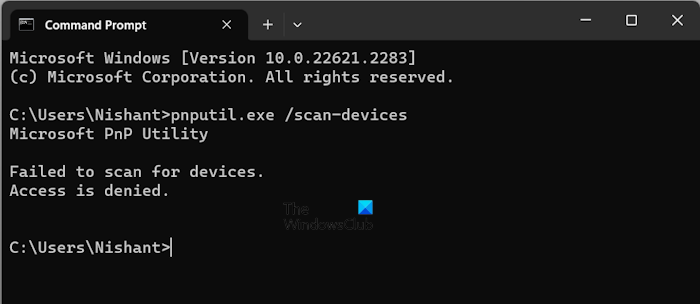
If you are scanning the hardware changes via the Command Prompt, it is necessary to launch it as an administrator. Otherwise, the command will not execute successfully and you will see the following error message:
Failed to scan for devices.
Access is denied.
3] Create a new user account
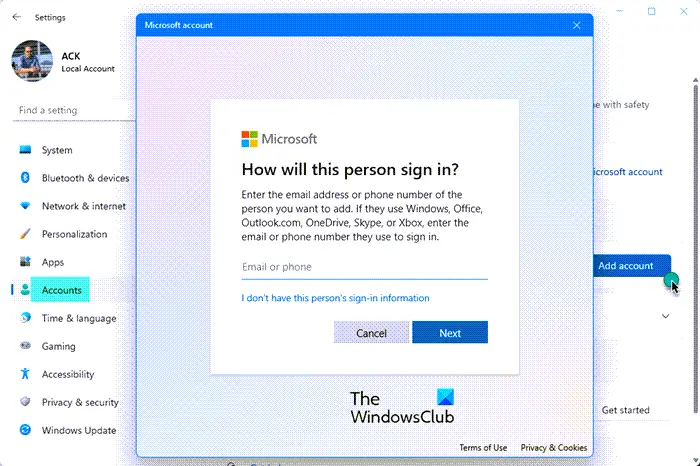
Sometimes, problems occur in a specific user account. Such a thing happens when the user account is corrupted. Create a new user account on your system and then see if it helps.
4] Manually install the missing driver

We need to scan for hardware changes when we uninstall a device driver or if Windows does not scan for hardware changes automatically. If you have uninstalled a device driver and now you are facing trouble reinstalling it, you can install it manually. Download its latest version from the manufacturer’s website and run the installer file to install the device driver.
If the above-mentioned fixes do not work, you can try to restore your system to the previous working point or reset your PC.
Read: Touchpad driver not showing up in Device Manager of Windows.
Scan for hardware changes missing
Some users reported that they did not find the Scan for hardware changes option in the Action menu in the Device Manager. If the Scan for hardware changes is missing on your system, you can use the following fixes to resolve the issue. Before proceeding, check for Windows Update manually and install the same if available.
- Select a category in the Device Manager
- Repair your system files
- Perform System Restore
- Reset this PC
1] Select a category in the Device Manager
When you manually scan for hardware changes, it is important to select a category in the Device Manager, otherwise, you will not see this option in the Action menu. Alternatively, you can also select your computer name in the Device Manager. Now, click on the Action menu. It should show the Scan for hardware changes this time.
2] Repair your system files
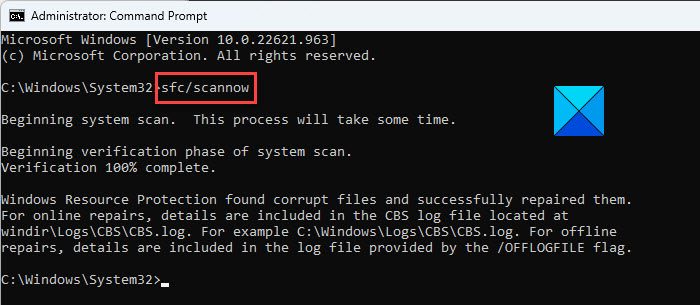
Corrupted system files can be the cause of this issue. If after selecting a category in the Device Manager, the Scan for hardware changes still remains missing, your system may have corrupted files. Run SFC and DISM scans to repair the corrupted system files.
3] Perform System Restore
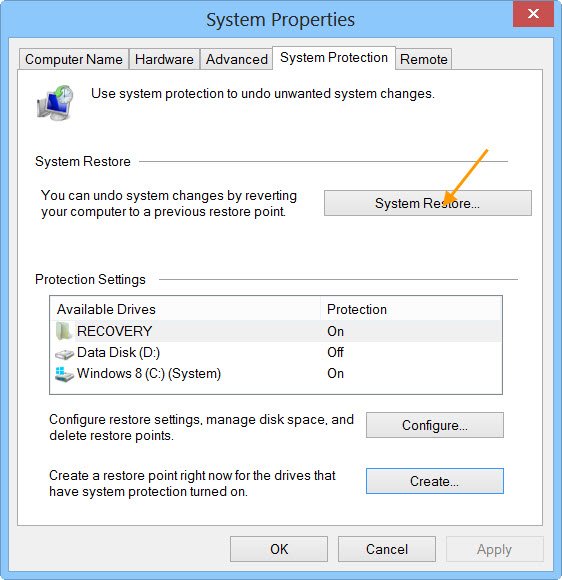
System Restore is a powerful tool in Windows computers that helps users restore their system to the previous working state in case a problem occurs. System Restore can work in this case. Perform System Restore. While doing this action, select the date before which the problem did not exist.
4] Reset this PC
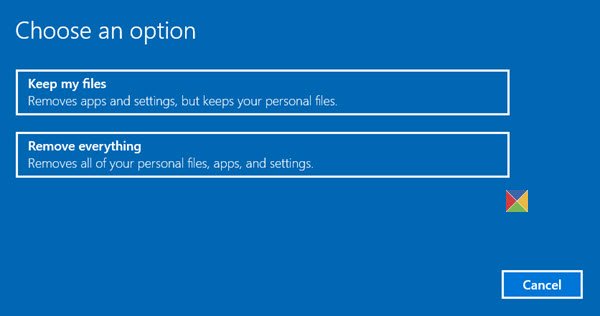
You can reset your PC to the factory default settings without deleting the data. This should fix the problem.
That’s it. I hope this helps.
Read: Device Manager Blinking or Flickering in Windows.
How do I check my hardware on Windows 11?
You can check your hardware specs on Windows 11 via the System Information. Click on Windows Search and type System Information. Select the right match from the search results. Now, you can view your system summary, components details, etc. Alternatively, you can also install a third-party tool like HWiNFO.
How do I Scan for hardware changes on my network adapter?
The process to Scan for hardware changes on your network adapter or on any other hardware device is the same. Open the Device Manager and select the required device category. Now, go to Action > Scan for hardware changes.
Read next: List of Device Manager Error Codes on Windows PC along with solutions.
Leave a Reply